Tag Archives: Antietam

The Friction of War

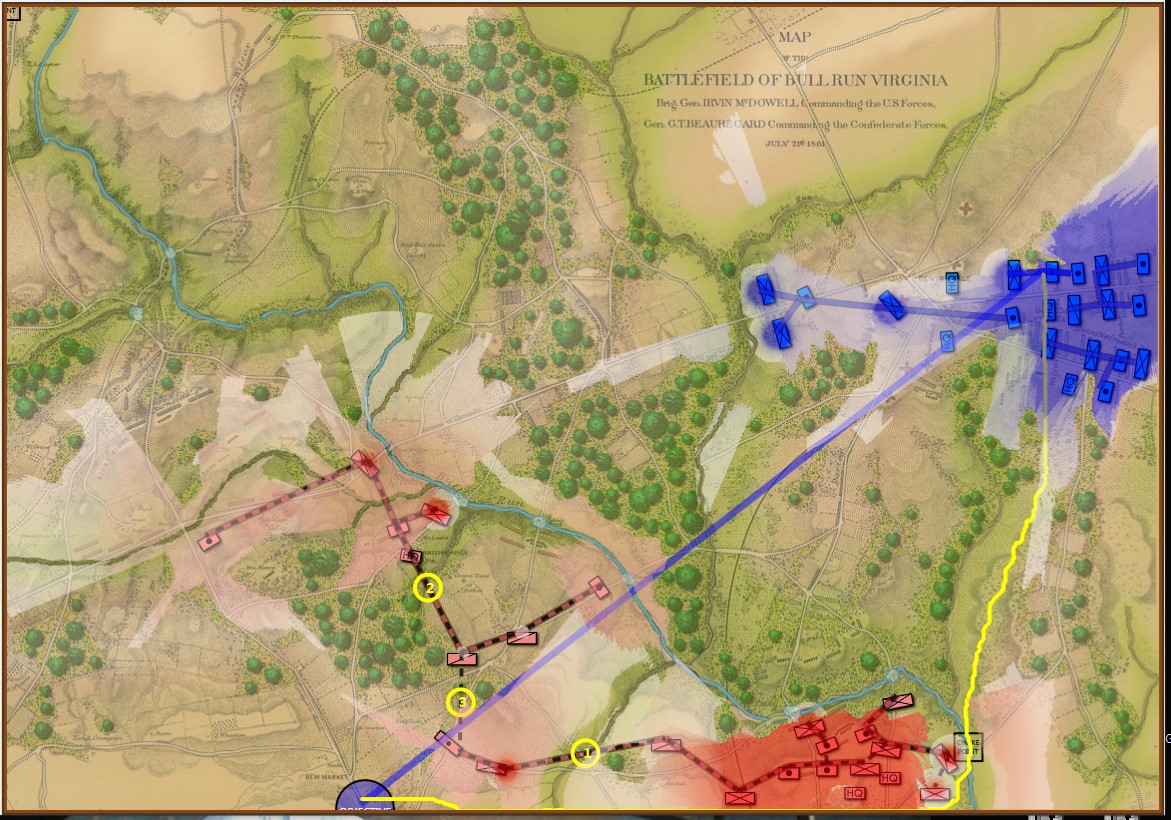
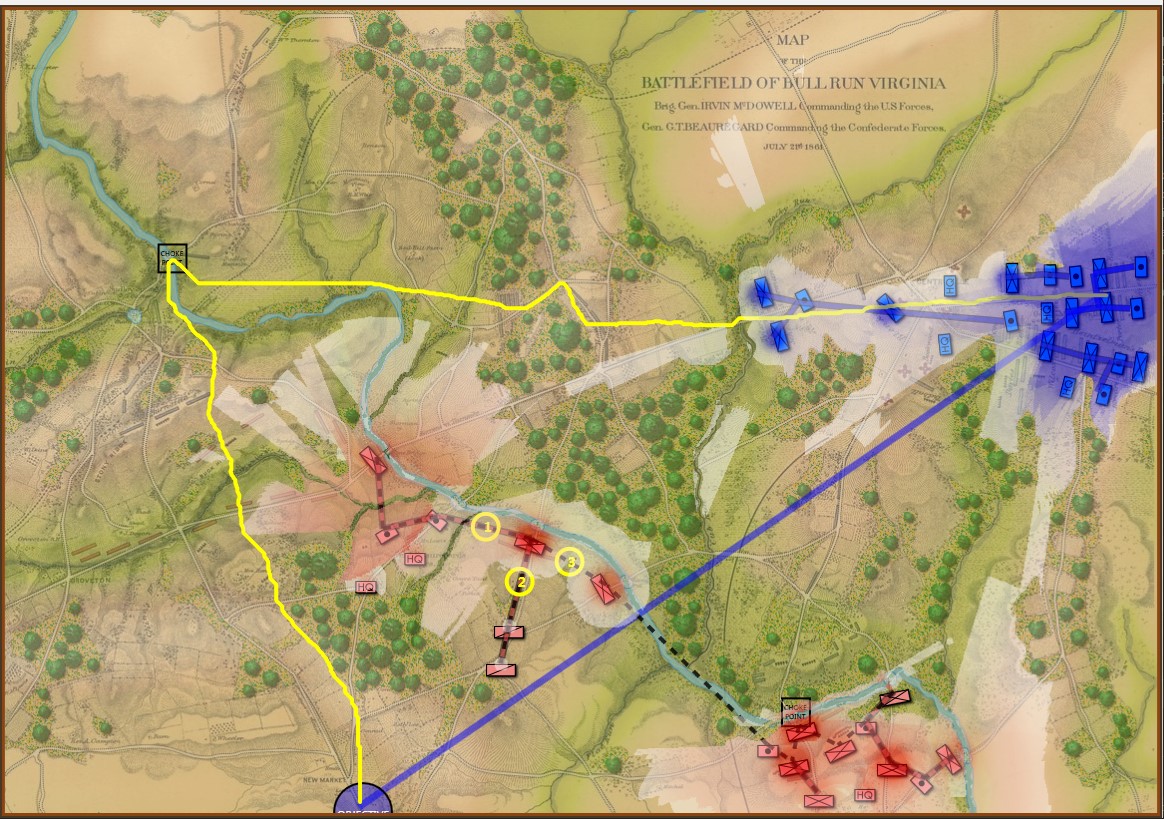
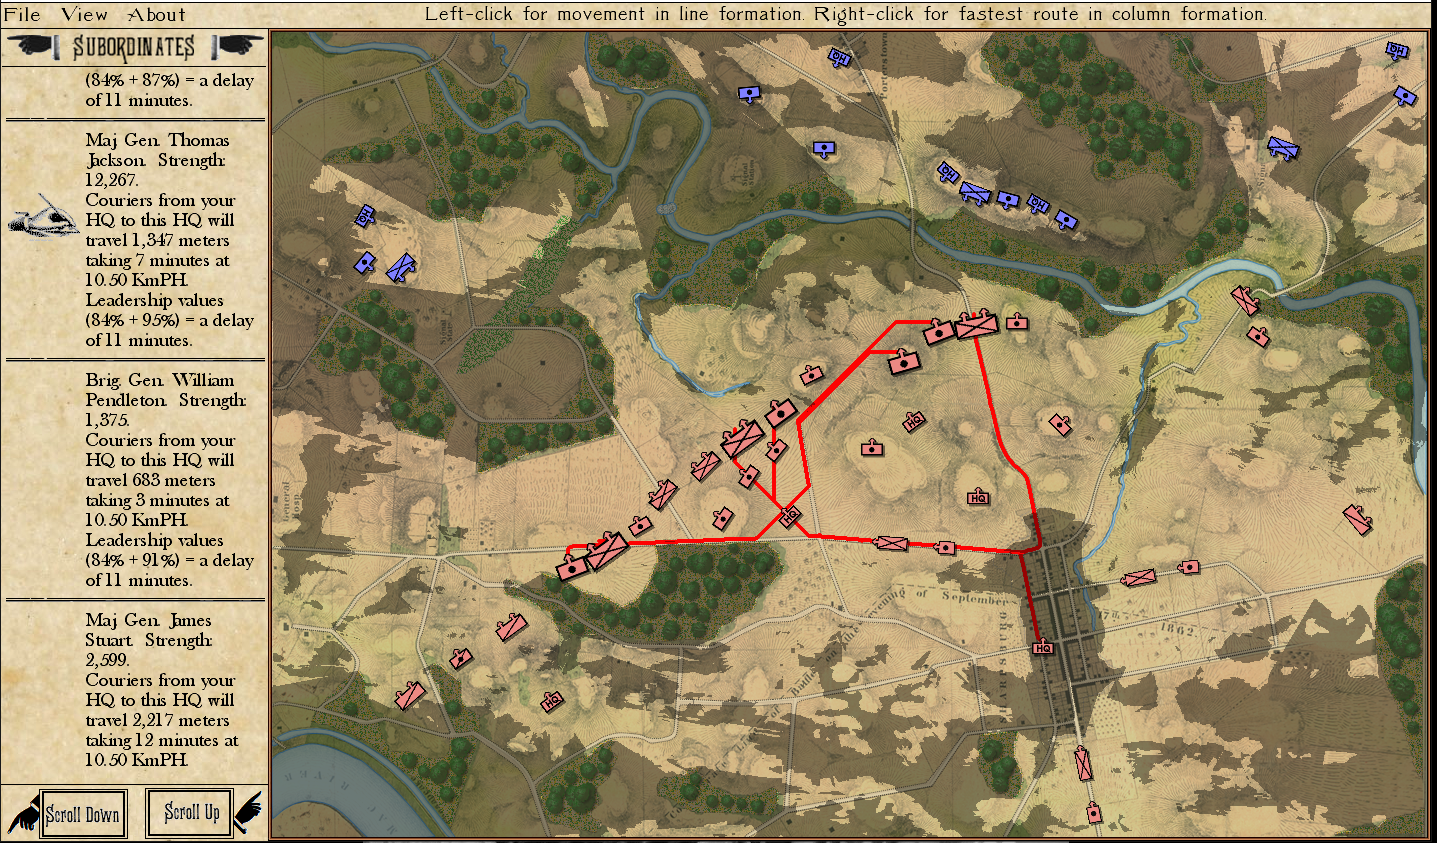
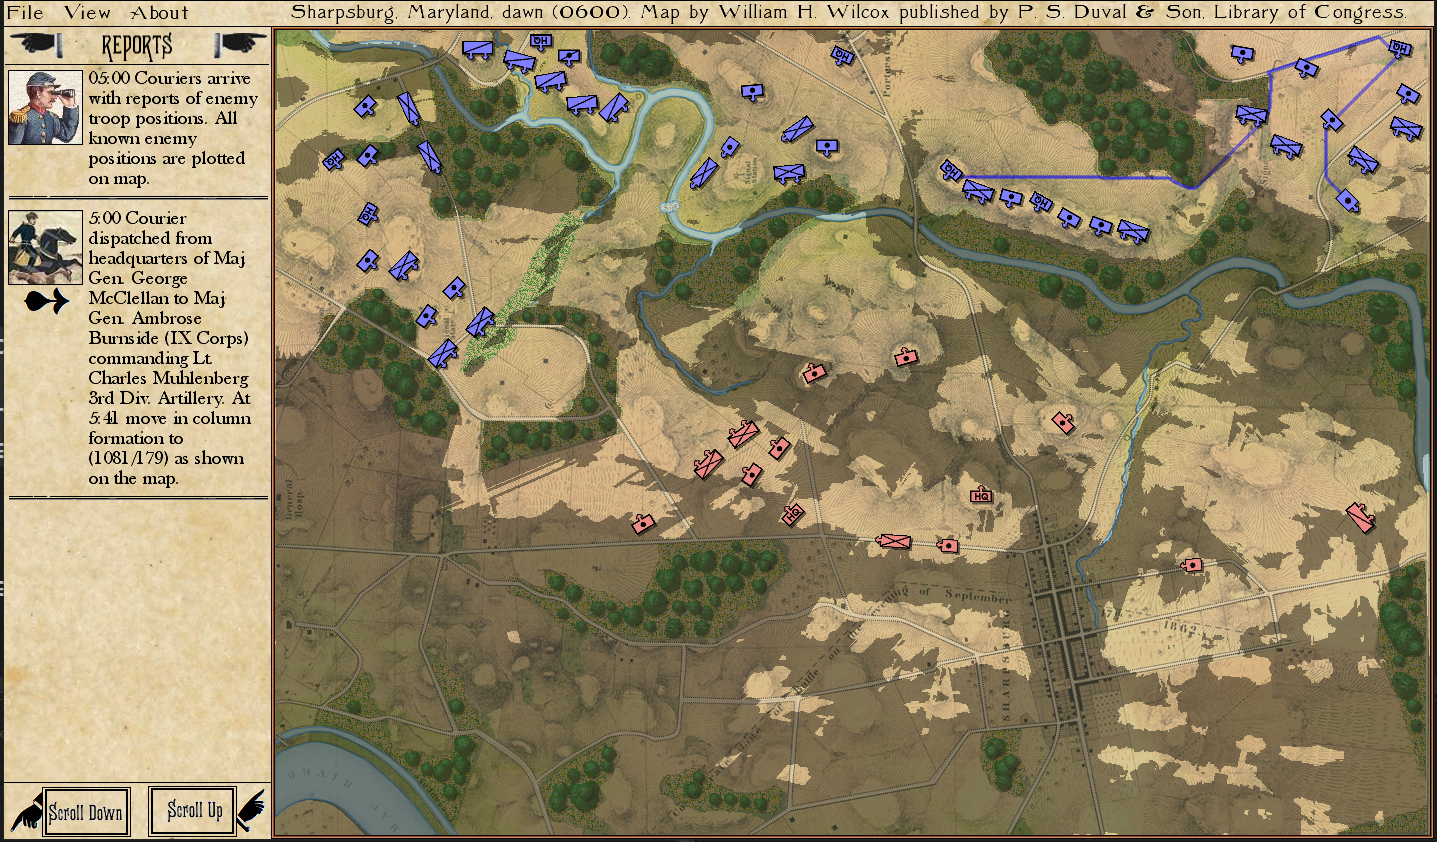
The delay in the transmittal of orders from headquarters and staff is one example of the Friction of War. Note the calculated time for couriers to arrive displayed in the Subordinate Orders list on the left of the screen. The red lines are the routes that couriers from General HQ to Corps HQ to individual units will take. General Staff: Black Powder screen shot. Click to enlarge.

Carl von Clausewitz, in has seminal work, On War, (Book 1, Chapter 7) originated the phrase, “Friction of War”:

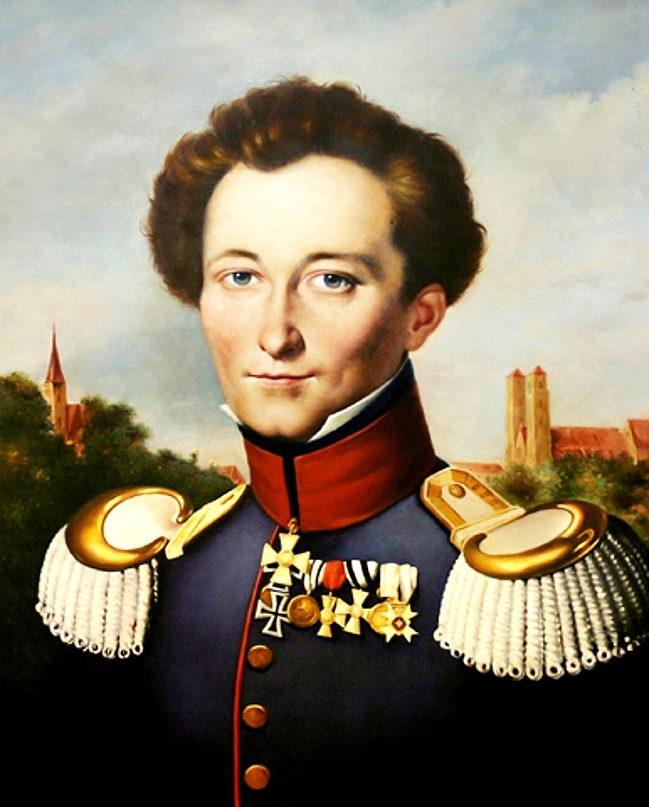
Carl von Clausewitz painted by Karl Wilhelm Wach. Credit Wikipedia.

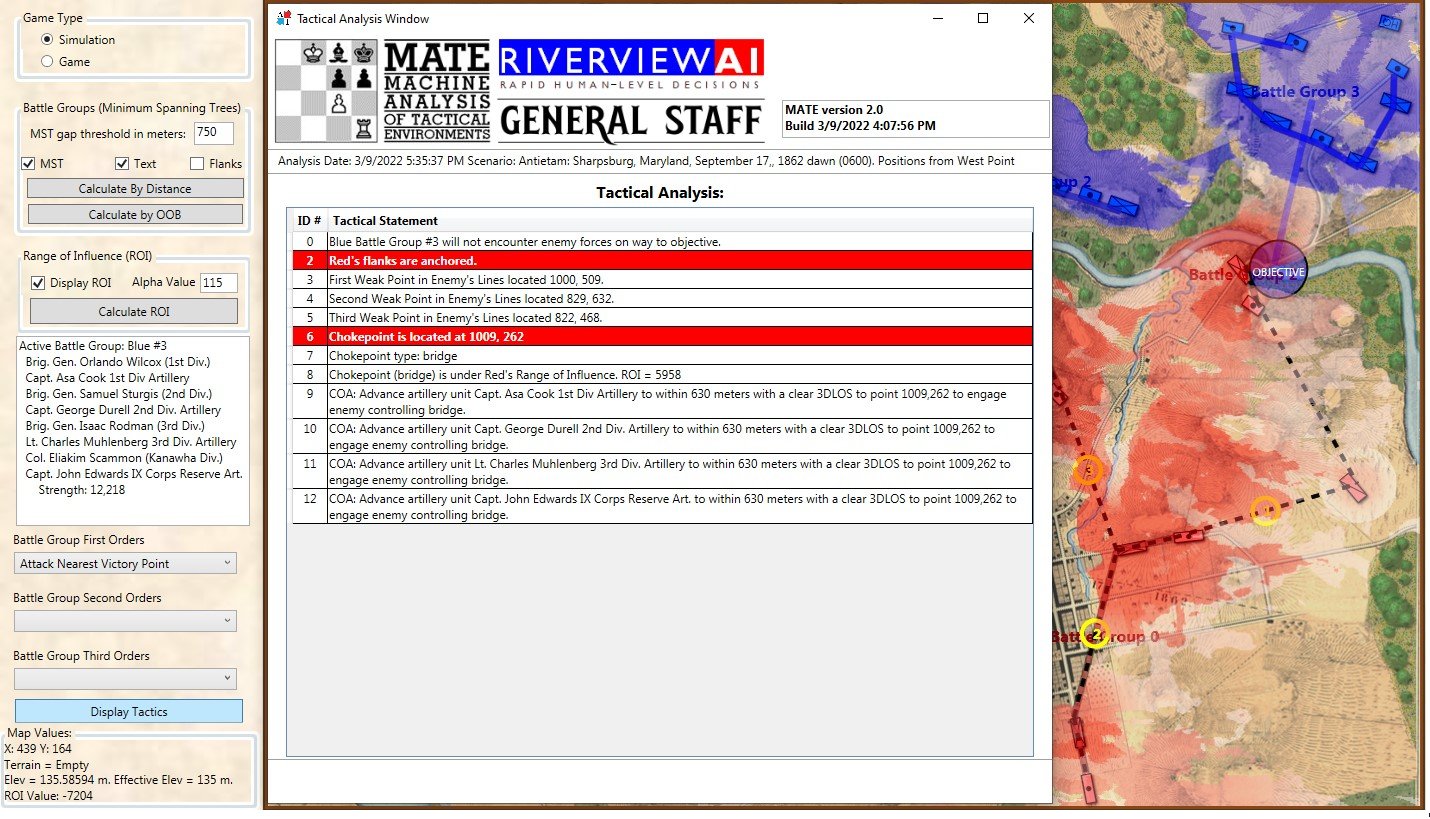
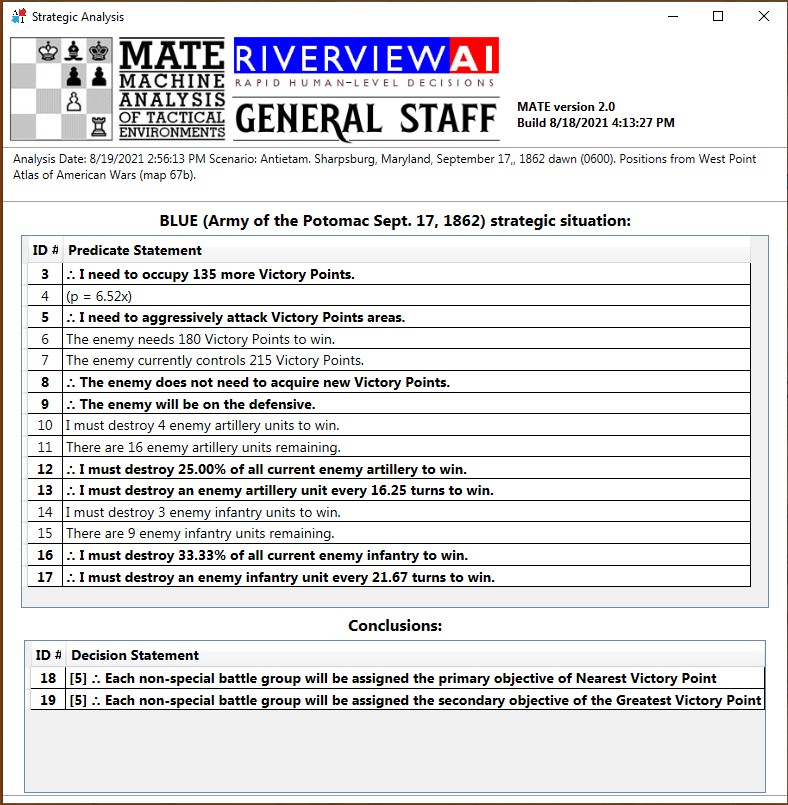
“Friction is the only conception which, in a general way, corresponds to that which distinguishes real war from war on paper. The military machine, the army and all belonging to it, is in fact simple; and appears, on this account, easy to manage. But let us reflect that no part of it is in one piece, that it is composed entirely of individuals, each of which keeps up its own friction in all directions.”

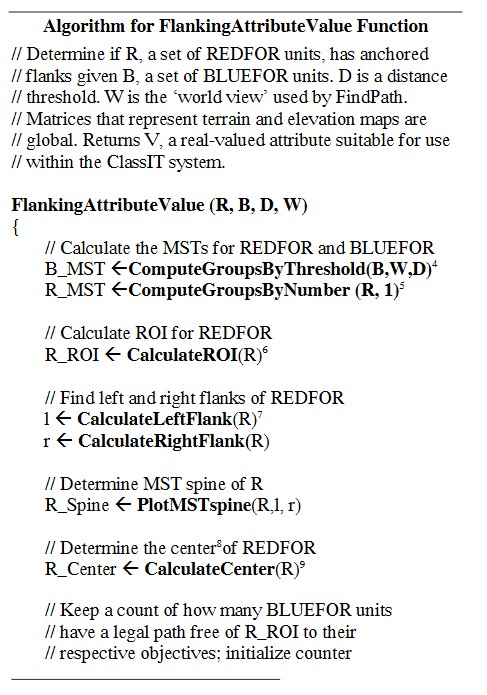
I knew that if General Staff: Black Powder were to be an accurate simulation, and not just ‘war on paper’, that the friction of war would have to be calculated into the command / orders chain. One part of this – the distance the couriers will travel from one headquarters to the next to deliver their orders and the time it takes to travel this distance – can be calculated with reasonable certainty (I’m using the rate of 10.5 kilometers per hour for a horseman, I’m not an expert but this seemed reasonable, and it’s easy to change if somebody has a more accurate value).

Another example of friction of war is factored into the delaying of the arrival of orders is Leadership Value:

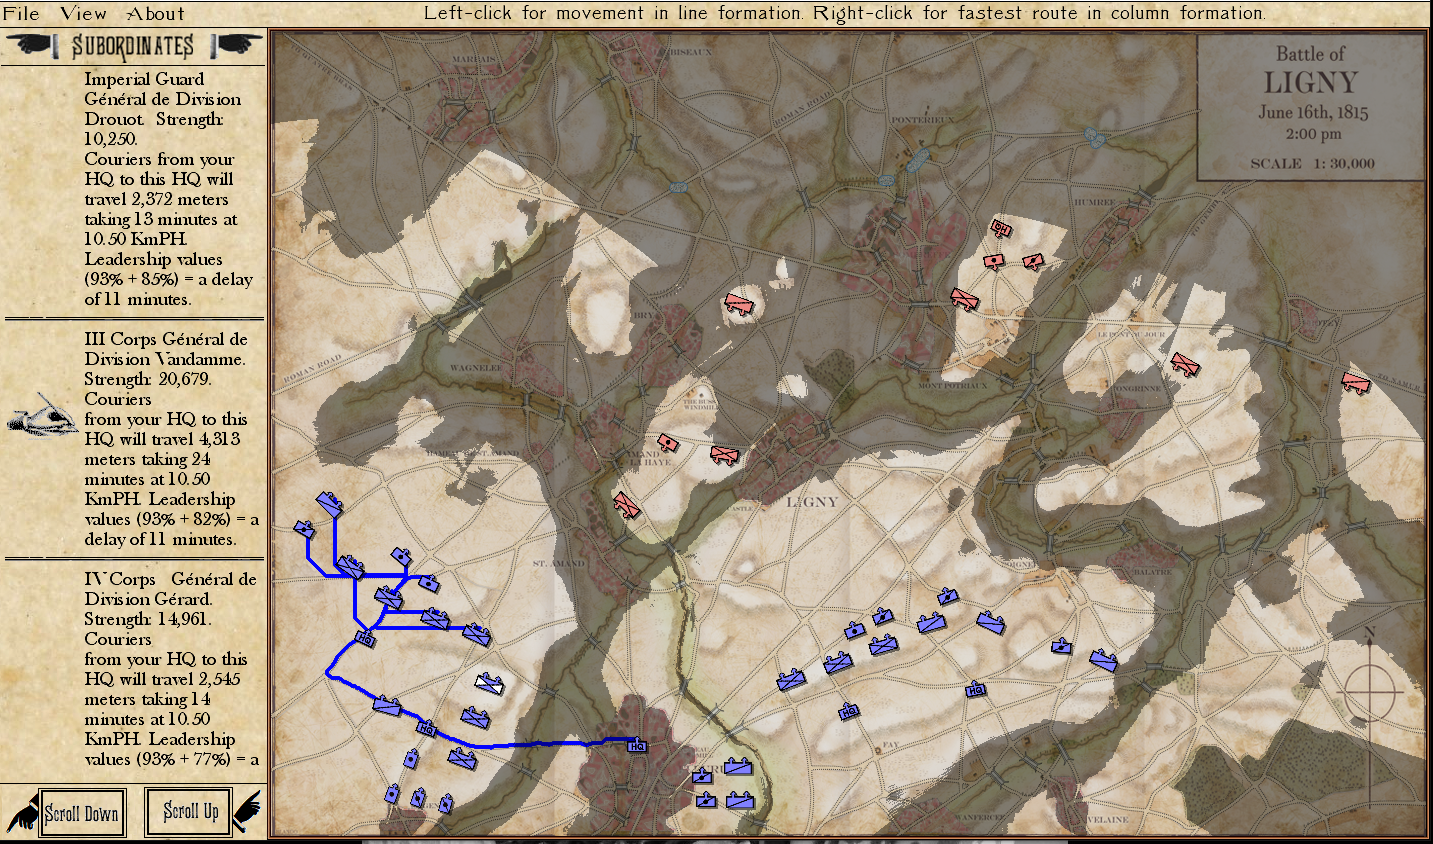
In this example, the Imperial couriers will travel over 4.3 kilometers, taking 24 minutes, to deliver their orders. Also, note the cost of the combined Leadership Values. Because Napoleon and Vandamme have very high Leadership Values little additional delay is added. General Staff: Black Powder screen shot. Click to enlarge.

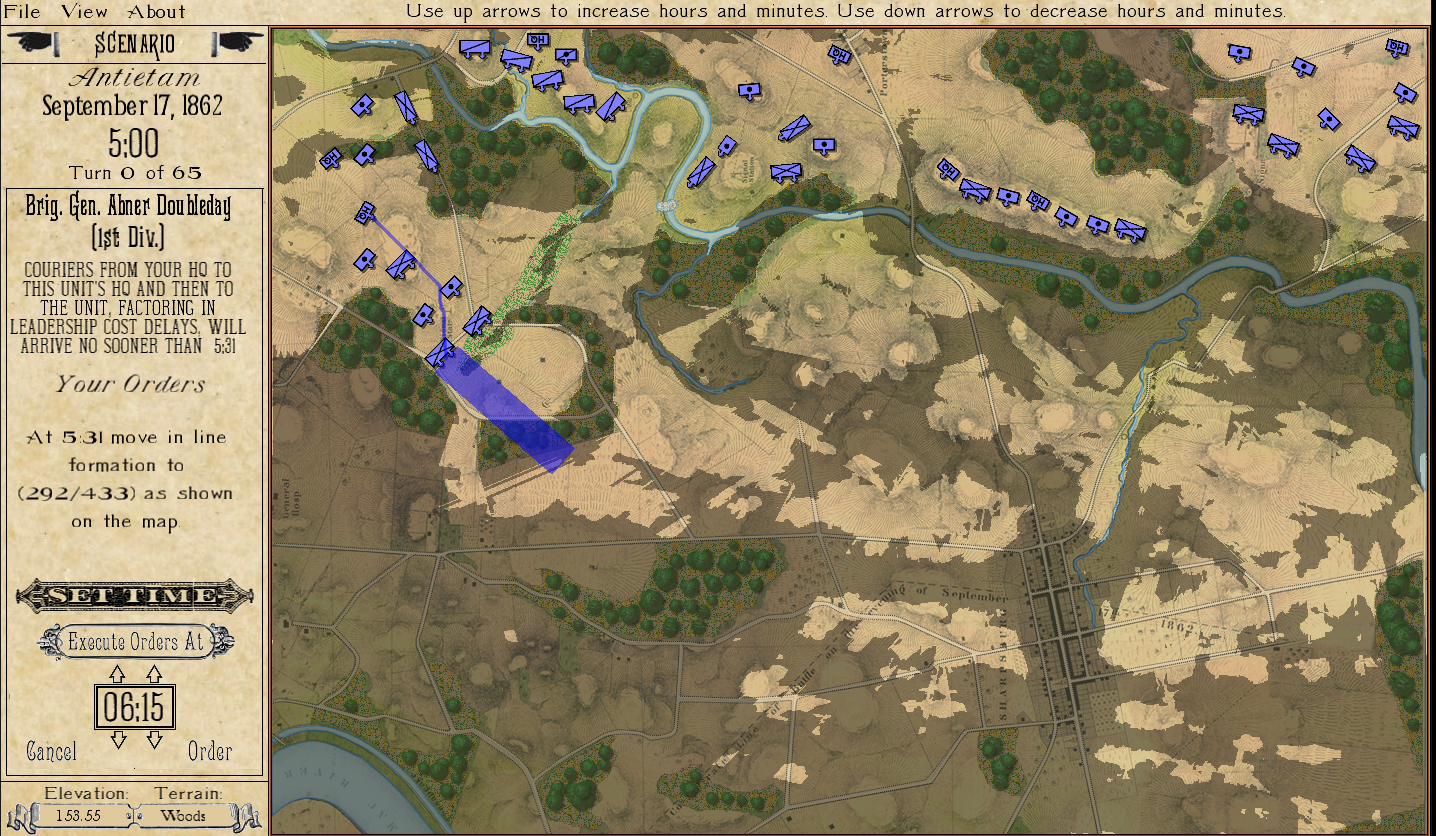
You can specify at what time the order is to be executed (in this case 6:15), however you can not set a time earlier than when the couriers would arrive. This allows for coordination of attacks across units. General Staff: Black Powder screen shot. Click to enlarge.

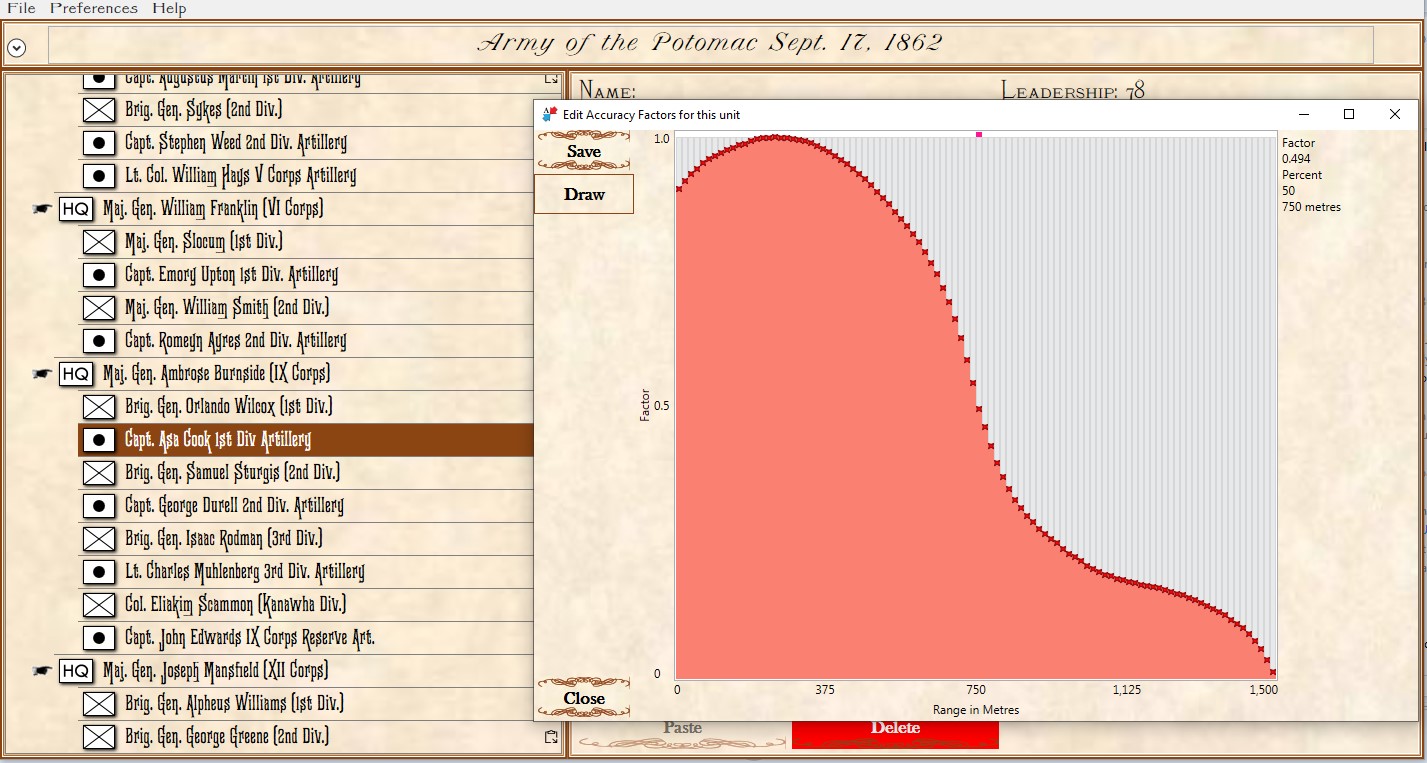
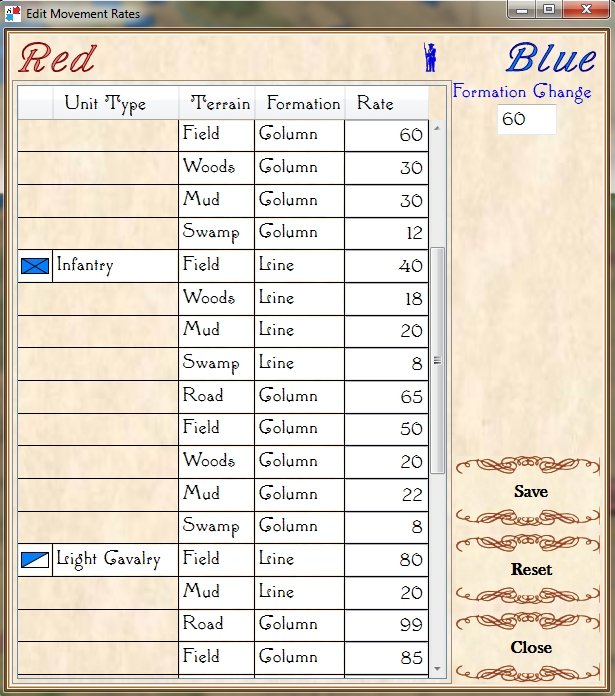
The other value – and it is arbitrarily set – is the cost of ineptitude, incompetence, lack of motivation, and sloppy staff work. In the above scenario (Ligny) Napoleon’s Leadership is set at 93%:

The slider adjusts Napoleon’s Leadership Value which effects the delay in issuing orders. General Staff: Black Powder Army Editor screen shot. Click to enlarge.

I understand that Napoleon may have been feeling a bit under the weather during the Hundred Days Campaign. You can set his Leadership Value to anything you want in the Army Editor (above).

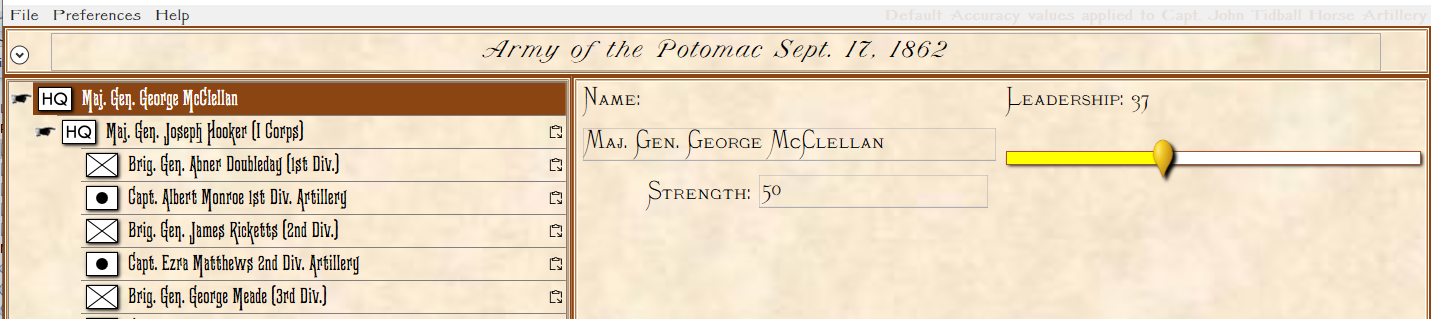
Major General George B. McClellan’s Leadership Value can be changed in the Army Editor. Click to enlarge.

Did I set McClellan’s Leadership Value too low? He was amazingly incompetent. Note below:

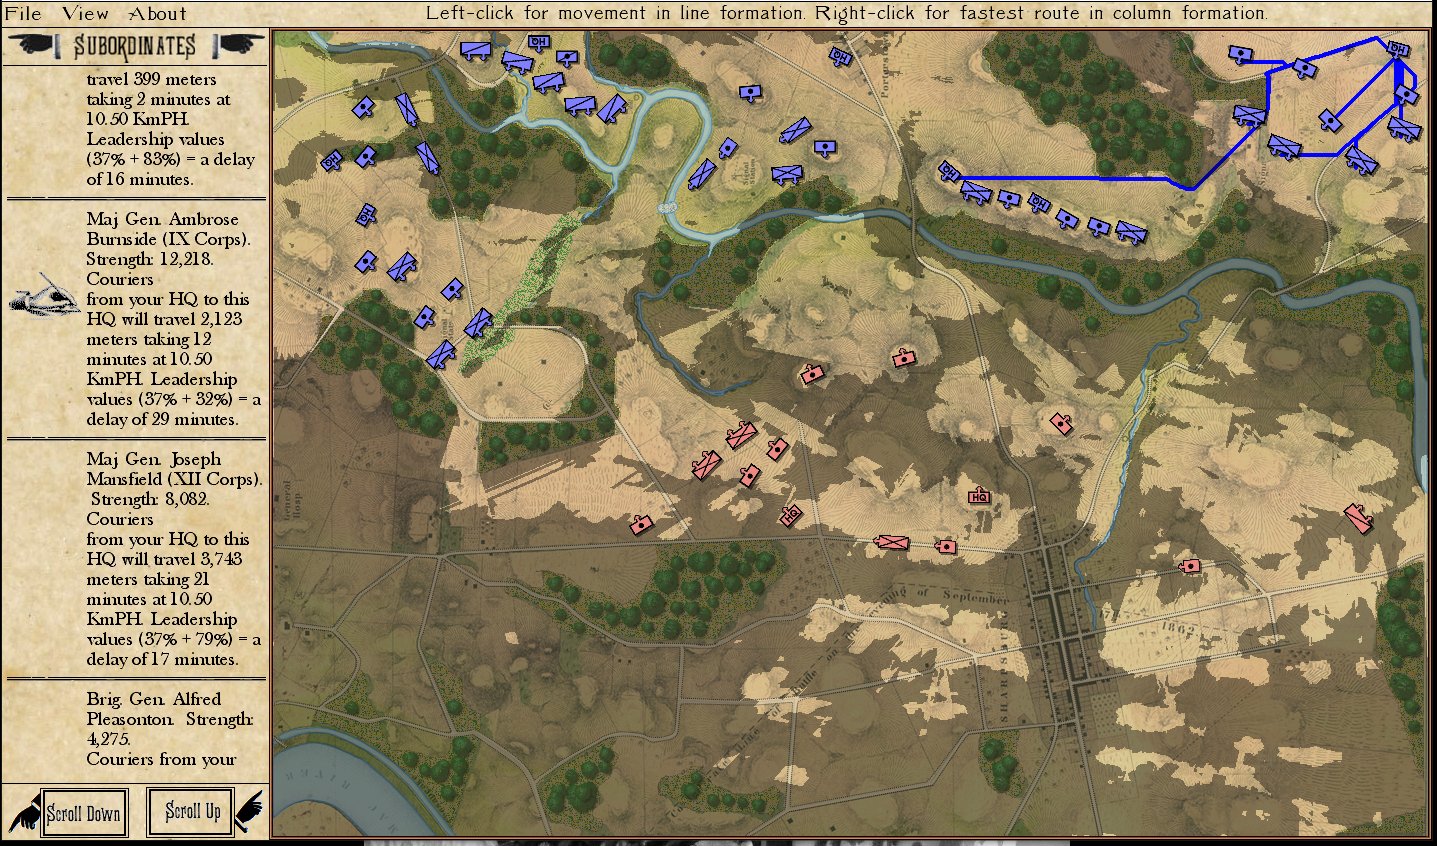
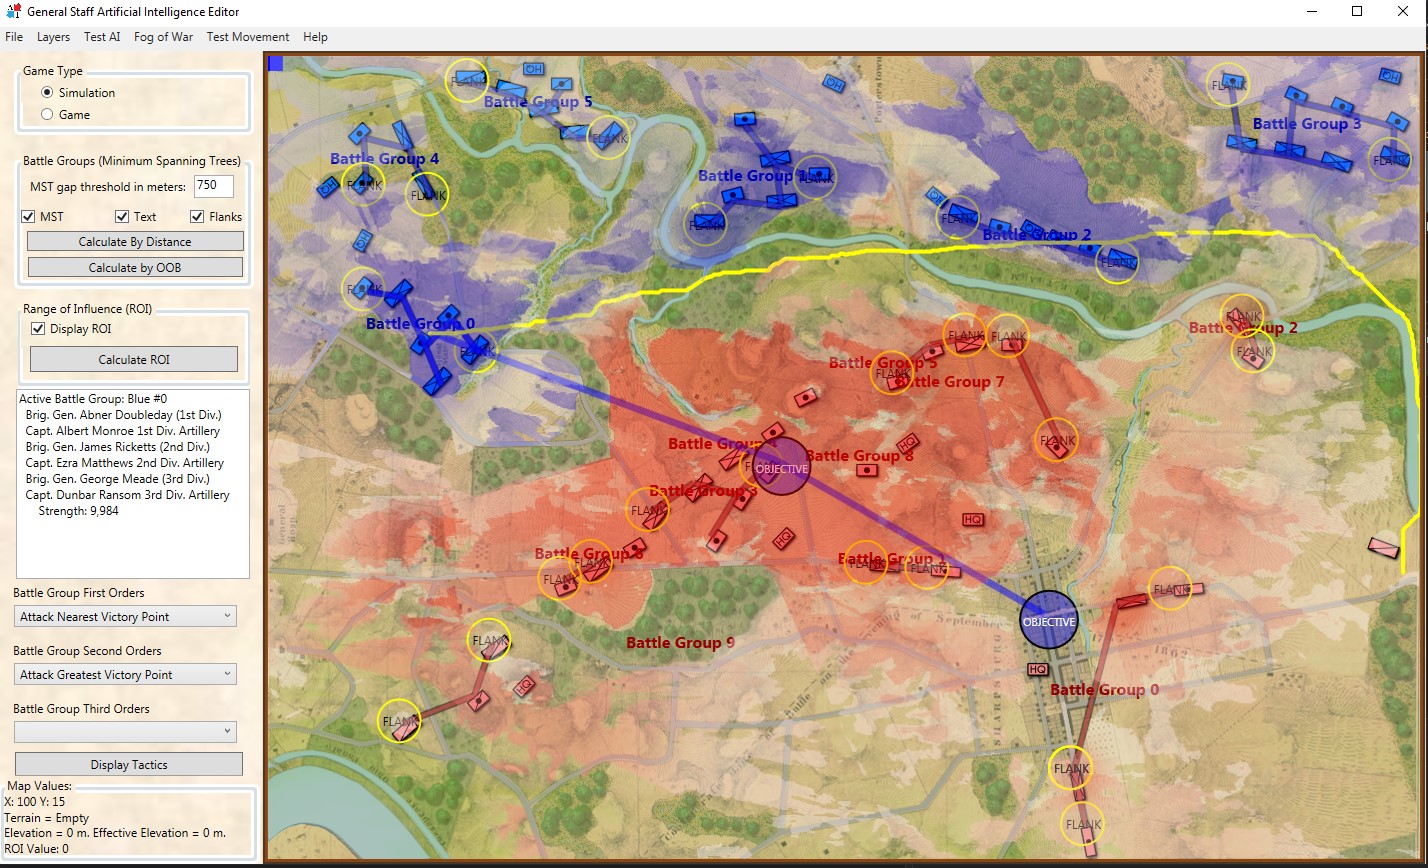
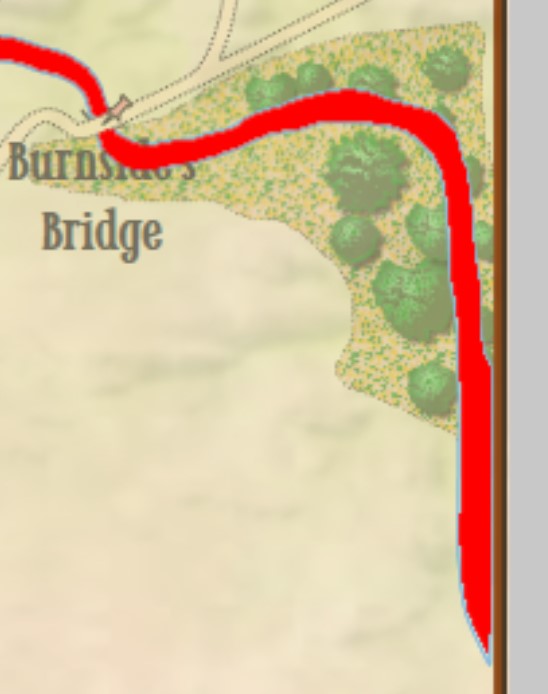
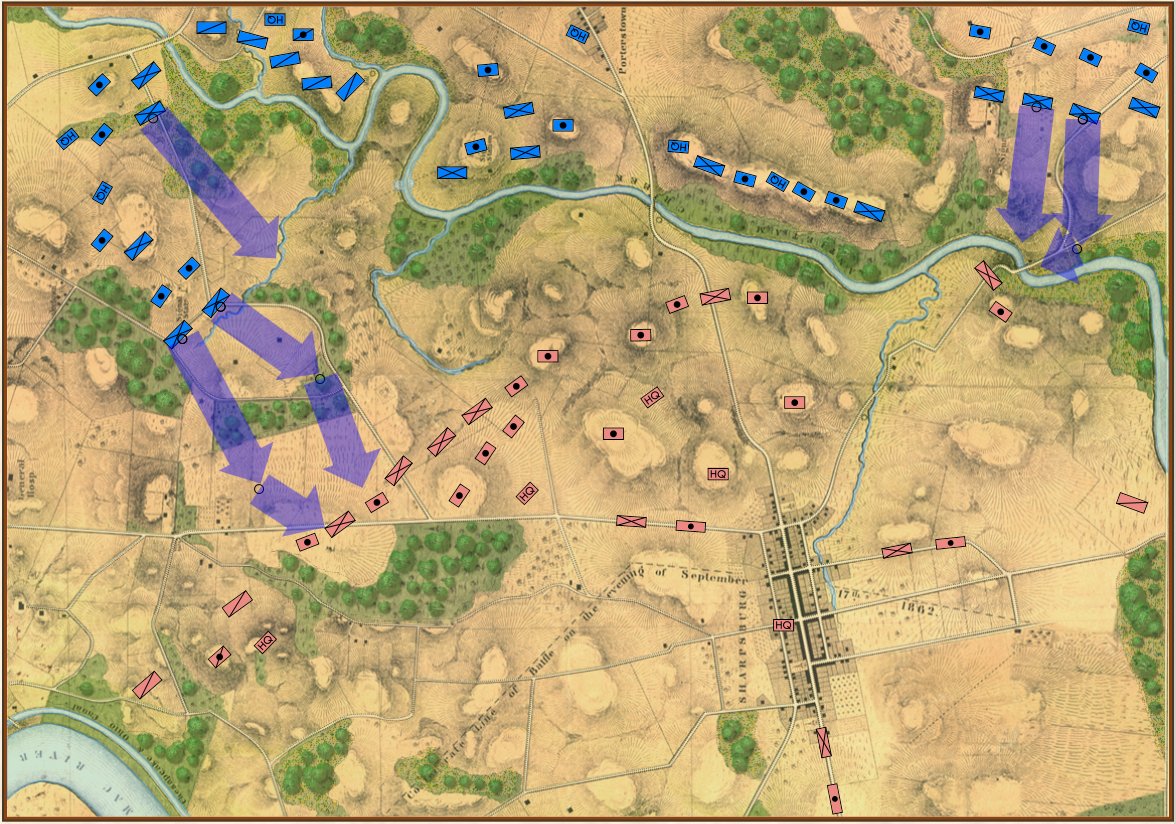
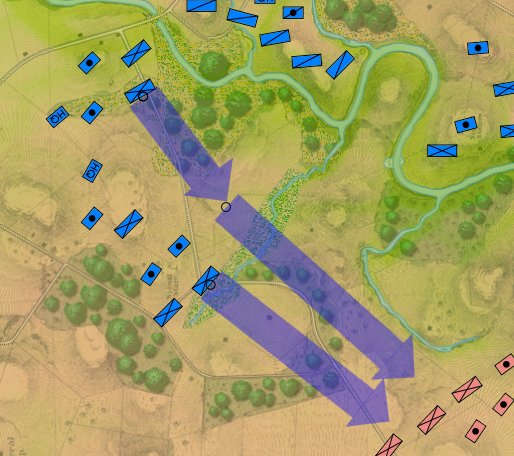
The combination of McClellan’s and Burnside’s extremely low Leadership Values adds an additional 29 minutes to the transmittal of orders. The blue lines trace the route that couriers would travel from McClellan’s headquarters to Burnside’s headquarters and then to each division and battery. General Staff: Black Powder screen shot. Click to enlarge.

The combination of McClellan’s and Ambrose Burnside’s Leadership Values results in almost a half hour delay in transmittal of the orders (remember after receipt of the orders, Burnside has to send couriers to his divisional and battery commanders, too and their Leadership Values effects the delay before their unit executes the order). After factoring the time it would take for a horseman to travel the distance between McClellan’s headquarters to Burnside’s headquarters (14 minutes) the earliest that a unit could be expected to respond to the original order from General Headquarters would be forty-one minutes later (and, in reality, a bit after that because of that unit’s Leadership Value).

The path of the couriers from McClellan’s headquarters, to Burnside’s Headquarters and then out to the divisions and batteries. General Staff: Black Powder screen shot. Click to enlarge.

I have spent some time at Antietam and studied it at length and this delay of about three-quarters of an hour between the time McClellan wanted to issue an order and the men of Burnside’s IX Corps moved out seems if anything, too optimistic of a timetable. In fact, as I write this, I think I need to increase the penalty for poor Leadership Value. McClellan and Burnside couldn’t possibly have got units moving in less than an hour.

As I have begun playtesting General Staff: Black Powder I found the delay between issuing orders and wanting to see something move now was a bit disconcerting. It shouldn’t have been. I’ve read enough military history to know that battlefield orders were often transmitted the night before and moving units around during the battle could be a risky proposition. Some armies, however, were less afflicted with these problems than others, and that I would attribute to ‘leadership value’ which also encompasses the army’s general staff.

If you don’t want to use General Staff: Black Powder as a simulation that inserts a calculated delay between orders and execution, and would rather just move units instantly, there is ‘Game Mode’:

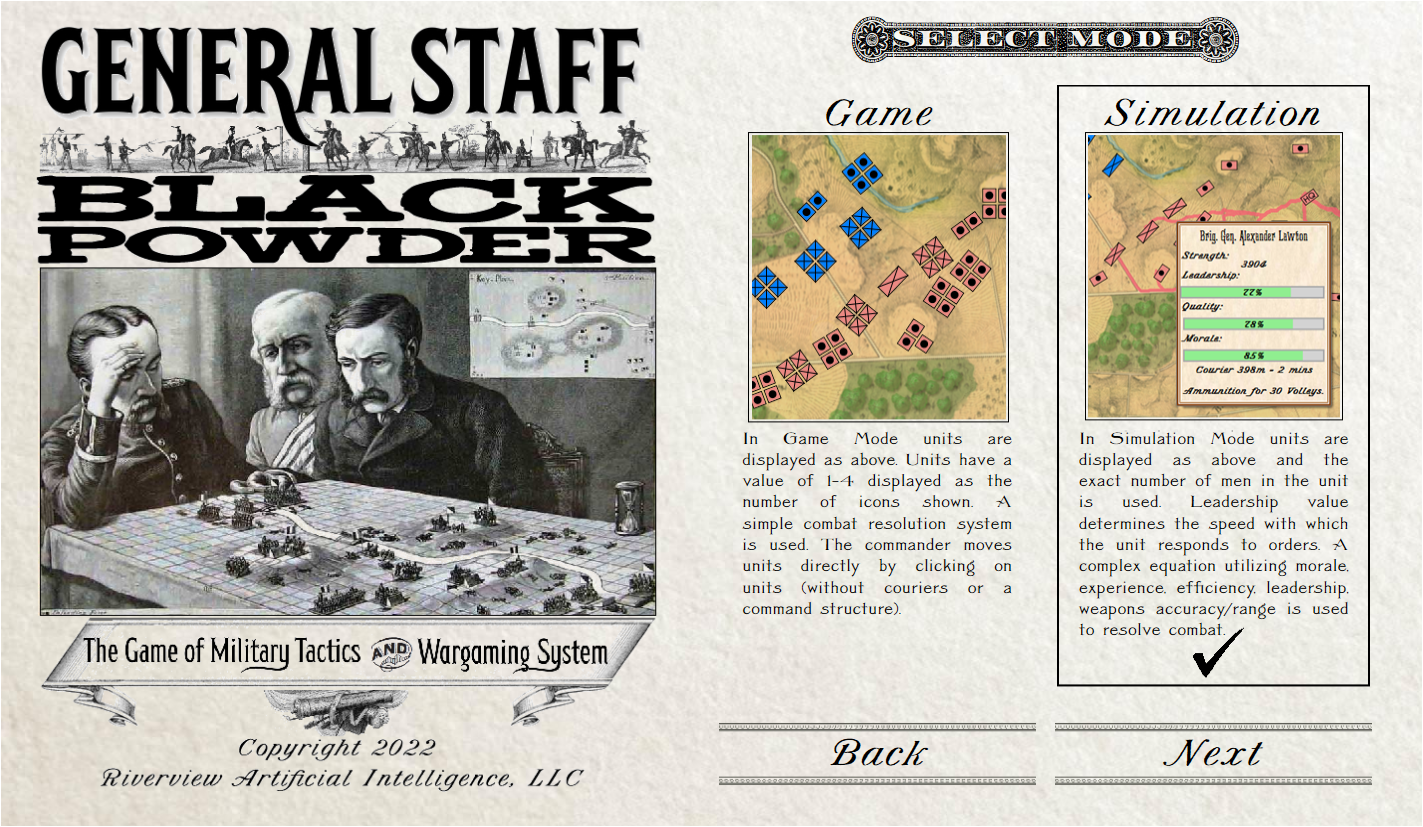
The Select Mode screen in General Staff: Black Powder. The user chooses between ‘game’ and ‘simulation’ with differences in rules and unit icons. Click to enlarge.

Game Mode has the same maps but uses simpler icons and rules. I originally envisioned Game Mode as a way of introducing wargaming to a new generation (I wanted to write it for the XBox). Anyway, it’s included with General Staff: Black Powder.

Lastly, I know everybody is waiting for news about when can I get my hands on the game?!!?!!  My friend, Damien, wasn’t able to work on  finishing it using Unity so I’m finishing it up using MonoGame. As you can see I’m pretty far along and I think I will be playing the first ‘actual game’ (that is a simulation from start to finish) within the next couple of weeks; maybe sooner. After that, probably at least another month of fixing bugs, but then I’m hoping to set up a Beta download for all the early backers via Steam. We have a space on Steam but I haven’t even begun to build it out. Obviously, I’m just one guy, I’m working as fast as I can, but I think this is all good news. Also, I’m working on a video to show everything off.

As always, if you have any questions or comments, please feel free to contact me directly.


A Human-Level Intelligence at Antietam

“Map of the battlefield of Antietam,” by William H. Willcox. Published in Philadelphia. Lithograph of P. S. Duval and Son, 1862. From the US Library of Congress.

There are many reasons that I am intensely interested in this particular American Civil War battle fought on less than twenty square miles wedged in between the Potomac River and Antietam Creek. The battle of Antietam (September 17, 1862) exhibits a number of significant battlefield attributes which I use as base line cases to test algorithms used in creating a human-level tactical artificial intelligence 1)MATE: Machine Analysis of Tactical Environments. Specifically, Antietam definitively demonstrates 2)see http://riverviewai.com/download/SidranThesis.pdf the following attributes:

  • Choke Points
  • Anchored Flank
  • Interior lines of communication
  • Exterior lines of communication
  • Restricted Avenue of Retreat
  • Restricted Avenues of Attack

For example, in a blind survey of Subject Matter Experts (SMEs), it was overwhelmingly agreed that the RED (Confederate) left flank at the battle of Antietam exhibited the attribute of ‘anchored flank3)a flank that is attached to or protected by terrain, a body of water, or defended fortifications. and other positions, such as RED’s (Russian and Austrian) left flank at Austerlitz SMEs overwhelmingly agreed that the flanks do not exhibit the attribute of ‘anchored’ and are, therefore, unanchored. Once we have an example of an anchored flank and another example of an unanchored flank we can begin testing algorithms to detect the attribute of an anchored flank.

In my doctoral thesis (above) I demonstrated the algorithm 4)see pages 45-6 http://riverviewai.com/download/SidranThesis.pdf  for detecting the attribute of anchored and unanchored flanks. I have made a number of substantial improvements to the original algorithm since then which are now incorporated into the current MATE.

We have recently posted analyses of other battles that did not exhibit the attribute of an anchored flank (Ligny and 1st Bull Run, or Manassas). MATE correctly recognized that Ligny and Manassas do not have these attributes.

The tactical situation for Blue at Antietam is quite different than Blue’s positions at Ligny and Manassas (is it not curious how often Blue is the attacker in wargames?). The key difference, of course, is the lack of an open flank to attack. MATE will always attack an open flank if it can. Without an obvious objective, like an exposed flank, MATE will next look at opportunities to fulfill victory conditions. For Antietam, as Blue, MATE sees the situation like this:

MATE Analysis of Antietam from the Blue position. Screen shot. Click to enlarge.

Below is a list of statements, predicates and conclusions generated by MATE during the above analysis with my commentary added on the right:

MATE analysis of Antietam. Click to enlarge.

I recently added a set of algorithms that recognize the composition of battle groups and exploits any possible advantages. For example:

Screen shot showing MATE analysis of BLUE position at Ligny. NB: Battle Group #3 (Pajol’s and Exelmans’ cavalry divisions) are, “snatching the pawn,” at Balatre. Click to enlarge.

At Ligny, above, MATE has recognized that Battle Group #3 and Battle Group #4 are uniquely cavalry (and horse artillery) battle groups and are to be used differently. While Battle Group #4 is held in reserve, Battle Group #3 will snatch Balatre. Though it is valued at only 10 Victory Points, MATE realized that no enemy force could oppose it. That said, I can still hear the voice of my old chess tutor, Mr. Selz,  warning me against ‘pawn snatching’; that is grabbing a minor point that can lead to defeat because the position was not thoroughly analyzed. MATE, however, is correct in this analysis and can safely seize the objective.

While, at Antietam, Battle Group #1 (all the cavalry of the Army of the Potomac commanded by Brigadier General Alfred Pleasonton) is frozen ‘in reserve’. This is not a case where MATE can snatch a pawn. MATE looked at the situation and said, ‘nope’, there are no unattended Victory Points to snatch and there is not an open flank to exploit so, the default setting is ‘in reserve’.

This leads to the interesting conundrum: what exactly was the Union cavalry at Antietam doing? Honestly, I had never really thought of it before. Now, when I look into the question I find, Was McClellan’s Cavalry Deployment at Antietam Doctrinally Sound? This monograph argues that McClellan massing his cavalry in the center for a great coup de grâce exploitation of a breakthrough across the Middle Bridge was acceptable within the framework of Jomini’s theories as taught at West Point before the Civil War. But, then it is countered with this:

In Landscape Turned Red, Stephen Sears has this to say: Shortly before noon, McClellan had ventured to push several batteries across the Middle Bridge, supported by Pleasonton’s cavalry and a force of regulars from George Syke’s Fifth Corps. He was nervous about the move-it was taken against the advice of Porter and Sykes-and he cautioned Pleasonton not to risk the batteries unduly. As an afterthought, he asked, “Can you do any good by a cavalry charge?” Pleasonton wisely ignored the suggestion. – Sears, Stephen, Landscape Turned Red: The Battle of Antietam, New York: Ticknor and Fields, 1983. page 271. (as cited in above)

Would a great massed cavalry attack across Middle Bridge have been suicide? Or brilliant? For the first time in memory I took the 1st edition of McClellan’s Own Story off the shelf and discovered… nothing. McClellan died suddenly of heart failure just as he was writing about Antietam and his memoirs end abruptly with very little insight into his side of the story. But, using cavalry to support horse artillery – rather than the other way around – seemed a bit odd.

I do not know of any other great cavalry charge in the American Civil War than Sheridan at Five Forks (above). Is this what McClellan envisioned at Antietam? Would it have worked? Could American Civil War regiments have formed square against a massed cavalry charge?

Moving on, let’s drill down to the Course of Action (COA) for Blue Battle Group #3 (Burnside’s IX Corps) at Antietam:

MATE tactical analysis for Blue Battle Group #3 at Antietam (Burnside’s IX Corps). Screen shot. Click to enlarge.

The author walking across Burnside’s Bridge in 1966 (age 12).

The above is MATE’s output that concludes with the COA for Burnside’s IX Corps. Perhaps, the greatest mystery of the battle of Antietam is what took Burnside so long to take this bridge (now forever linked with his name)? It is true that there were numerous, futile and bloody attempts to cross it. Note that MATE, above, recognizes the bridge as a critical Choke Point. When MATE sees a Choke Point that is within the enemy’s control (see statement #8, above, “Chokepoint (bridge) is under Red’s Range of Influence ROI = 5958″ and 5,998 is very high ROI value) it brings up artillery (see statements #9, #10, #11, #12, above). All the artillery in the IX Corps is to be within 630 meters of the objective. Why 630 meters? Because at that distance it is guaranteed a 50% accuracy rate. This rate, by the way, was set in the Army Editor:

The accuracy curve for the 1st Division, IX Corps artillery as set in the Army Editor. Screen capture. Click to enlarge.

So, MATE says 5)I apologize but I find it easier to describe how the AI works using such phrases as ‘thinks’, ‘says’, and ‘decides’. It’s not worth straining over. Trust me, “My objective is a Choke Point. I’m not sending my units into a meat grinder. I’m sending artillery to a point where they are guaranteed a 50% accuracy per volley and have a clear 3D Line of Sight to the target. This is how I’m going to project as much force as I can at the objective.” War is about force projection. MATE knows this. Is this a better plan than what Burnside actually did? Yeah, it is a lot better with a far greater probability of success. I’ve stood on that plain just east of Burnside’s Bridge and thought that nine batteries of 12 lb. Napoleons aimed at the crest of that hill just beyond the bridge would provide a substantial amount of force projection and covering fire. About half an hour of force projection followed up with an infantry assault would probably take the bridge.

I once described good AI as: Don’t do anything stupid, fast. MATE is doing that. I think MATE is on the way to beat most human opponents because humans do stupid things, fast.

We’ll see. Should be an interesting journey.

References

References
1 MATE: Machine Analysis of Tactical Environments
2 see http://riverviewai.com/download/SidranThesis.pdf
3 a flank that is attached to or protected by terrain, a body of water, or defended fortifications.
4 see pages 45-6 http://riverviewai.com/download/SidranThesis.pdf
5 I apologize but I find it easier to describe how the AI works using such phrases as ‘thinks’, ‘says’, and ‘decides’. It’s not worth straining over. Trust me

Why Machines May Kill Us In Our Sleep

An amazing screen capture of the AI’s solution to a problem. It has found a 1 pixel gap between the data and the edge of the screen and is exploiting it to successfully find an ‘open flank’ of Red. Click to enlarge.

Professor Alberto M. Segre was my thesis advisor and one day he said to me, “You know when your AI is really working because it will surprise you.” Today I got to have one of those weird surprises.

The screen shot (above) is a visual representation of what the AI is up to. You won’t get to see this in the actual game. The program that’s running is called the AI Editor which is a bit of a misnomer because you don’t actually edit the AI in it; you mostly just get to observe what it’s doing. There’s a lot of stuff going on in the above image. There are multiple layers visually displaying different types of data (check out the blog – Layers: Why a Military Simulation is Like a Parfaitfor more information about these). But, what interests us are the AI layers: Battle Groups, Objectives, and that thin yellow line that snakes from a group of blue units, crossing Antietam Creek at the Middle Bridge and then, amazingly, exploiting a data anomaly to reach its goal: a point far behind enemy lines.

Some background on the situation:

The map of the Antietam Battlefield (screen shot) with terrain and elevation layers displayed. Click to enlarge.

Underlying all the clutter from the first screen capture, top, is the battle of Antietam (above). The map has been rotated 90 degrees to the left so north is now pointing to the left; east is at the top of the screen.

After adding Blue (Union) and Red (Confederate) units to the map in their historical positions at 0600 September 17, 1862 the AI performed a tactical analysis from the perspective of Blue.

The AI ‘strategic’ analysis for Antietam playing Blue (Union).

The above are a list of Predicate Statements all of which the AI knows to be true. Statements preceded by the logical sign ∴ (therefore) are conclusions, or inferences, derived from the predicate statement referenced in the brackets. It is this analysis that determines if the AI will be on the offensive or defensive and what its objectives will be.

Next, the AI performs Range of Influence (ROI) calculations for the entire observable battlefield. I plan on doing a video about this later, but for now the darker the red (in the topmost screen capture) the more – and more powerful – weapons the Red army can bear on that point.  The AI next divides all the units on the map into a forest of minimum spanning trees called Battle Groups. I want to do a video about this, too. However, if you can’t wait, these subjects are covered in my paper, Implementing the Five Canonical Offensive Maneuvers in a CGF Environment (free download).

Again, referring to the top screenshot you can see the AI’s calculations to this point:

  • It has determined it (Blue) will be on the offensive.
  • It has calculated enemy ROI.
  • It has assigned objectives to the first Battle Group.

Flanking Algorithm published in, “Algorithms for Generating Attribute Values for the Classification of Tactical Situations”. Click to enlarge.

Now the AI needs to determine if the enemy has an ‘open or unanchored flank’. In Algorithms for Generating Attribute Values for the Classification of Tactical Situations I published the Algorithm for Flanking Attribute Value Function (right). It basically comes down to this: can the AI trace an unbroken path from the center of the Blue Battle Group to a specific point (called the Retreat Point) far behind enemy lines without crossing into ‘No Go Areas’ (water, swamp) or entering any area controlled by Red’s ROI (literally the red areas in the topmost screen shot).

The reason that I was using Antietam as a test case for anchored / unanchored flanks is because years ago I had analyzed the battle for my doctoral thesis and knew it to be a classic example of anchored flanks; Lee’s left flank rests on the Potomac and his right flank is anchored on the Antietam. Granted, the Confederate flanks were held by Stuart’s cavalry with a little horse artillery support but they were still, by definition, anchored flanks.

Due to an error in the data that made up the Antietam terrain map a 1 pixel (about 3.8 meter wide) strip of ‘no terrain’ was inserted at the far right hand edge of the map (see blow up of screen capture, right; it’s the thin line between the water, represented in red, and the brown edge of the map). This meant there was a ‘land bridge’ across Antietam Creek where none existed in real life. A digital parting of the Red Sea, if you will. But, by the rules of the game the AI perfectly performed its function. There was no error in the AI – again, the AI performed better than I had dared hope – the error was with the data set.

And that’s how fifty years from now I can see a cyber-detective standing over the chalk marks around a body saying, “Yeah, the machine performed perfectly, brilliantly, in fact. But, the error in the data set killed him.”

It’s already happened in real life. For cars with autopilot the data set of the world in which it operates is crucial. However, “against a bright spring sky, the car’s sensors system failed to distinguish a large white 18-wheel truck and trailer crossing the highway, Tesla said. The car attempted to drive full speed under the trailer, “with the bottom of the trailer impacting the windshield of the Model S”, Tesla said.” The driver died. The AI functioned perfectly. But, the error in the data set killed him.

So, I fixed the error in the data set (probably caused by not using the right values in InkScape when I converted the Antietam Water.bmp into paths) and imported it back into the Antietam map using the General Staff Map Editor, saved it out, and ran the AI Editor again and saw this:

The AI did not display a yellow path from the center of the Blue Battle Group to the Red Retreat Point because none existed. Instead, it just wrote the first Predicate Statement in the Tactical Analysis stack: “Red’s flanks are anchored”.

Again, the machine was performing perfectly. And its results were no longer surprising.

Addendum

I recently got to experience this again (though this time it was caused by a different data bug) when I was reviewing the AI’s decisions at the battle of Manassas:

Because the Range of Influence was not calculating the very bottom row the AI found another, perfectly legal, way to reach its goal. Screen shot from the General Staff AI Editor. Click to enlarge.

In this instance, the error in the database was caused by the Range of Influence (basically a map of what red and blue can see and hit) not calculating the very last row. Consequently, the AI was able to legally trace a path from the blue forces in the northeast to their goal at the bottom of the map.

After this bug was corrected the AI performed as expected:

The AI correctly sees going around red’s left flank as the solution to the problem. Screen shot from General Staff AI Engine. Click to enlarge

In the above screen shot the AI has demonstrated the correct solution to the tactical problem facing blue at Manassas on July 20, 1861 (the day before the actual battle). Red’s left flank is unanchored. It’s wide open. Note how the AI identifies the one choke point (Sudley Springs Ford) in the plan.

So, the AI surprised me again. I think it’s looking pretty good. When you play against it, watch your flanks.

Movement & Maps

Screen shot showing unit movement arrows for the battle of Antietam scenario. Note how movement is stopped by the small creek in the upper left hand corner of the screen. Click to enlarge.

I‘m in self-quarantine. As many of you know, I had a bone marrow / stem cell transplant in 2014 followed by a year of intense chemo. I’m fine (all things considering) but my immune system took a beating. In 2014 H1N1 put me in the hospital for 3 days so I’m taking COVID-19 seriously as, uh, the plague. In a way, being cooped up in the house (the weather hasn’t been cooperating, either, as I had hoped to replace my daily gym workout with long walks with my dog, George) is a lot like a typical upper Midwestern winter: it’s what I call ‘good programming weather’. There’s not much else to do but hunker down and write code. So, obviously, I’m working on General Staff and I wanted to show you an update (above).

General Staff is being written in C# and Windows Programming Foundation (WPF). There are a number of technical reasons why this was a good idea but I’m not overly familiar with WPF and doing some basic things, like creating these transparent movement arrows, took far longer, and involved a lot more programming, than I thought it would.  My partner on this project, Andy O’Neill, is a WPF rockstar; I’m a novice. I would much rather be working on the ‘under the hood’ stuff (like AI) but for the last week or so I’ve been working on movement arrows while Andy is busy with another project (the kind that pays the rent). Anyway, I’m very pleased about how they turned out. Please feel free to write me with comments.

Movement arrows for units at Quatre Bras. Note how blue units are stopped by the stream feeding the large pond. Click to enlarge.

Forward movement of this blue division is stopped by this tiny creek.

But, I also discovered a very interesting problem while testing these movement routines: our maps are too good! If you look at this detail (right) from the Antietam screen capture (above), you’ll see that movement is stopped when it encounters a tiny creek. I’ve walked that area of the Antietam battlefield and that little creek (well, I think it would be more properly called a ‘crick’) wouldn’t stop a division moving forward. However, the movement validation routines stop units from crossing bodies of water (except in column formation while crossing a bridge or a ford).  Ed Kuhrt, who digitized these great maps and copied every small detail was, perhaps, too precise. Definitely better to err on the side of being too precise when it comes to maps, Ed.

We’re seeing the same thing at Quatre Bras (above): the little streams that feed Materne Pond (Etang Materne) are also stopping the French from attacking. I haven’t been to Quatre Bras but I know the French crossed the small streams to attack the Anglo-Allied army’s positions.

Luckily, fixing this is easy. If you have done any work with the General Staff Map Editor you know that erasing terrain features, like water, is quick.

Removing the water in the little stream that feeds Antietam Creek by placing a ‘field’ over the water. Note that the ‘Field’ object is ‘above’ the ‘River’ object on the left Edit Terrain tab. Screen shot. Click to enlarge.

In the above screen shot we’ve opened the Antietam map in the General Staff Map Editor and drawn a ‘Field’ over the ‘crick’ that kept the Union forces from advancing. Note that both the Field and the River are objects and whichever object is higher in the list on the left ‘overwrites’ lower objects. If, for whatever reason, we wanted to restore the water in the creek we could either delete the Field or move it lower down the list than the River object.

Edit: After originally posting this, some readers (see comments, below) suggested that units crossing a small stream should suffer a movement penalty. This is absolutely correct. Instead of ‘painting’ with ‘field’ terrain, I should have used ‘mud’. This allows for a movement penalty (set in the Scenario Editor).

Adjusting unit type speeds across various terrain types in the General Staff Scenario Editor. Screen capture.

And now that that obstacle to movement has been eliminated the I and XII Union Corps can advance:

Now that the water has been removed from the little stream feeding Antietam Creek the Union forces can advance again. Screen shot.

As always, I would love to hear any comments or feedback that you may have.

What’s Taking So Long?

This is what a brilliant game publisher looks like: Marten Davies. I was looking for a photo of Marten from the ’80s and I found this 2019 photo (credit: University of Texas). This is exactly what he looked like in ’87. He hasn’t aged a day.

Marten Davies, my first publisher and still a close friend, was painfully accurate when he said, “Take any time estimate that Ezra gives you and multiply it by three.” Now, in my defense, Marten probably said that because I had a contractual obligation to deliver UMS: The Universal Military Simulator in some insanely short period of time like six months and I actually delivered it in eighteen. To my credit I delivered a #1 game (Europe and US). To Marten’s credit, he was very easy to work with and it remains the best experience of my career. The bottom line was that Marten knew that I needed more time to make a better game and he made sure I got it.

So, what’s the hold-up? Well, that would be me, again.

Specifically, it’s the AI.  As many of you know, I’ve been working on AI for wargames for a long time and I was hoping to turn General Staff into a showcase for my work. Some of this has been accomplished 1) Antietam & AI . These are the algorithms that I’ve written about in my doctoral thesis and in various published papers.

The MATE2)Machine Analysis of Tactical Environments, see http://riverviewai.com/ set of tactical AI routines built upwards from low level routines; like 3D Line of Sight (3DLOS) 3) https://www.general-staff.com/tag/3d-line-of-sight/ , Range of Influence (ROI), and least weighted path algorithms 4) https://www.general-staff.com/tag/least-weighted-path-algorithm/ to battlefield analysis 5) Algorithms for Generating Attribute Values for the Classification of Tactical Situations.: http://riverviewai.com/papers/Algorithms-Tactical_Class.pdf , to selection of objectives 6) https://www.general-staff.com/antietam-ai/ , and the implementation of offensive maneuvers 7) Implementing the Five Canonical Offensive Maneuvers in a CGF Environment.:http://riverviewai.com/papers/ImplementingManeuvers.pdf to achieve those objectives.

So, given a list of objectives the AI can implement a tactical plan (Course of Action, or COA); but the AI doesn’t have any comprehension of the greater strategic picture. For example, MATE’s analysis of Gettysburg is that Blue8)MATE always labels the attacker as blue (Confederates) should not attack because Red (Union) has interior lines, a superior defensive position, and greater troop strength.

MATE representation of Gettysburg: Confederates (blue), Union (red). MATE screen shot. Click to enlarge,

MATE output analysis of Gettysburg. Confederates (BLUEFOR) should not attack because REDFOR (Union) has interior lines, a superior defensive position, and greater troop strength.

But, what the AI doesn’t understand is that the Confederates were desperate for a victory on Union soil which required them to attack at Gettysburg.

Screen capture of the Battle of Little Bighorn in the General Staff Scenario Editor. Click to enlarge.

Or consider the tactical positions at the battle of the Little Bighorn (above). My goal is to write a human-level tactical AI and, clearly, the historical attack (splitting forces) by Blue (7th Cavalry) against the far superior Red (Native American) forces was very ill advised (perhaps calling into question the definition of ‘human-level tactical AI’).

After a lot of thought I realized that I needed to create an AI Editor program. You use the Army Editor to create armies for the General Staff Wargaming System, the Map Editor to create maps, the Scenario Editor to place armies on the map and now you use the AI Editor to quickly and easily select strategies for an army. For example:

Screen shot of the General Staff AI Editor being used to program AI strategies for the Union forces at Antietam. Click on a battle group and select strategies from the drop down menus. Click to enlarge.

The AI Editor is very easy to use. You just load a scenario (created in the Scenario Editor, of course) tell the AI to separate the units on the field into battle groups (this creates unique groups based on proximity rather than the Order of Battle hierarchy) and then select strategies from the drop down menus. It’s important to note that these units won’t follow the direct paths between objectives; those are just there to show the order of Objectives. The MATE AI algorithms will be engaged to actually move units on the battlefield and implement tactical maneuvers like envelopment and turning attacks. Also, note the AI Editor creates one set of strategies that the AI will follow, if so instructed, when you actually play a simulation. You will also have the  option to let the Machine Learning algorithms select strategies as well though these may not follow historical strategies.

It took less than a minute to set up Custer’s strategy at Little Bighorn:

Screen shot from the General Staff AI Editor showing Custer’s historical strategy at Little Bighorn. Click to enlarge.

With the creation of the AI Editor the last piece is in place for the General Staff Wargaming System. We now have nine battlefield maps with more on the way (we’re hoping to ship the finished game with about 20 battlefield maps) and fifteen armies (we hope to have about sixty when we’re finished). We’re now registered with Steam and are getting our ‘store’ set up. We will be using Steam for player vs. player games. With a bit of luck we’re hoping to start player vs. player testing in about sixty days.

As always, please feel free to contact me directly with questions, comments or complaints. I’m sorry for the delay, but we’re creating something that hasn’t been done before and that always takes a bit longer.

References

References
1 Antietam & AI
2 Machine Analysis of Tactical Environments, see http://riverviewai.com/
3 https://www.general-staff.com/tag/3d-line-of-sight/
4 https://www.general-staff.com/tag/least-weighted-path-algorithm/
5 Algorithms for Generating Attribute Values for the Classification of Tactical Situations.: http://riverviewai.com/papers/Algorithms-Tactical_Class.pdf
6 https://www.general-staff.com/antietam-ai/
7 Implementing the Five Canonical Offensive Maneuvers in a CGF Environment.:http://riverviewai.com/papers/ImplementingManeuvers.pdf
8 MATE always labels the attacker as blue