Category Archives: Survey

How Will You Play General Staff?

Every wargame that I’ve designed allows the user to adjust important variables such as leadership and morale and how they affect combat. Usually included is the ability to design your own armies, maps and scenarios as well. However, with the General Staff Wargaming System we’ve added a new feature: the ability to control the realism level before playing a scenario.

The General Staff Wargame has two basic levels of play:

Simulation mode uses HQ units and a chain of command that passes orders down from the General HQ to the sub-commander to the individual unit. How fast the unit responds to the orders are affected by the distance that the courier must travel and the Leadership Value of the HQs.  Simulation mode also employs a more detailed combat resolution model and tracks the actual number of troops in every unit.

An example of Simulation Mode: the path (red line) and time (16 minutes) it will take for a courier to travel from JEB Stuart’s HQ to Munford’s cavalry with orders. Click to enlarge.

Kriegsspiel mode does not have HQ units and friendly units are moved directly and immediately (no transmission of orders via couriers). The combat resolution model is simpler and units have a value of 1-4 displayed by the number of unit icons on the map.

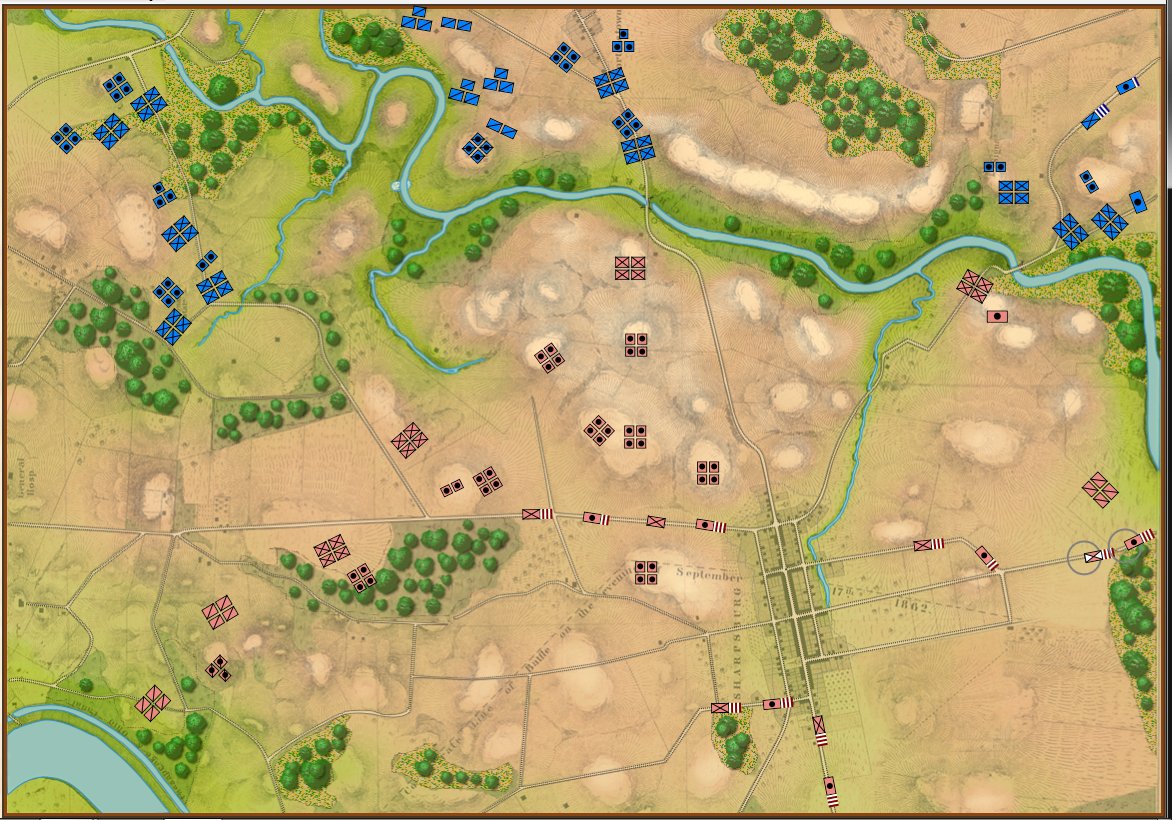
Antietam in Kriegsspiel mode. Notice that there are no HQ units (so no couriers to deliver orders) and units are represented by 1-4 icons. Units in column have a ‘tail’ that indicates the unit strength. Click to enlarge.

In addition to the two game modes (Simulation and Kriegsspiel) there are three Scenario Options:

Order of Battle (OOB) displayed / not displayed. Enemy units with known positions appear dark; enemy units ‘on the map’ but with unknown locations appear grayed out. This, of course, gives the user complete knowledge of the enemy’s OOB and, more importantly, knows when units from certain formations are not directly observable.

A mock up of how the Order of Battle option will appear (note this image was created from screen captures of the Scenario Editor and the Sand Box). Click to enlarge

Only friendly units directly observed by the General HQ are displayed. All other friendly units fade at their last known location. Couriers bring in unit location updates, but they are outdated by the time they arrive.

Only enemy units directly observed by the General HQ are displayed. All other enemy units fade at their last known location. Couriers bring in unit location updates, but they are outdated by the time they arrive.

If both of these above options are selected (only friendly and enemy units that are directly observable by your commanding General HQ) you will be simulating the Fog of War that field commanders of the age of gunpowder experienced.

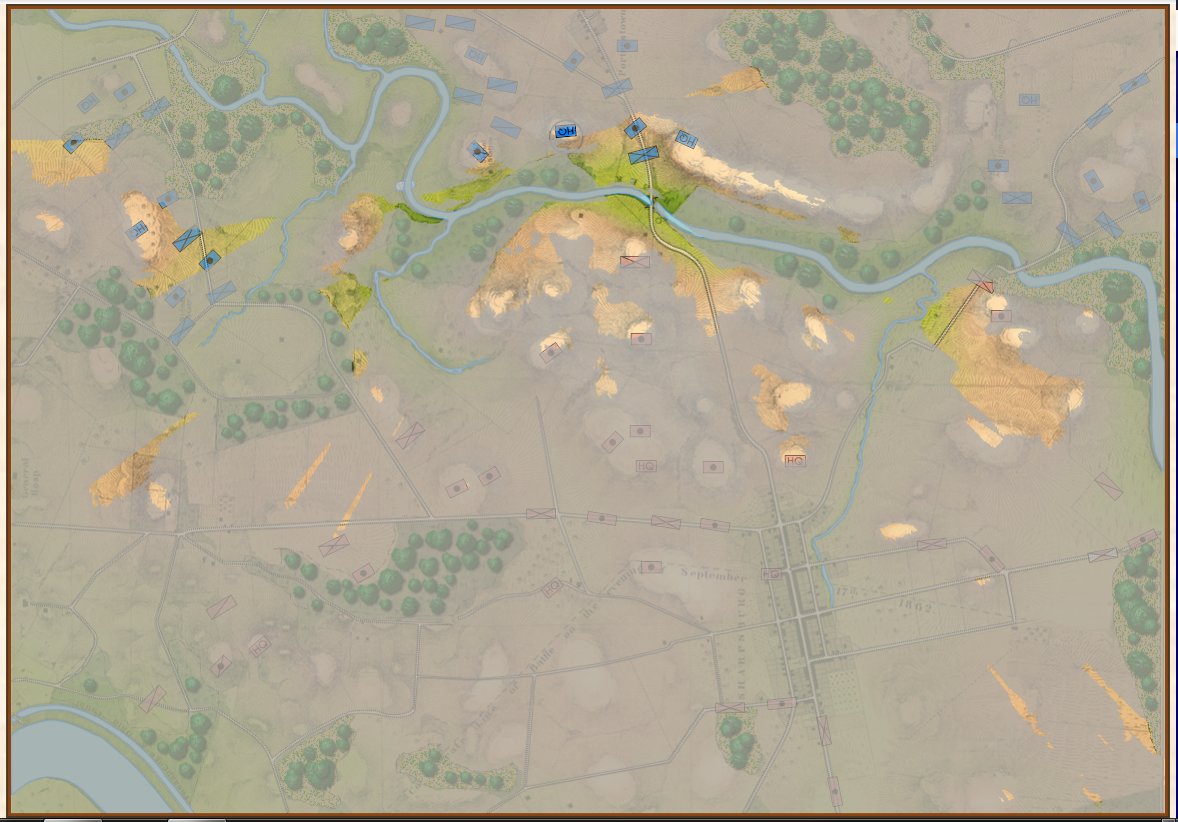
What General George B. McClellan could actually see at Antietam. Screen shot (General Staff Sand Box). Click to enlarge.

We would like to hear from you and get your opinion on what realism features you will use in General Staff:

Free Scenarios Twenty-One Through Twenty-Five

We asked you for your Top 30 battles that you would like to see included free with General Staff for supporters of our Kickstarter campaign. We have previously announced the first twenty vote-getters. Today we are announcing the next five. One of the interesting features of General Staff is the ability to combine any two armies with a map to create a scenario. We use this feature for two day battles (such as Wagram and 2nd Bull Run) effectively creating two completely different battles (with two different armies) but using the same battlefield map.

This map of the battle of Alma was created only two years after the battle. Click to enlarge.

The battle of Alma is our first foray into the Crimean War. The Russians, though outnumbered, have the heights with their guns entrenched in heavy fortifications. The British and the French suffer numerous communication breakdowns. The battle seesawed back and forth until a final assault by the Highland Brigade carried the day and the Russians broke and fled from the battlefield. Playing the Allies will test your ability to coordinate attacks via messengers. Playing the Russians will require skillful coordination of counterattacks.

Wagram was a two day battle with the first day involving crossing the Danube. Click to enlarge.

On May 21st and 22nd Napoleon had attempted to cross the Danube at Lobau Island only to be turned back by Archduke Charles. Now, after over a month of preparations and reinforcements, Napoleon was ready to try again.

We present two distinct scenarios for the battle of Wagram: the first representing the situation on July 5th and Napoleon’s second attempt at crossing the Danube and establishing a beachhead and the second the battle of July 6th in which Archduke Charles attempted a double envelopment of Napoleon’s army. Only Napoleon’s hastily created ‘grand battery’ of artillery, a desperate cavalry charge and a counterattack by MacDonald’s corps saved the day. The Austrians eventually broke and fled the battlefield and sued for an armistice which ended the 1809 war.

Plan of the second Battle of Bull Run Va. Showing position of both armies at 7 p.m. 30th Aug. 1862. From the Library of Congress. Click to Enlarge

After General George McClellan’s disastrous Peninsula campaign, President Lincoln appointed Major General John Pope to lead the newly formed Army of Virginia and was tasked with the missions of protecting Washington D.C. and clearing the Shenandoah Valley of Confederates. McClellan, who never responded promptly to orders even in the best of circumstances, simply ignored commands to begin transferring his army from the peninsula southeast of Richmond up to Pope in front of Washington. Lee, knowing that McClellan had a bad case of the ‘slows’ took advantage of his interior lines to rapidly move his forces north to destroy Pope before McClellan’s troops could reinforce him.

The battle on the old Mananas battlefield began on August 28, 1862 with Jackson (commanding the left wing) shelling the passing Union column of King’s division (which included the soon to be famous Iron Brigade). The Iron Brigade, though outnumbered, attacked and fought Jackson’s famous division to a standstill. However, Jackson’s attack was primarily a feint employed as a ‘fixing force’ for an envelopment maneuver; Longstreet’s corps was expected to appear on the Union’s unprotected left flank.

On the second day, August 29th, Pope attempted to initiate a double envelopment against Jackson. However, Longstreet had now appeared on the battlefield at exactly the wrong place for Pope’s envelopment maneuver. The day was marked with incredibly poor communications between Pope and his subordinates and ended mostly as it began with neither side gaining or losing much ground.

The third day, August 30th, began with Longstreet’s counterattack on the Union’s exposed left flank. Again, incredibly poor communications between Pope and his subordinates turned a bad situation into a disaster. Unlike the first battle of Bull Run, the Union army fell back on Washington in an orderly column through an extremely limited avenue of retreat over Bull Run.

What 18th and 19th Century Battles Would You Like to Receive with General Staff?

We have decided to reward backers of General Staff on Kickstarter with thirty (yes, thirty!) battles / scenarios for the General Staff Wargaming System. They can be any battle, skirmish or detail of a battle (think the Peach Orchard at Gettysburg, for example). The only restrictions are they should be battles with a limit of about thirty units per side (the map just gets too crowded with more than 60 units running around) and there should be two superior levels of command (e. g. if we were to do Gettysburg there would be the  Army Commander and the Corps Commanders with divisions being the units represented on the map).

Let your imagination run wild! What battles, scenarios or skirmishes would you like to see? Please post in the comment section below, or use this handy Contact Us email form or write to me directly at Ezra [at] RiverviewAI.com

Screen capture of a scenario using a map of Trenton and General Washington’s Continental Army. Click to enlarge.


Results of the Splash (Hachure) Contours vs. Concentric Elevation Contour Survey

The results of our survey to determine if you preferred splash (hachure) contours or concentric lines to represent elevation on General Staff maps are in: 58.21% voted for concentric contour lines and 41.79% voted for splash or hachure contour lines.

The results of our splash (hachure) contour lines versus concentric contour lines survey. 58.21% for concentric contour lines, 41.79% for splash contours.

However, while waiting for the results of the survey we wound up writing a splash (hachure) contour algorithm anyway:

An example of splash contours.

This isn’t perfect and we’ll continue to optimize it. However, General Staff will now include both methods of displaying elevation on a map: splash (hachure) and concentric elevation lines.

Help Us Decide: Splash Contours or Elevation Contours?

We need your input on how elevation (hills and ridges) will be displayed in General Staff. Originally we had planned on using ‘splash contours’. Splash contours were often used in quick sketch maps on the battlefield and they have an authentic look to them.

An example of a splash contour representing a hill (artwork by Ed Isenberg).

However, recently “Cry Havoc” – a Grognard on Facebook – asked if we were going to include the original Kriegsspiel Meckel map with General Staff. That got us thinking and taking another look at the original Kriegsspiel maps. Below is a map from the original American Kriegsspiel (circa 1892-8):

An original American Kriegsspiel map (circa 1892). Note the elevation contour lines. Click to enlarge.

Obviously, concentric elevation contours were in use in the 19th century so we could be authentic using either method of display.

This leads us to a very simple user survey:

[os-widget path=”/drezrasidran/splash-contours-or-concentric-elevation-contours” of=”drezrasidran” comments=”false”]