Tag Archives: Manassas

A Human-Level Tactical Artificial Intelligence at Bull Run

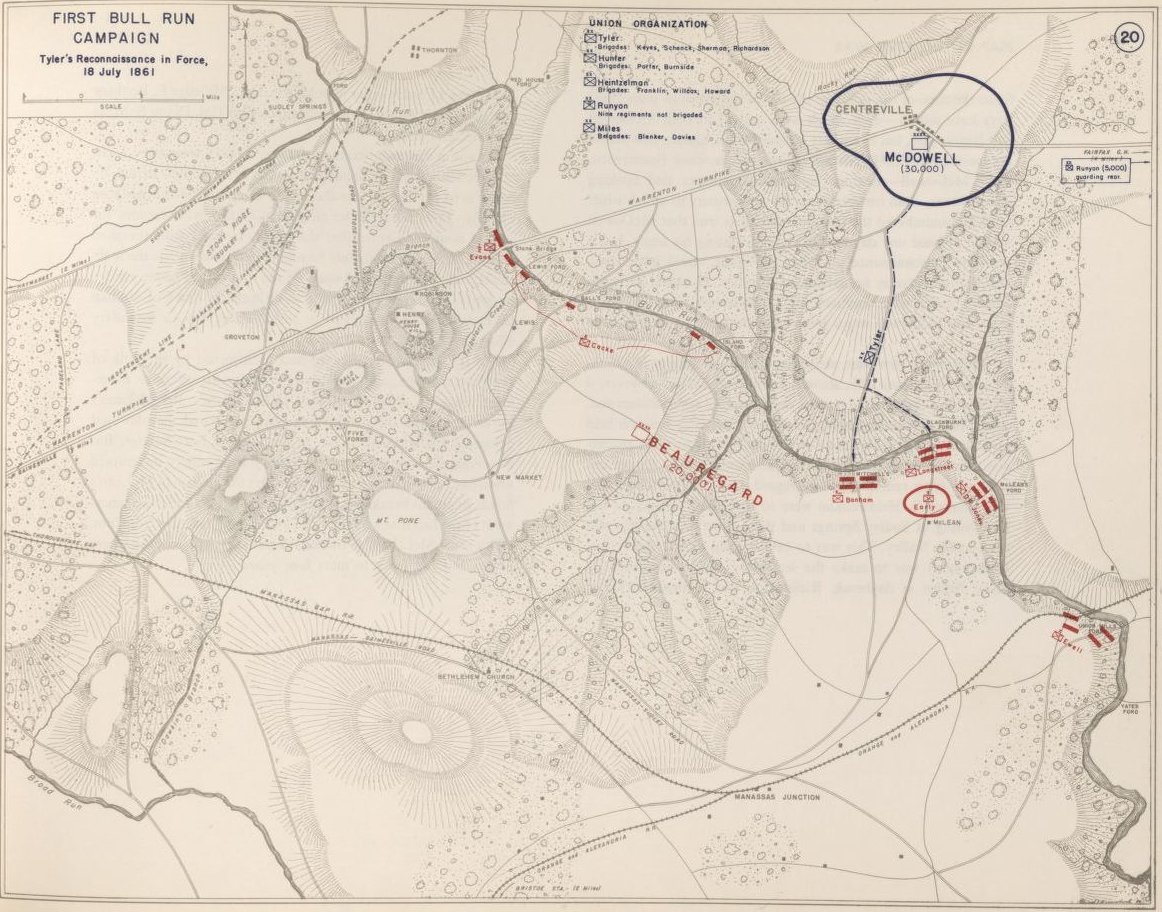
West Point Atlas Map 20; the situation near Manassas & Centreville, July 20, 1861. Click to enlarge. From the Library of Congress; original source.

I‘ve been looking for interesting tactical problems for MATE1)Machine Analysis of Tactical Environments 2.0 to solve and I found a good one after reading William C. Davis’s Battle at Bull Run.2)1995, Stackpole Books,  Mechanicsburg, PA The actual battle (called 1st Bull Run by the Union who named battles after nearby waterways and 1st Manassas by the Confederates who labeled battles from nearby geographic features and cities) was a tragicomedy fought on July 21, 1861 in which both commanders (Irvin McDowell for the Union and P. G. T. Beauregard for the Confederates) had little control of their own forces after their initial battle orders were given. Indeed, the battle came down to a series of charges up and down Henry Hill with units committed piecemeal as they arrived on the field. Large elements of both armies were never committed. All in all, not a particularly interesting tactical situation for MATE to analyze.

However, the tactical position the day before (see West Point Atlas map #20, above) is quite a different situation. The Union army is massed at Centreville (Washington, D. C. is off the map, about 30 miles to the east). The two armies are separated by Bull Run which can only be crossed at eleven fords and bridges. Confederate general Beauregard is certain that McDowell’s attack will be almost due south from Centreville and will cross Bull Run at Mitchell’s and Blackburn’s fords. He has assembled almost all of his forces there. This is a tactical situation of which avenues of attack are open and which are closed.

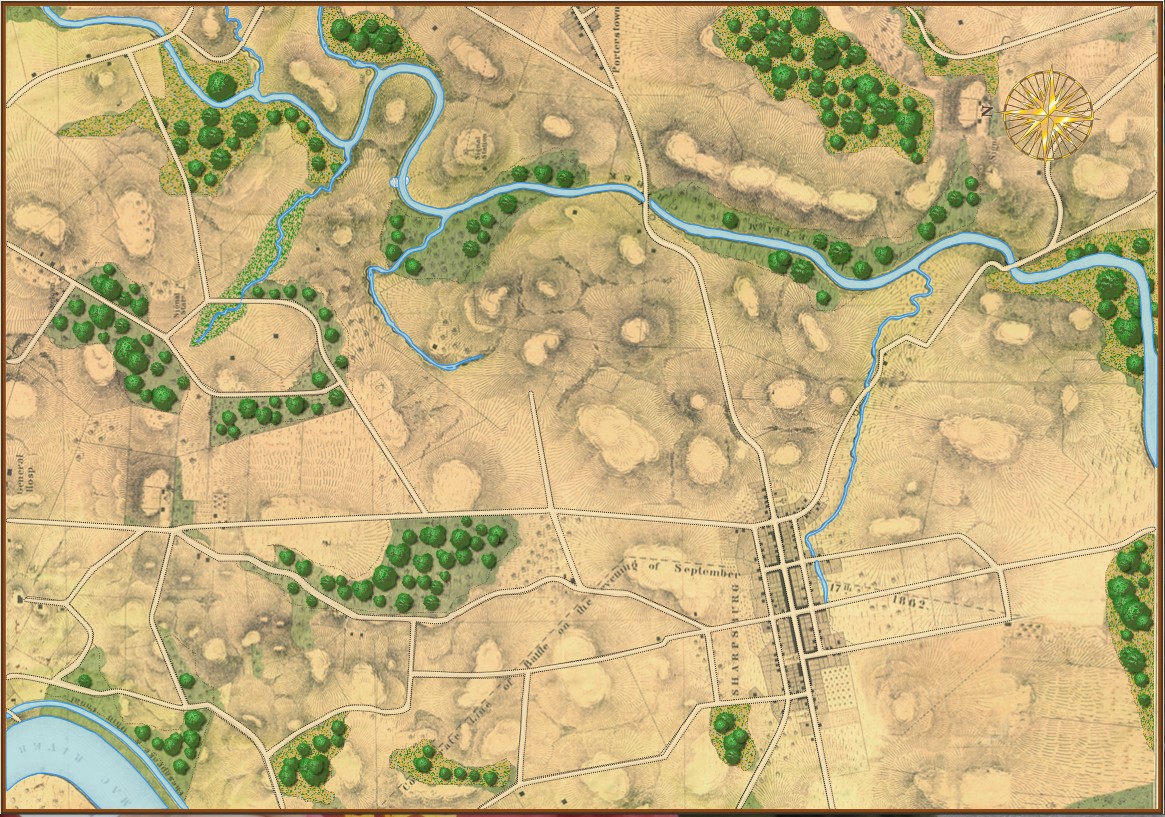
Troop positions and topographical data fed to MATE for this analysis come from the McDowell Map, below:

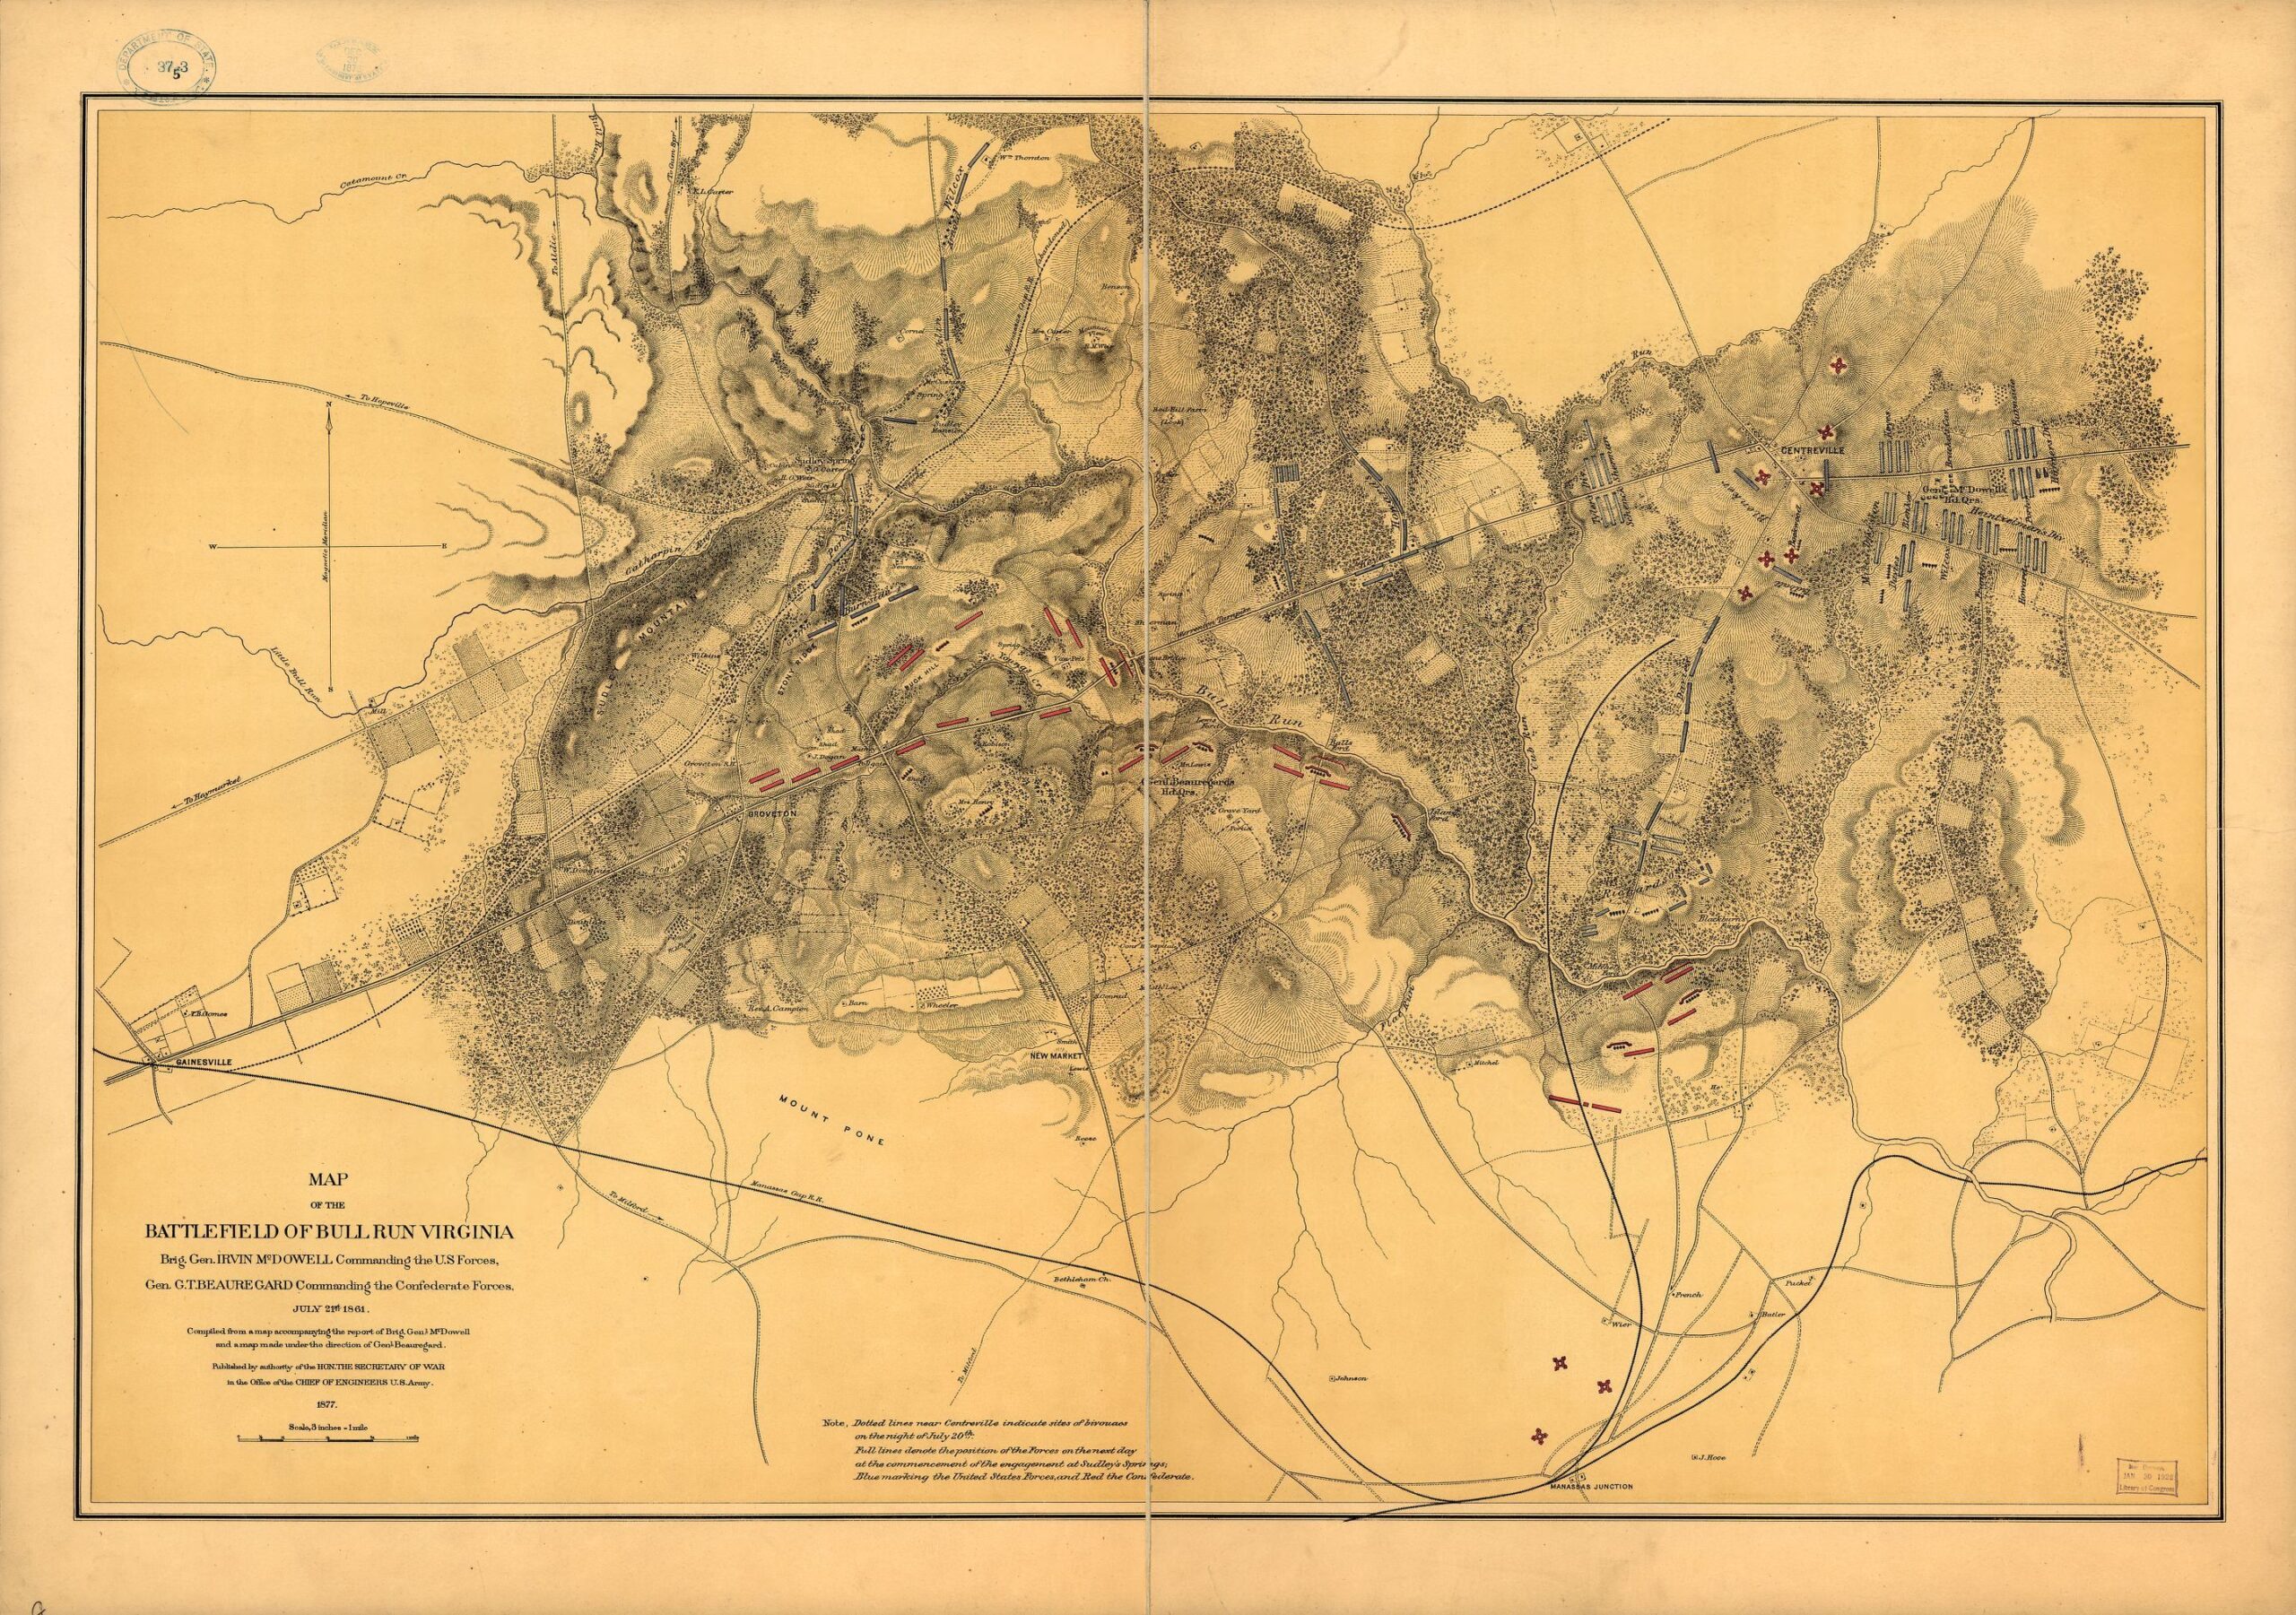
Map of the battlefield of Bull Run, Virginia. Brig. Gen. Irvin McDowell commanding the U.S. forces, Gen. [P.] G. T. Beauregard commanding the Confederate forces, July 21st 1861 from the Library of Congress. Click to enlarge.

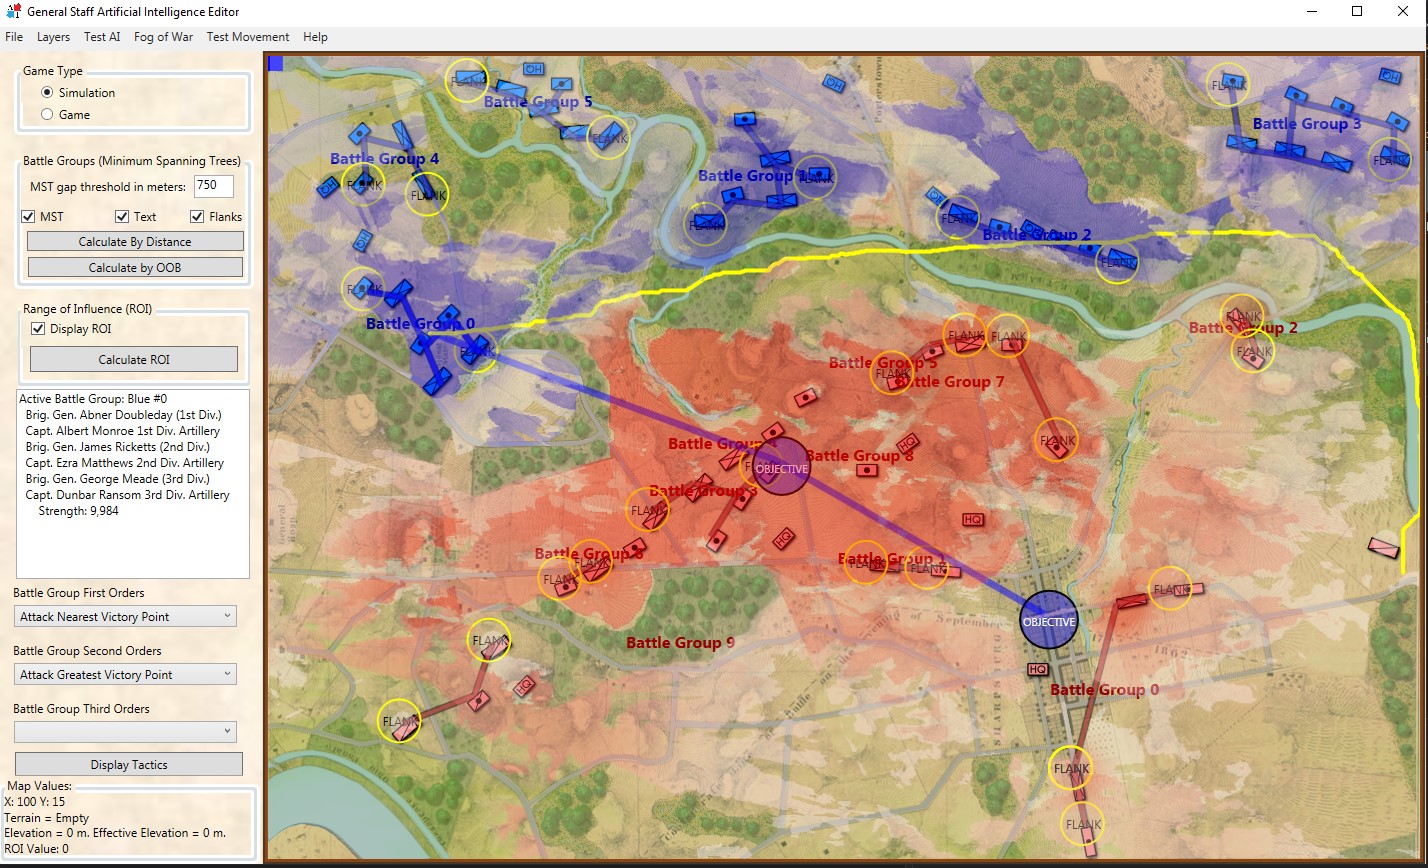
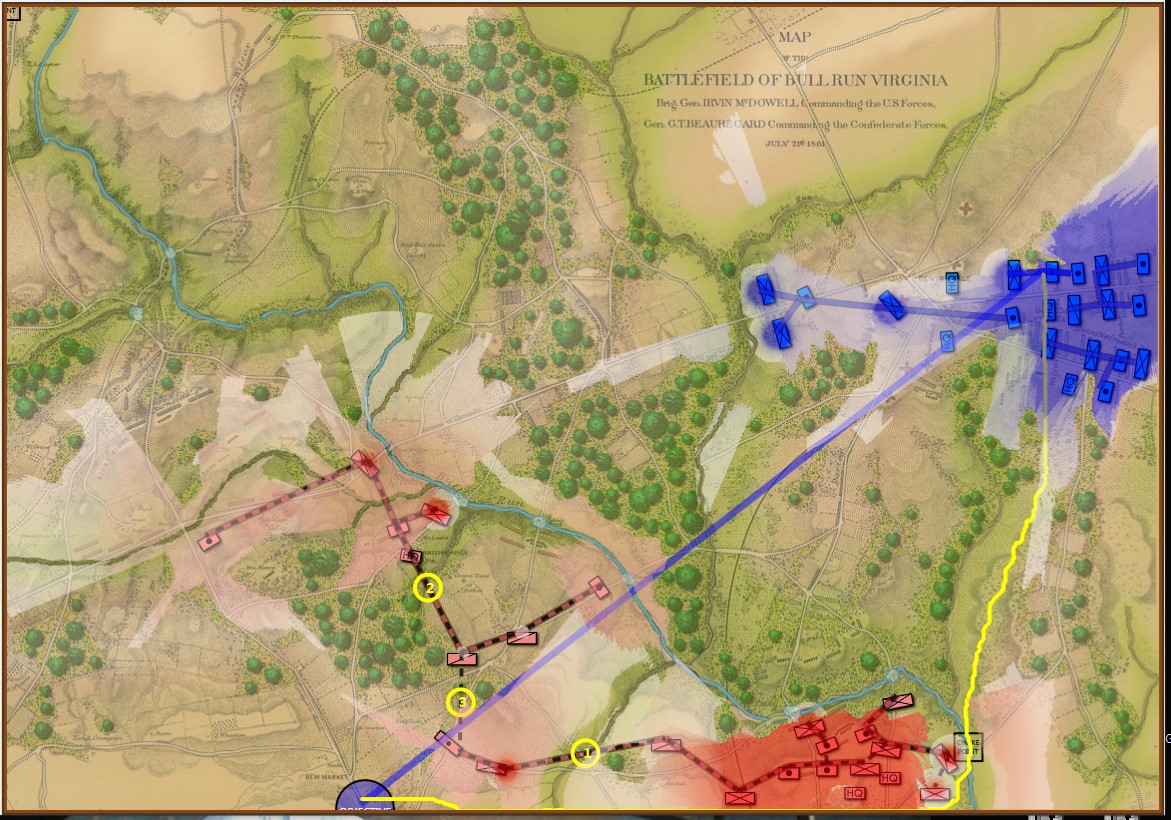
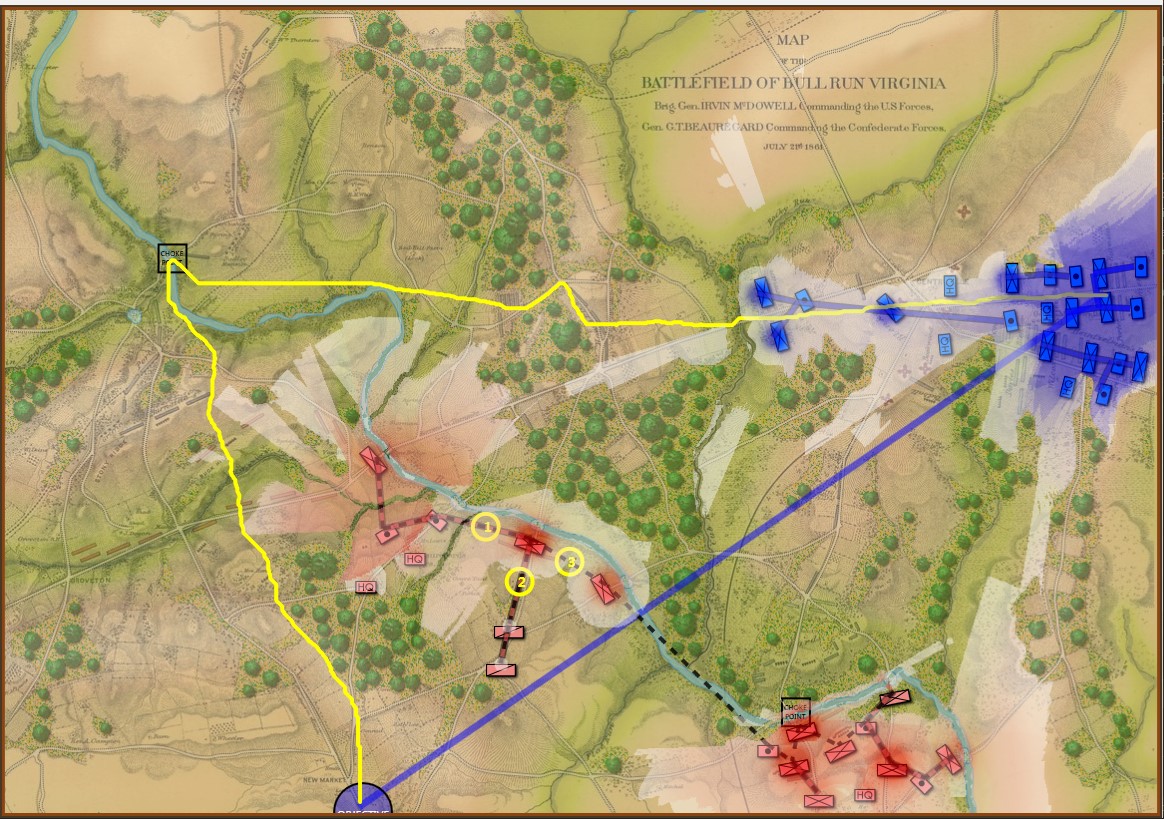
MATE’s assessment of this situation from the Confederate (RED) perspective is below. I use a program called the AI Editor (which, ironically, doesn’t actually edit AI) to observe what MATE is thinking and seeing.

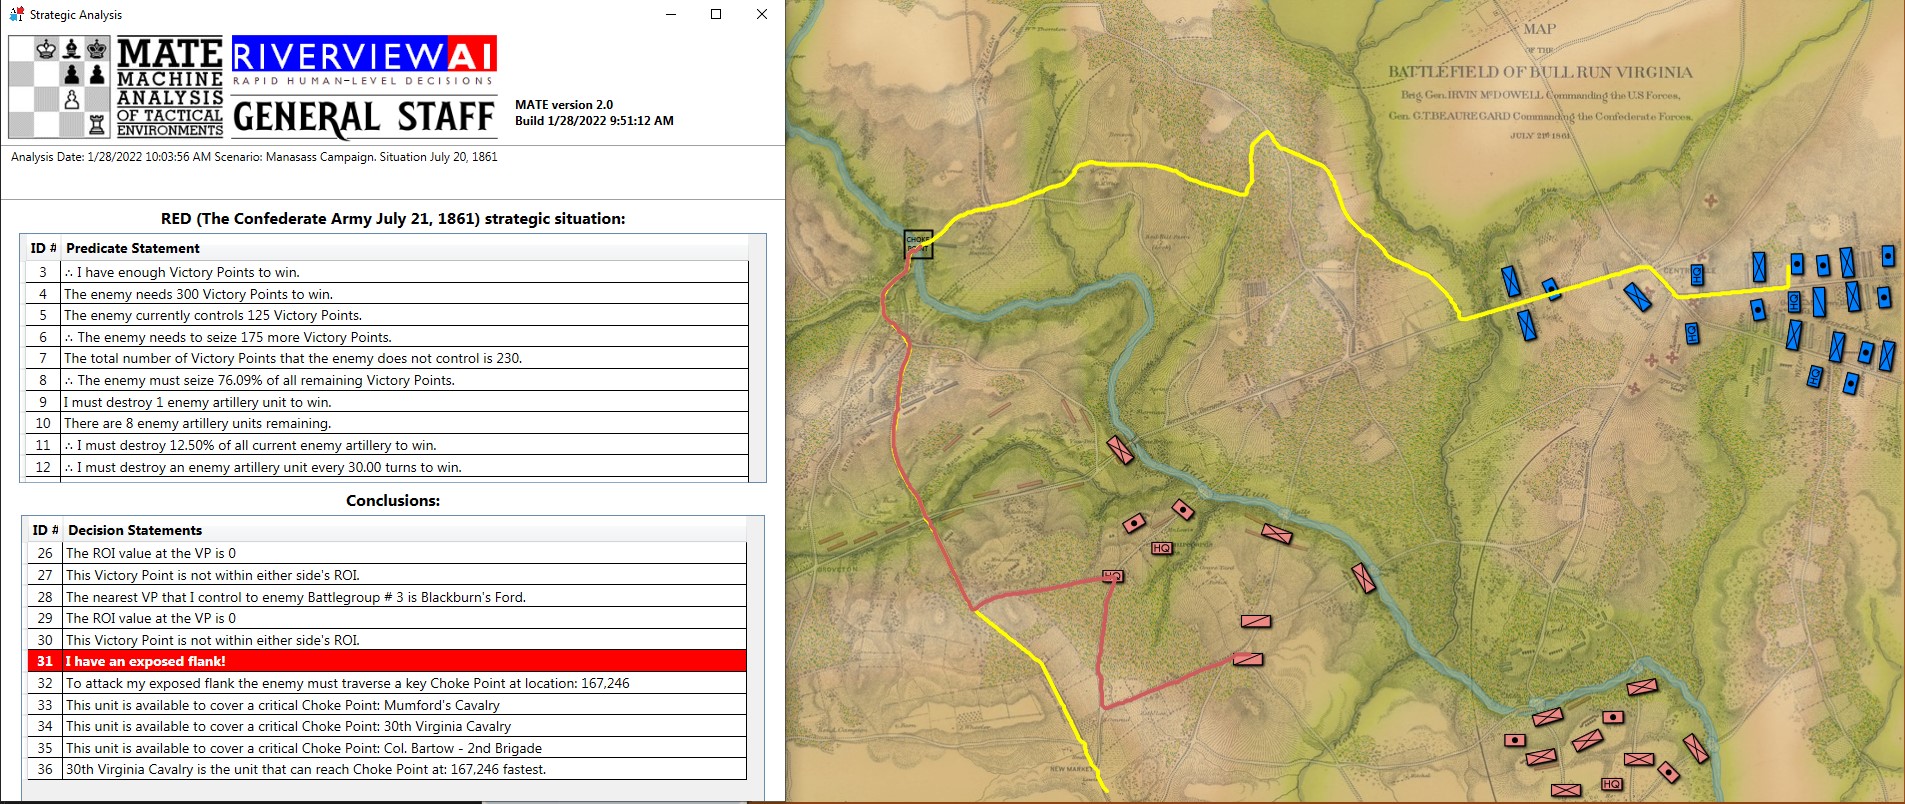
Screen shot of the AI Editor. Click to enlarge.

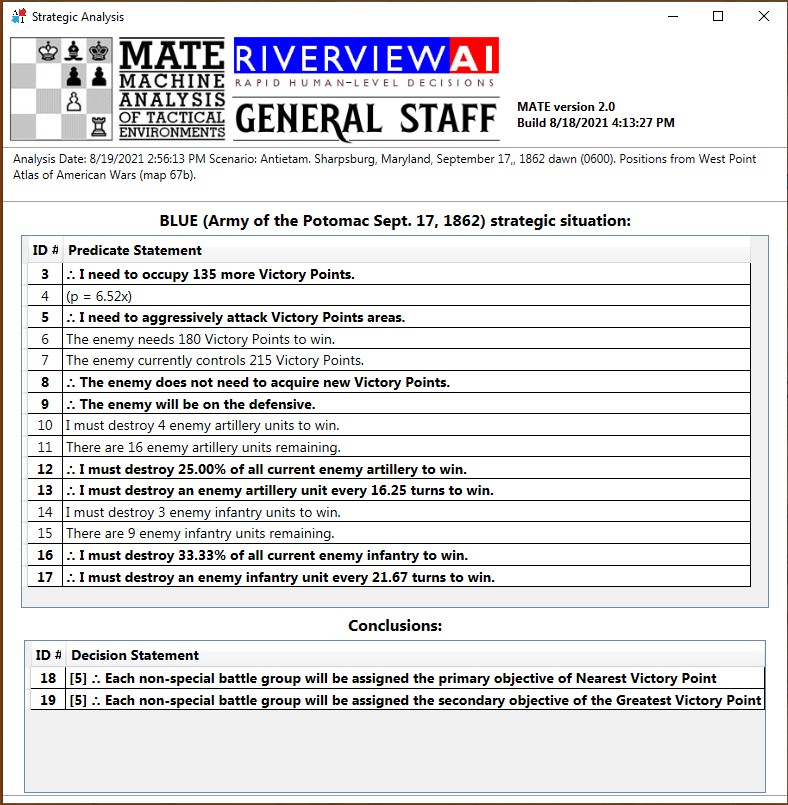
The left window contains a series of predicate statements, conclusions and inferences. Predicate statements to MATE are simple factual statements that MATE knows to be true; e. g. statement #4: The enemy needs 300 Victory Points to win is a basic factual statement. MATE can combine statements (such as #4 and #5: The enemy currently controls 125 Victory Points) to come to a logical conclusion (indicated by beginning the new statement with logical symbol ”∴” or therefore): #6∴ The enemy needs to seize 175 more Victory Points.

The left window is divided into two windows of scrolling text. I printed out the complete list of all statements and conclusions and added commentary (below) so you can follow the thread of MATE’s thought processes:

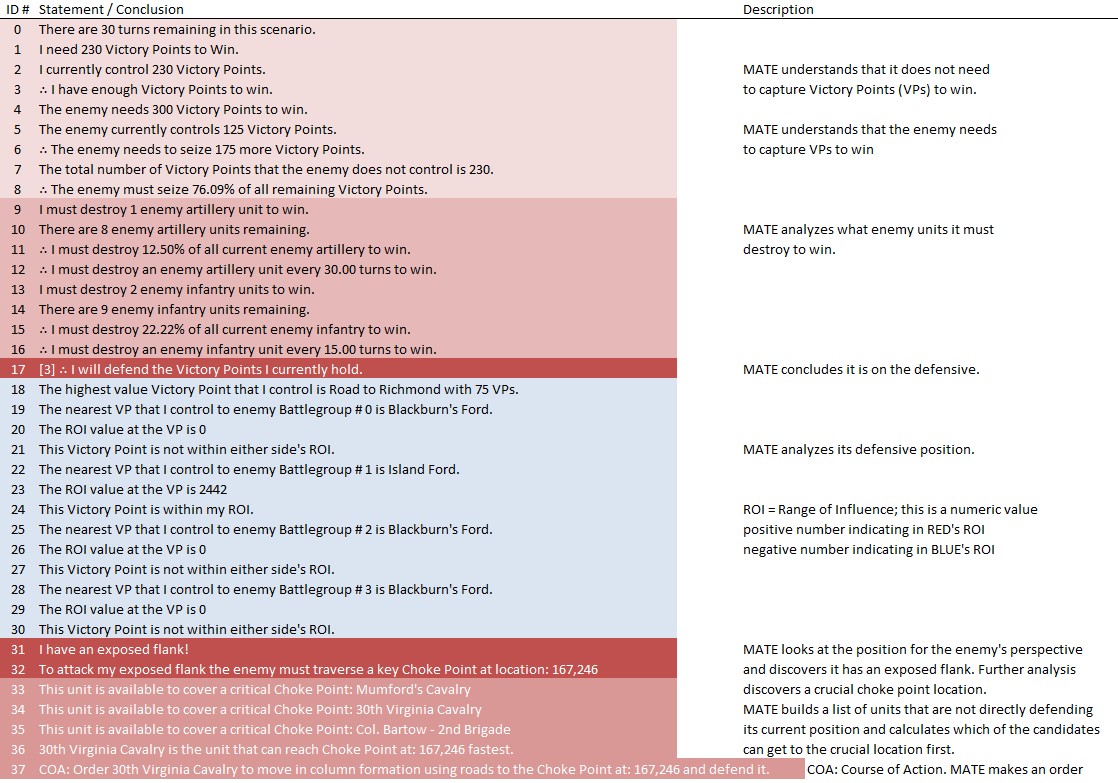
List of premises and conclusions with commentary from MATE’s analysis of Manassas. Click to enlarge.

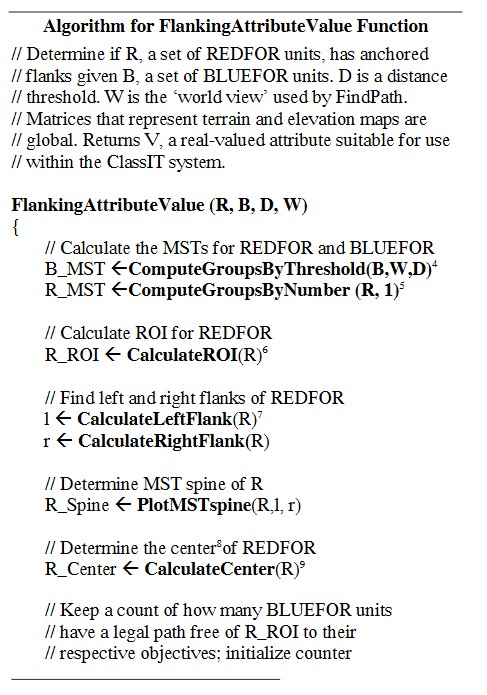
The right window shows the graphic output of some of MATE’s views of the battlefield (see Layers: Why a Military Simulation Is Like a Parfait). In the above screen shot it is displaying the terrain and elevation layers of the map plus all RED and BLUE forces. The yellow line is how MATE would attack if it were BLUE. Yes, that is correct. MATE analyzes its own defensive position by planning to attack it from the enemy’s perspective. The yellow line (the path using the road net) is how it would turn its own flank. It was this analysis that triggered the creation of statement #31: I have an exposed flank! To see the complete algorithm click here (PDF). The Red line is the optimal route of the 30th Virginia Cavalry to Sudley Ford indicated on the screen by the black box labeled CHOKE POINT.

MATE’s analysis of Manassas certainly appears to be a reasonable analysis and solution to this tactical problem.  It also generated a COA (Course of Action) ordering a regiment of cavalry to secure a critical choke point. This, in fact, was better than Confederate General Beauregard’s actual performance.

Is there more work to do? Certainly. MATE uses heuristics. Here is the classic definition of heuristics: “A heuristic function, also simply called a heuristic, is a function that ranks alternatives in search algorithms at each branching step based on available information to decide which branch to follow.”

Here is my definition of a heuristic: a function that groks3)to understand profoundly and intuitively from Heinlein’s Stranger in a Strange Land the problem. MATE uses dozens of heuristic algorithms. MATE is pretty good at discovering – and pouncing – on an exposed flank. MATE groks exposed flanks. MATE also groks interior lines, the high ground, the road net, and constricted avenues of attack and retreat. That may not be a long list but it ticks more boxes than most 19th century generals.

References

References
1 Machine Analysis of Tactical Environments 2.0
2 1995, Stackpole Books,  Mechanicsburg, PA
3 to understand profoundly and intuitively from Heinlein’s Stranger in a Strange Land

Why Machines May Kill Us In Our Sleep

An amazing screen capture of the AI’s solution to a problem. It has found a 1 pixel gap between the data and the edge of the screen and is exploiting it to successfully find an ‘open flank’ of Red. Click to enlarge.

Professor Alberto M. Segre was my thesis advisor and one day he said to me, “You know when your AI is really working because it will surprise you.” Today I got to have one of those weird surprises.

The screen shot (above) is a visual representation of what the AI is up to. You won’t get to see this in the actual game. The program that’s running is called the AI Editor which is a bit of a misnomer because you don’t actually edit the AI in it; you mostly just get to observe what it’s doing. There’s a lot of stuff going on in the above image. There are multiple layers visually displaying different types of data (check out the blog – Layers: Why a Military Simulation is Like a Parfaitfor more information about these). But, what interests us are the AI layers: Battle Groups, Objectives, and that thin yellow line that snakes from a group of blue units, crossing Antietam Creek at the Middle Bridge and then, amazingly, exploiting a data anomaly to reach its goal: a point far behind enemy lines.

Some background on the situation:

The map of the Antietam Battlefield (screen shot) with terrain and elevation layers displayed. Click to enlarge.

Underlying all the clutter from the first screen capture, top, is the battle of Antietam (above). The map has been rotated 90 degrees to the left so north is now pointing to the left; east is at the top of the screen.

After adding Blue (Union) and Red (Confederate) units to the map in their historical positions at 0600 September 17, 1862 the AI performed a tactical analysis from the perspective of Blue.

The AI ‘strategic’ analysis for Antietam playing Blue (Union).

The above are a list of Predicate Statements all of which the AI knows to be true. Statements preceded by the logical sign ∴ (therefore) are conclusions, or inferences, derived from the predicate statement referenced in the brackets. It is this analysis that determines if the AI will be on the offensive or defensive and what its objectives will be.

Next, the AI performs Range of Influence (ROI) calculations for the entire observable battlefield. I plan on doing a video about this later, but for now the darker the red (in the topmost screen capture) the more – and more powerful – weapons the Red army can bear on that point.  The AI next divides all the units on the map into a forest of minimum spanning trees called Battle Groups. I want to do a video about this, too. However, if you can’t wait, these subjects are covered in my paper, Implementing the Five Canonical Offensive Maneuvers in a CGF Environment (free download).

Again, referring to the top screenshot you can see the AI’s calculations to this point:

  • It has determined it (Blue) will be on the offensive.
  • It has calculated enemy ROI.
  • It has assigned objectives to the first Battle Group.

Flanking Algorithm published in, “Algorithms for Generating Attribute Values for the Classification of Tactical Situations”. Click to enlarge.

Now the AI needs to determine if the enemy has an ‘open or unanchored flank’. In Algorithms for Generating Attribute Values for the Classification of Tactical Situations I published the Algorithm for Flanking Attribute Value Function (right). It basically comes down to this: can the AI trace an unbroken path from the center of the Blue Battle Group to a specific point (called the Retreat Point) far behind enemy lines without crossing into ‘No Go Areas’ (water, swamp) or entering any area controlled by Red’s ROI (literally the red areas in the topmost screen shot).

The reason that I was using Antietam as a test case for anchored / unanchored flanks is because years ago I had analyzed the battle for my doctoral thesis and knew it to be a classic example of anchored flanks; Lee’s left flank rests on the Potomac and his right flank is anchored on the Antietam. Granted, the Confederate flanks were held by Stuart’s cavalry with a little horse artillery support but they were still, by definition, anchored flanks.

Due to an error in the data that made up the Antietam terrain map a 1 pixel (about 3.8 meter wide) strip of ‘no terrain’ was inserted at the far right hand edge of the map (see blow up of screen capture, right; it’s the thin line between the water, represented in red, and the brown edge of the map). This meant there was a ‘land bridge’ across Antietam Creek where none existed in real life. A digital parting of the Red Sea, if you will. But, by the rules of the game the AI perfectly performed its function. There was no error in the AI – again, the AI performed better than I had dared hope – the error was with the data set.

And that’s how fifty years from now I can see a cyber-detective standing over the chalk marks around a body saying, “Yeah, the machine performed perfectly, brilliantly, in fact. But, the error in the data set killed him.”

It’s already happened in real life. For cars with autopilot the data set of the world in which it operates is crucial. However, “against a bright spring sky, the car’s sensors system failed to distinguish a large white 18-wheel truck and trailer crossing the highway, Tesla said. The car attempted to drive full speed under the trailer, “with the bottom of the trailer impacting the windshield of the Model S”, Tesla said.” The driver died. The AI functioned perfectly. But, the error in the data set killed him.

So, I fixed the error in the data set (probably caused by not using the right values in InkScape when I converted the Antietam Water.bmp into paths) and imported it back into the Antietam map using the General Staff Map Editor, saved it out, and ran the AI Editor again and saw this:

The AI did not display a yellow path from the center of the Blue Battle Group to the Red Retreat Point because none existed. Instead, it just wrote the first Predicate Statement in the Tactical Analysis stack: “Red’s flanks are anchored”.

Again, the machine was performing perfectly. And its results were no longer surprising.

Addendum

I recently got to experience this again (though this time it was caused by a different data bug) when I was reviewing the AI’s decisions at the battle of Manassas:

Because the Range of Influence was not calculating the very bottom row the AI found another, perfectly legal, way to reach its goal. Screen shot from the General Staff AI Editor. Click to enlarge.

In this instance, the error in the database was caused by the Range of Influence (basically a map of what red and blue can see and hit) not calculating the very last row. Consequently, the AI was able to legally trace a path from the blue forces in the northeast to their goal at the bottom of the map.

After this bug was corrected the AI performed as expected:

The AI correctly sees going around red’s left flank as the solution to the problem. Screen shot from General Staff AI Engine. Click to enlarge

In the above screen shot the AI has demonstrated the correct solution to the tactical problem facing blue at Manassas on July 20, 1861 (the day before the actual battle). Red’s left flank is unanchored. It’s wide open. Note how the AI identifies the one choke point (Sudley Springs Ford) in the plan.

So, the AI surprised me again. I think it’s looking pretty good. When you play against it, watch your flanks.