Tag Archives: Defensive AI

A Human-Level Intelligence at Quatre Bras

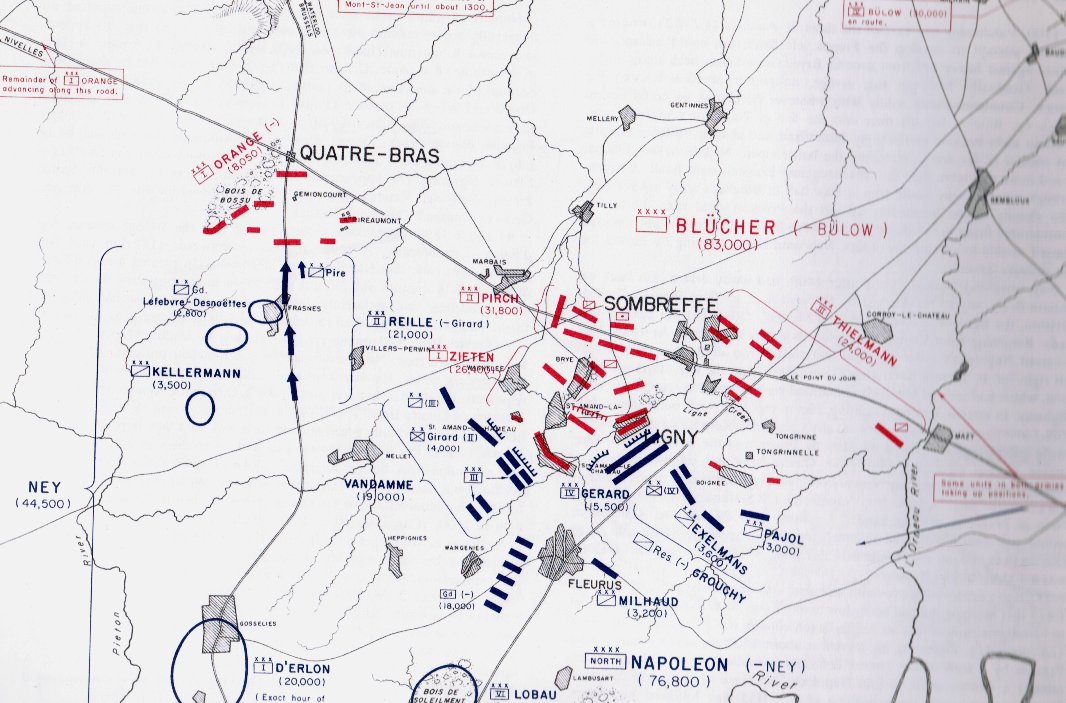
Quatre Bras, June 16, 1815. Click to enlarge

Napoleon has humbugged me, by God!” Lord Wellington swore. “He has gained twenty-four hours’ march on me!” 1)David Chandler, Waterloo: The Hundred Days, Macmillan Publishing Co., Inc. New York 1980, p. 85 And, indeed, he had.

The Armée du Nord, racing north on the roadnet from Paris to Brussels, now occupied the crucial strategic ‘central position’ between the Anglo-Allied army under Wellington assembling at Quatre Bras in the west, and the Prussian army under Blücher at Ligny in the east. Napoleon, outnumbered by the combined forces of Wellington and Blücher only had one realistic option: destroy his opponent’s armies separately before they could combine and destroy him.

Napoleon divided the Armée du Nord into two wings (the left commanded by Marshal Ney and the right by the Emperor, himself). The Imperial Guard would serve as the strategic reserve. In our previous blog, we showed the MATE (Machine Analysis of Tactical Environments) artificial intelligence analysis of the battle of Ligny.

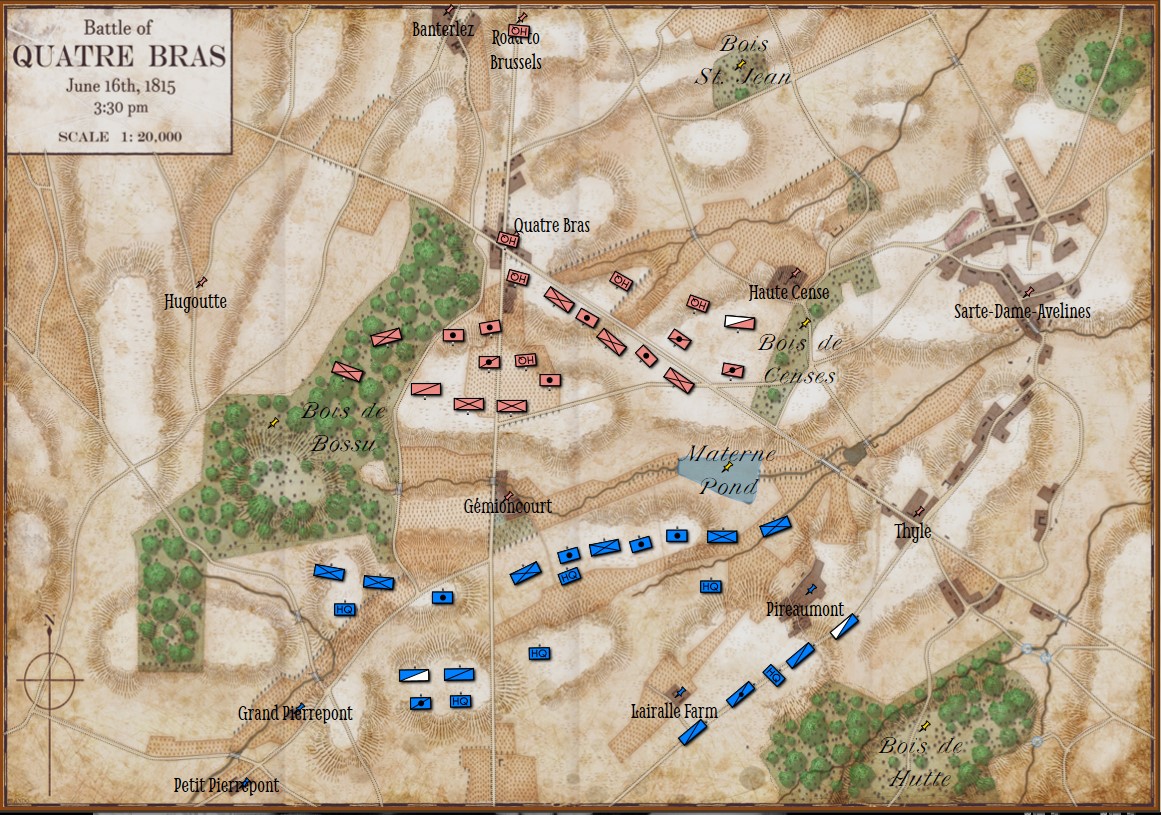
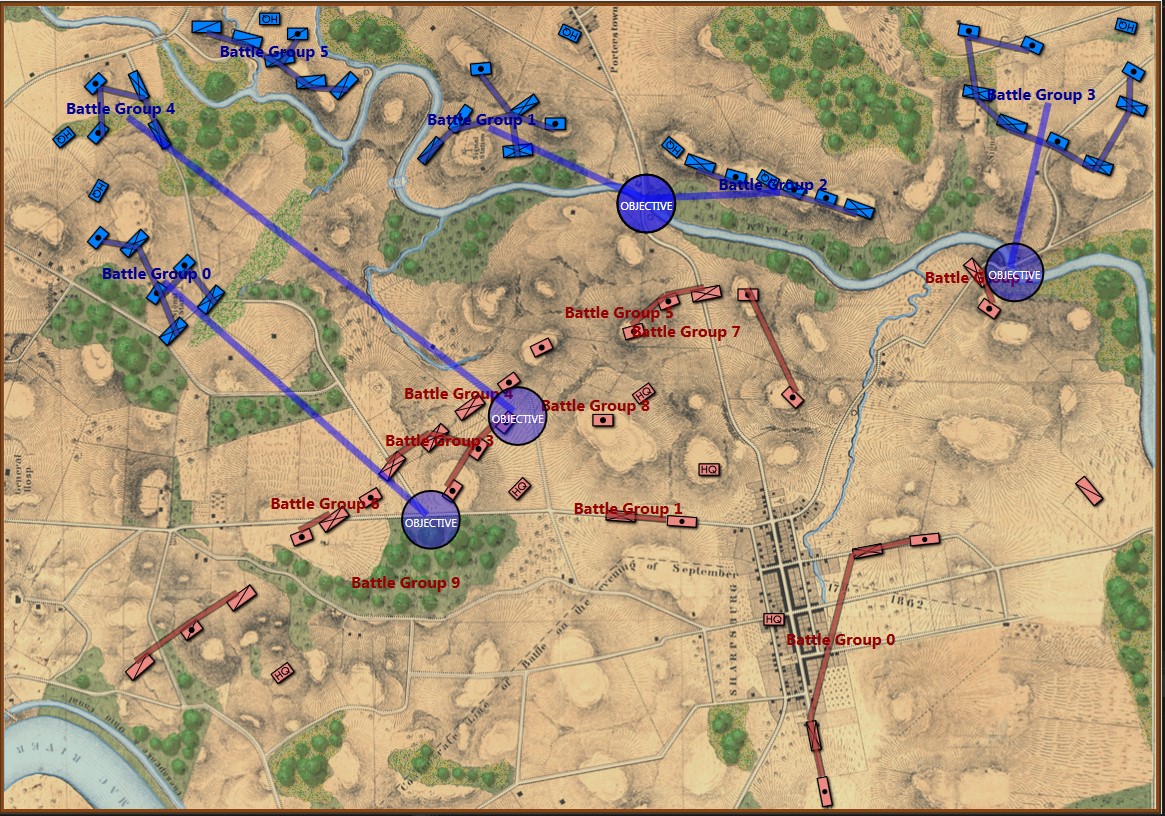
The starting positions of the Armée du Nord (Blue) and the Anglo-Allied Army (Red) at the battle of Quatre Bras. Screen shot from General Staff: Black Powder. Click to enlarge.

The positions in the above screen shot come from the West Point Atlas of the Napoleonic Wars and Chandler’s Waterloo: The Hundred Days. I’ve ordered Mike Robinson’s The Battle of Quatre Bras, 1815 (which is very highly regarded) but it’s coming from Europe and will be a while before it arrives. I’ll update the positions accordingly when it arrives.

Today MATE is going to show off a new trick that it learned.

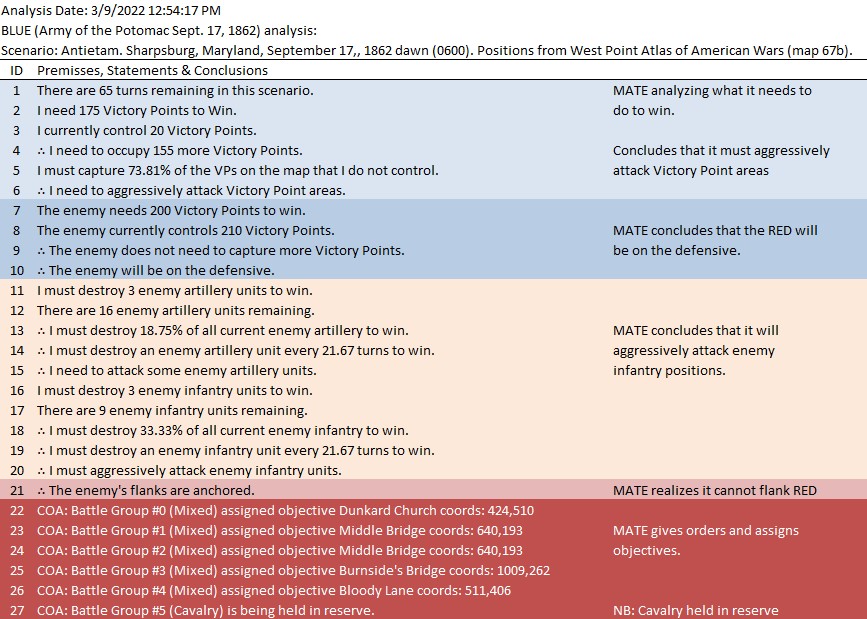
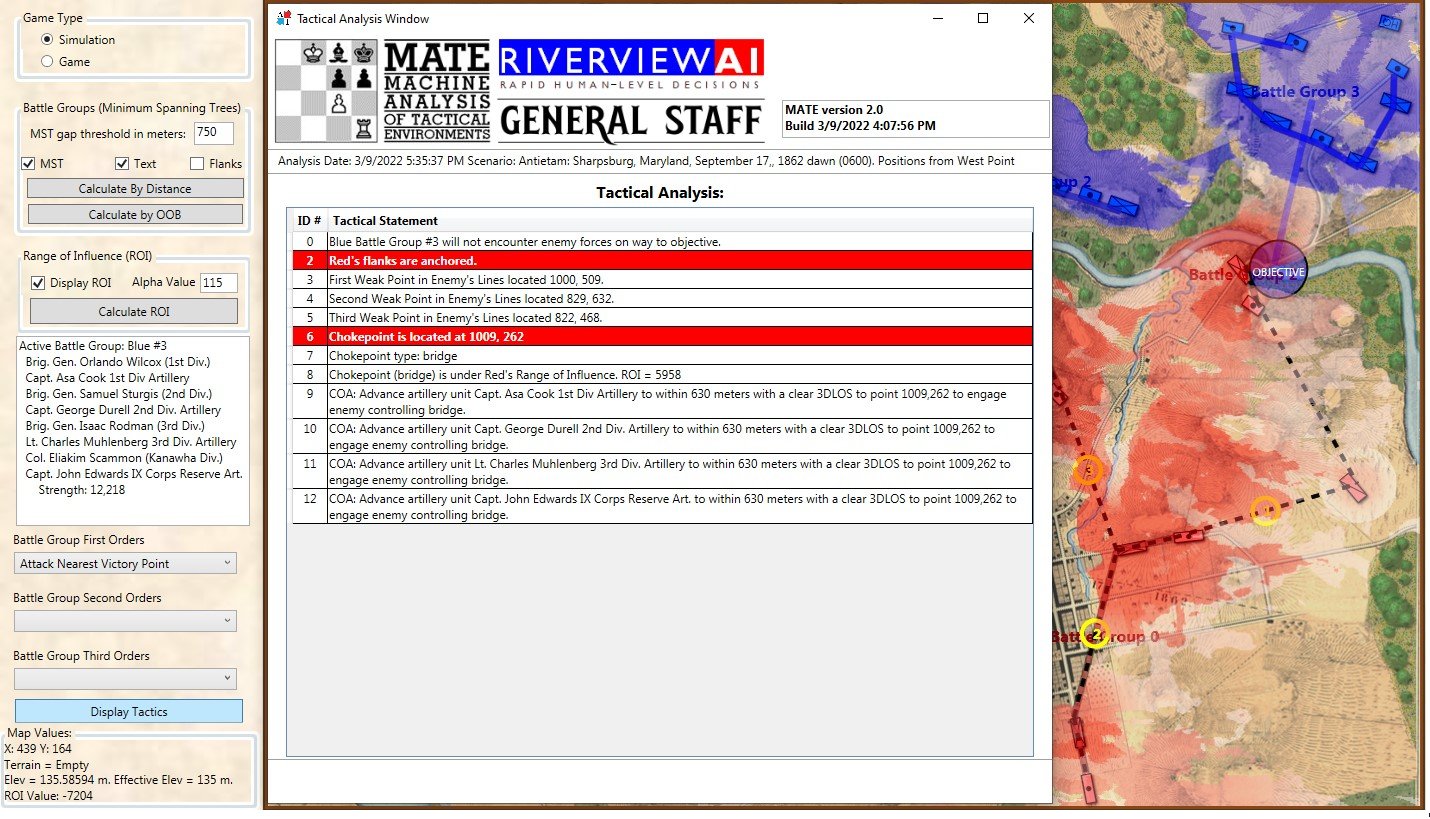
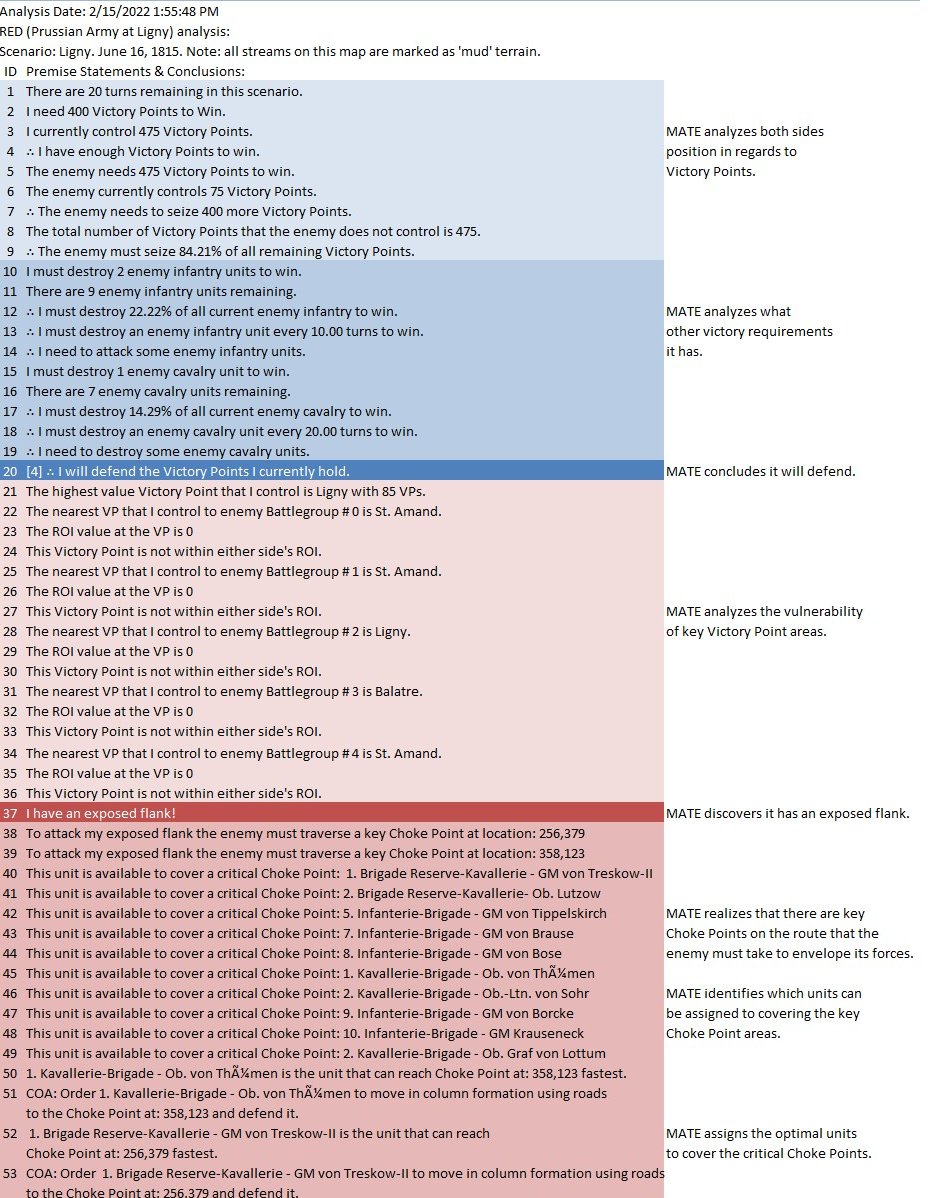
MATE AI analysis of Blue’s position. General Staff screen shot. Click to enlarge.

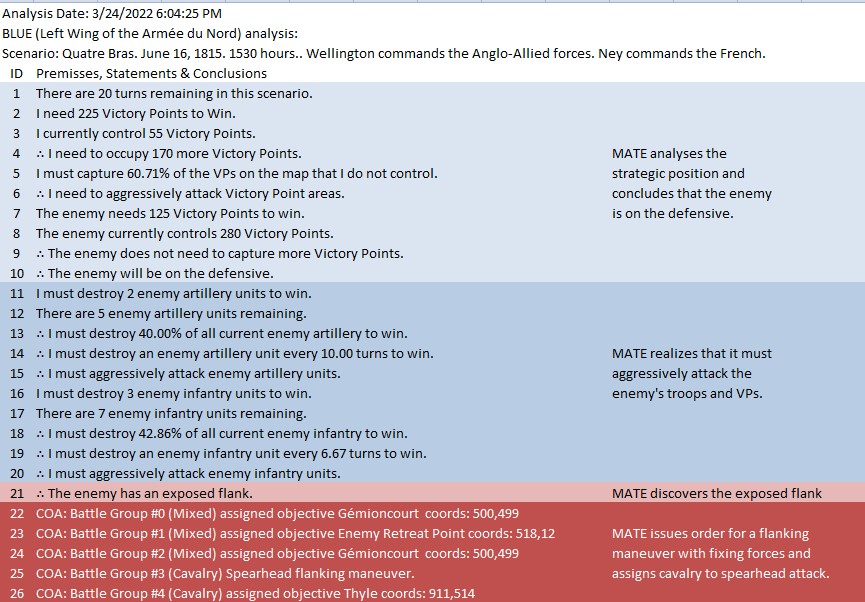
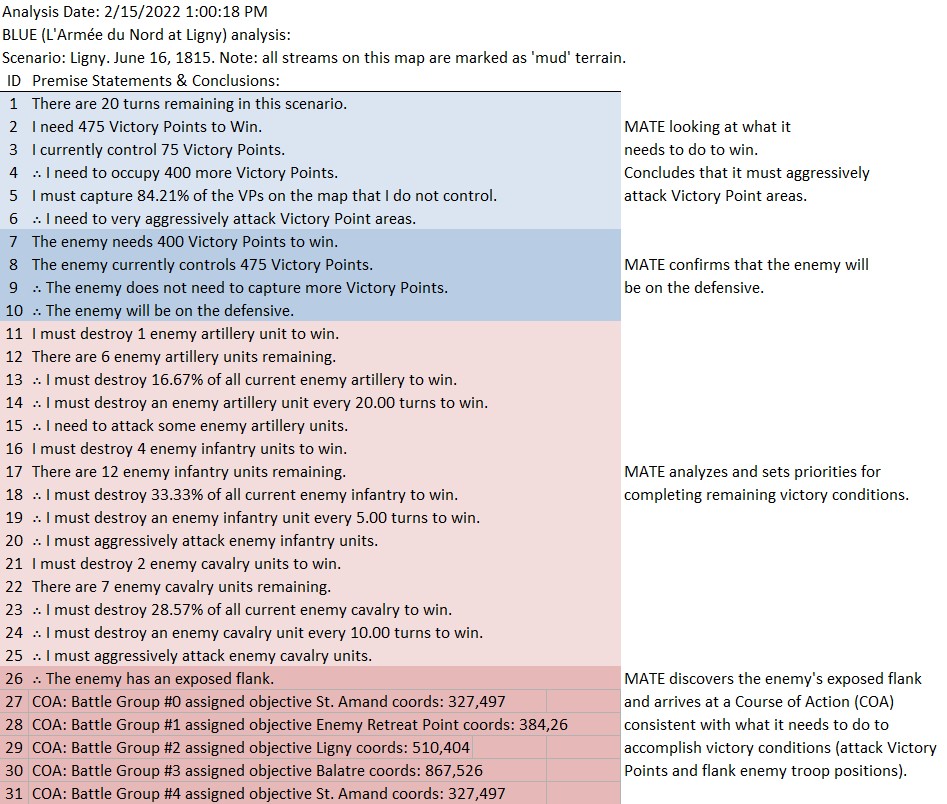
Text output and author’s commentary of MATE’s analysis of Blue’s position at the battle of Quatre Bras.

The salient points of MATE’s analysis of Blue (Ney’s) position at the battle of Quatre Bras are:

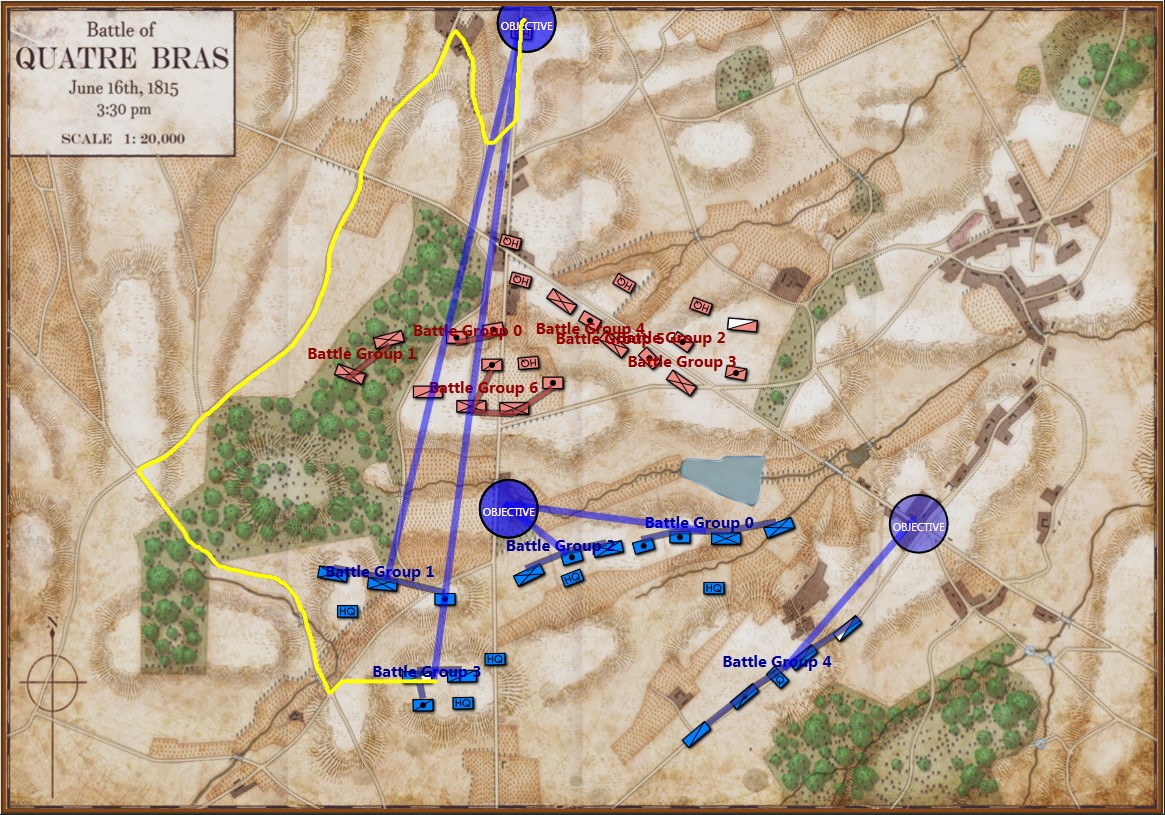
  • Red (Wellington) has an open flank (in fact, both of Red’s flanks are exposed but MATE has calculated a left flanking maneuver is shorter than a right flanking maneuver)
  • Blue has a reserve cavalry division (Line #25 in the text output above, Battle Group #3, Pire’s 2nd Cavalry Division) that is in position to spearhead the left flanking maneuver ahead of
  • Battle Group #1 (the 6th Division commanded by Prince Jerome) which will follow as the main strike force of the left flanking maneuver (Line #23)
  • Battle Groups #0 and #2 (Reilles and Foy’s divisions) will be the fixing force attacking Gémioncourt in the classic envelopment maneuver (see below):
  • Battle Group #4 (Kellerman’s reserve cavalry division) will snatch the important crossroads at Thyle.

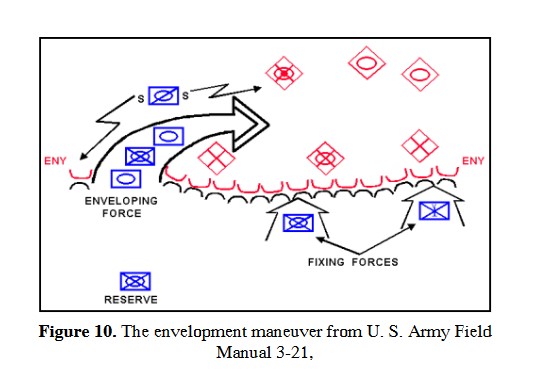
In other words, Battle Groups #3 and #1 will be the Enveloping Force and Battle Groups #0 and #2 will be the Fixing Force as illustrated in the above graphic from the U. S. Army Field Manual 3-21. Algorithms for implementing this maneuver (an early version of MATE) first appear in my paper, Implementing the Five Canonical Offensive Maneuvers in a CGF Environment.

And MATE’s new trick? It’s in line #25, above. If there is a Battle Group that is composed entirely of  cavalry and horse artillery, and it is close enough, it will be used as the spearhead for the flanking maneuver.

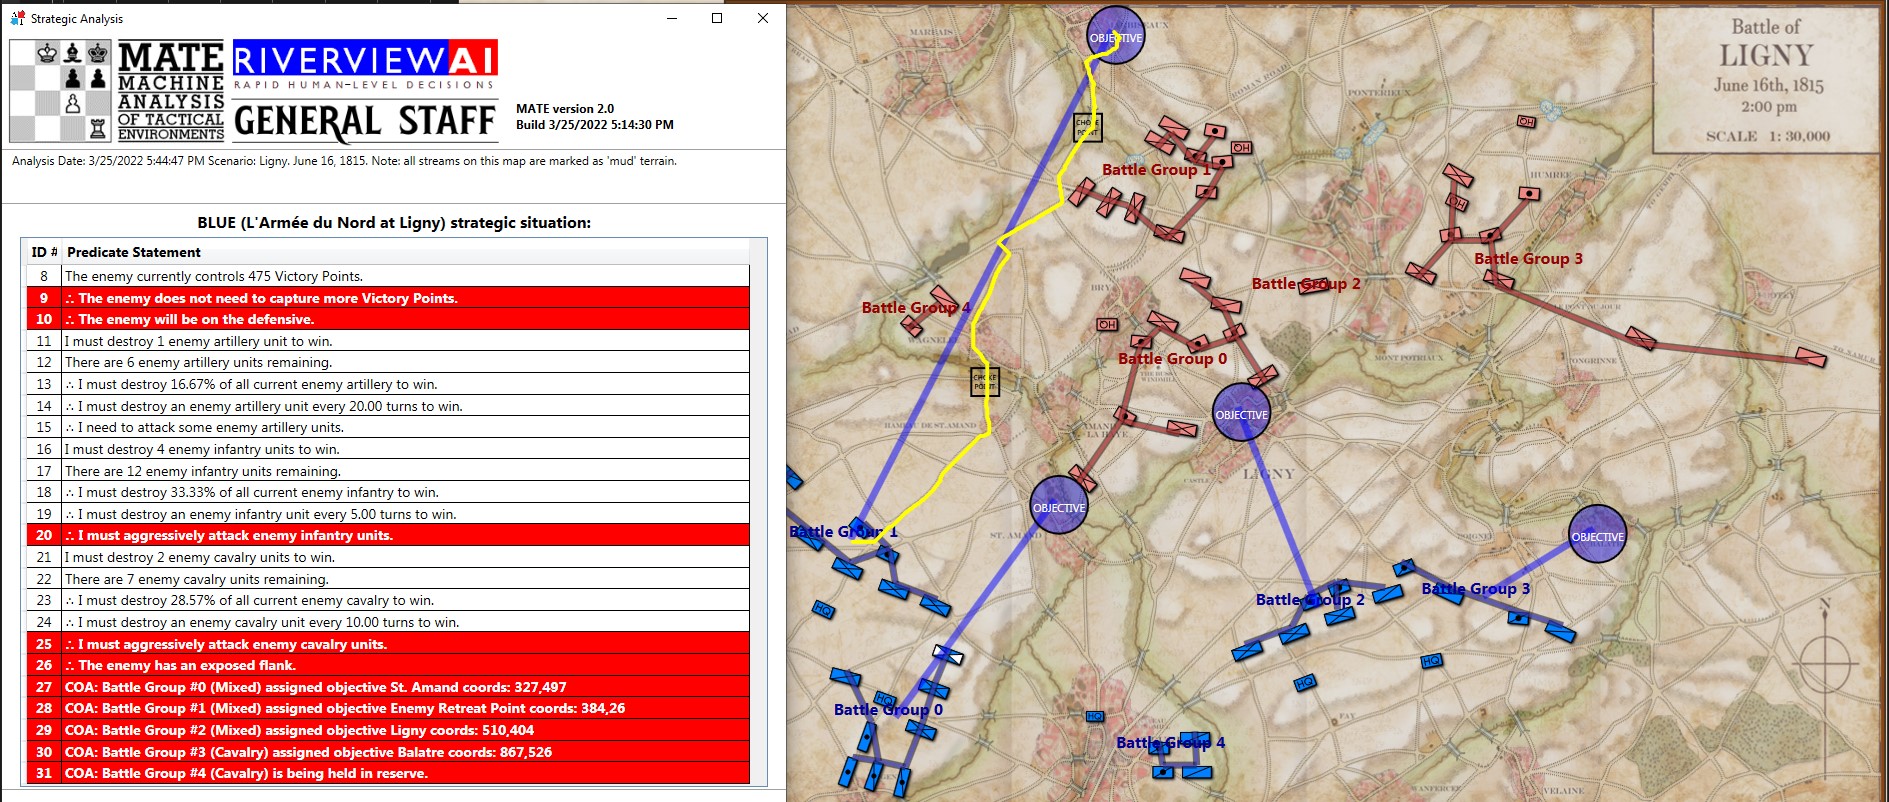
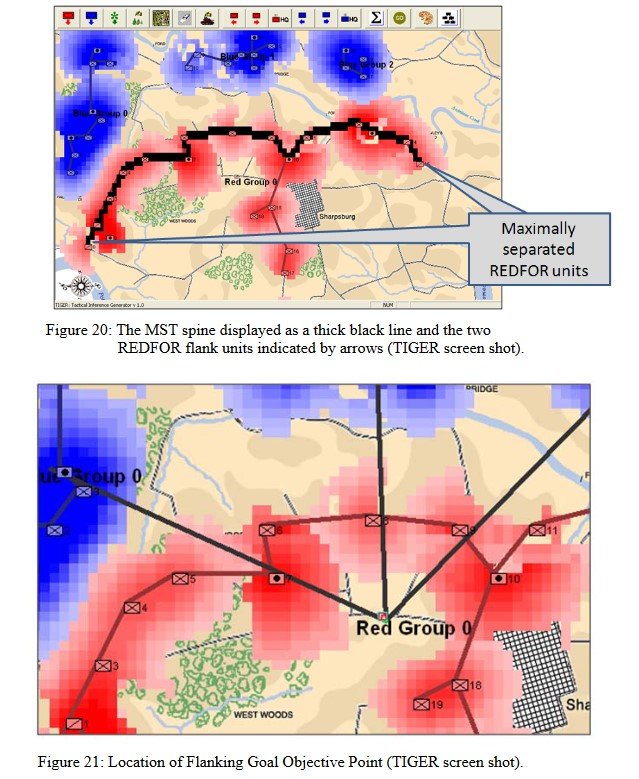
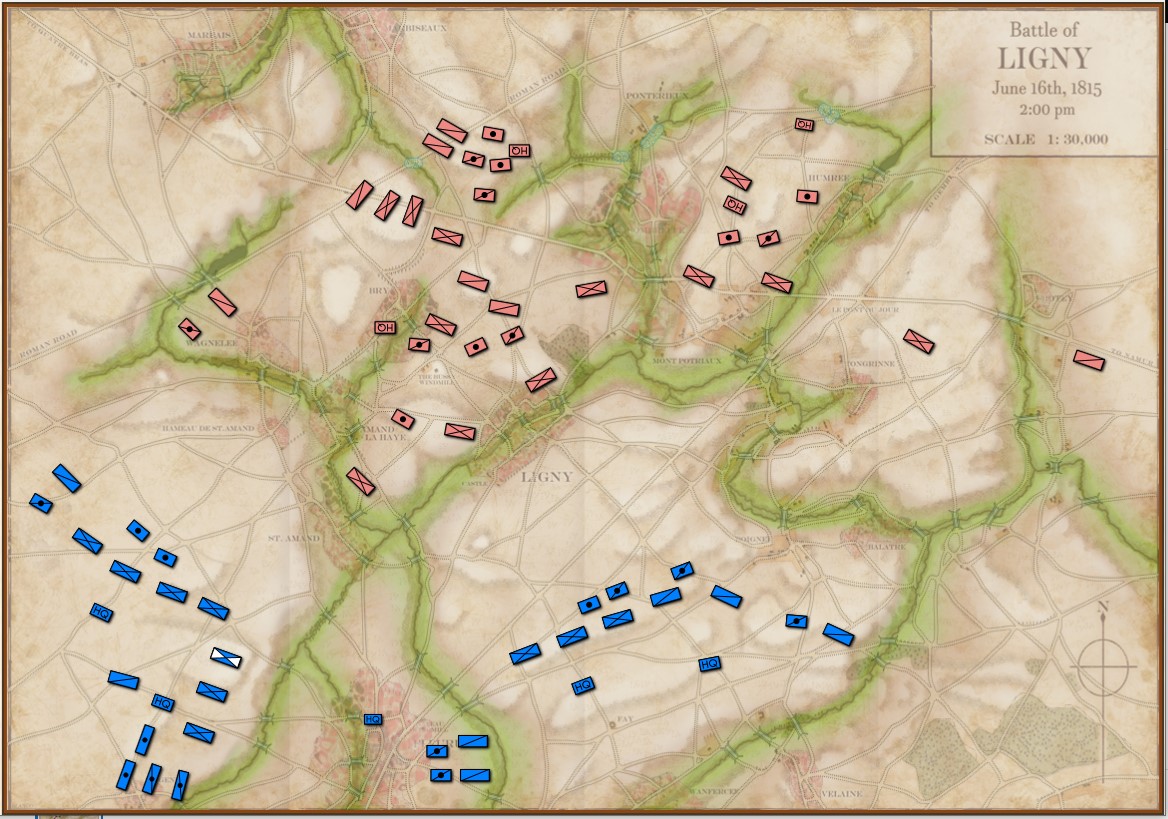
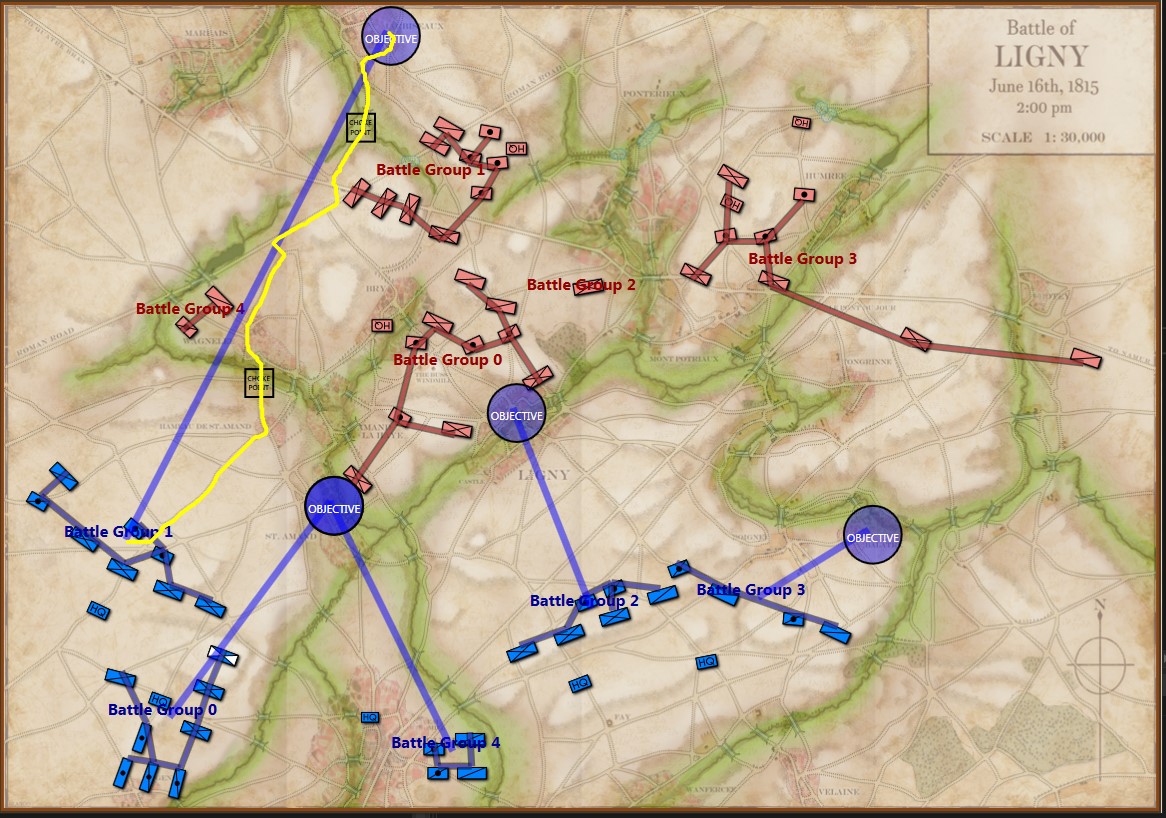
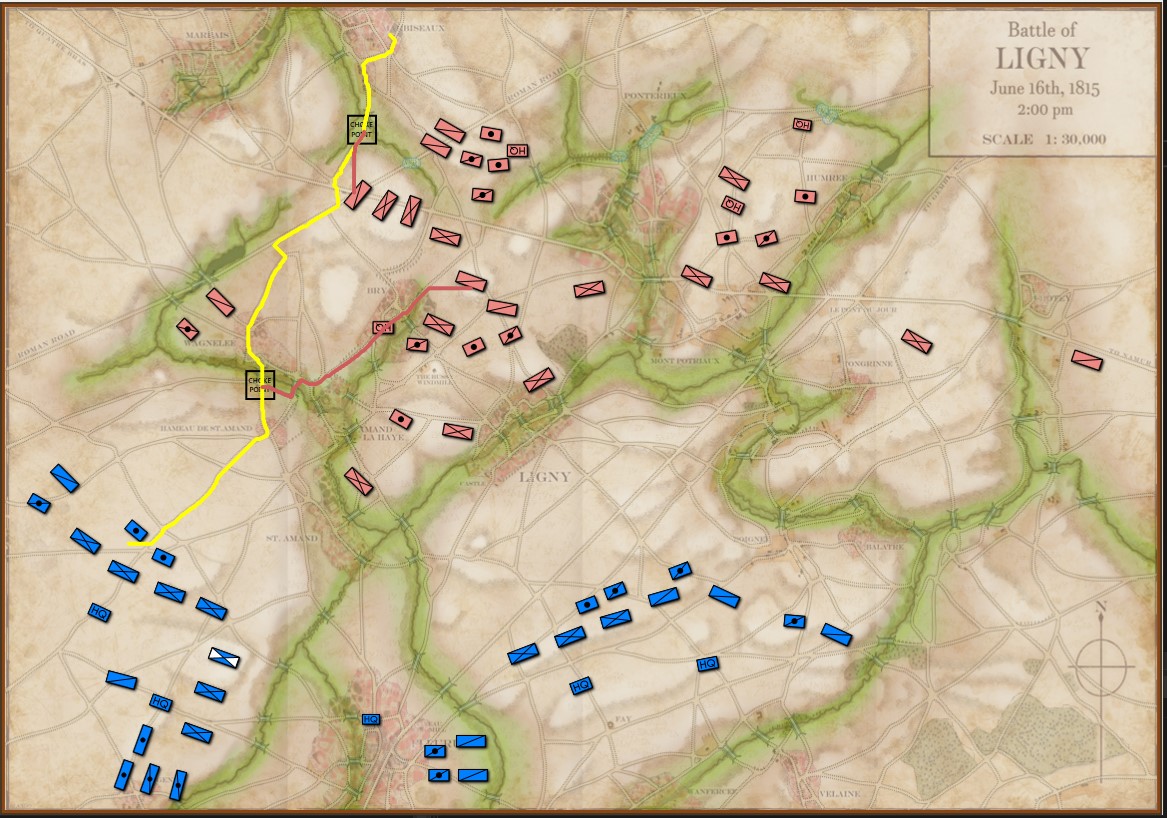
MATE’s analysis of Ligny. Screen shot from General Staff AI Editor. Click to enlarge.

But, in this situation (Ligny, above) MATE has calculated that Battle Group #1 will get to the crucial Choke Point (labeled in black, above) before the reserve cavalry Battle Group #4 will arrive and would create a tremendous bottleneck at the very choke point that MATE wants to quickly capture. Consequently, the cavalry has been left in reserve.

Mini MATE FAQ

Can MATE read and analyze any battle map from history?

No. MATE is integrated into the General Staff Wargaming System. MATE can only ‘understand’ Order of Battle (OOB) tables created in the General Staff Army Editor, maps created in the General Staff Map Editor and scenarios created in the General Staff Scenario Editor.

What is meant by a ‘human-level’ artificial intelligence?

Perhaps you have heard of the famous Turing Test (from Alan Turing’s Computing Machinery and Intelligence). In it he describes, “The Imitation Game,” where a computer is in one room behind a closed door, and a human is another room behind a closed door. A third person, the ‘interrogator’, can only ask questions via a teletype (an ancient I/O device consisting of a keyboard and a printer) and must determine in which room the computer is and in which room is the human. In Turing’s original paper the interrogator would ask questions of the two subjects such as, “Please write me a sonnet on the subject of the Forth Bridge,” and, “Add 34957 to 70764.” Currently, no Artificial Intelligence (AI) could pass such a test; the subject area is far too broad. However, it has been my thesis, that an AI could pass such a test if the subject area is restricted to a narrow field of human endeavor, such as commanding units on a battlefield. If, in the above Turing test, the computer in one room was replaced with MATE, the human in the other room was replaced by Napoleon, and the teletype was replaced by the General Staff Wargaming System, I argue that MATE could (or soon will be able to) pass such a test (subject matter experts would not be able to discern if it was MATE or Napoleon giving orders).

Can MATE analyze current military situations?

Though MATE came out of the TIGER (Tactical Inference GenERator) project funded by DARPA, it is currently set up specifically for the General Staff: Black Powder project which limits analysis to scenarios in the 18th and 19th centuries. It is intended that this project will be followed up with General Staff: Modern Warfare to specifically work with 20th and 21st century combat.

References

References
1 David Chandler, Waterloo: The Hundred Days, Macmillan Publishing Co., Inc. New York 1980, p. 85

A Human-Level Intelligence at Antietam

“Map of the battlefield of Antietam,” by William H. Willcox. Published in Philadelphia. Lithograph of P. S. Duval and Son, 1862. From the US Library of Congress.

There are many reasons that I am intensely interested in this particular American Civil War battle fought on less than twenty square miles wedged in between the Potomac River and Antietam Creek. The battle of Antietam (September 17, 1862) exhibits a number of significant battlefield attributes which I use as base line cases to test algorithms used in creating a human-level tactical artificial intelligence 1)MATE: Machine Analysis of Tactical Environments. Specifically, Antietam definitively demonstrates 2)see http://riverviewai.com/download/SidranThesis.pdf the following attributes:

  • Choke Points
  • Anchored Flank
  • Interior lines of communication
  • Exterior lines of communication
  • Restricted Avenue of Retreat
  • Restricted Avenues of Attack

For example, in a blind survey of Subject Matter Experts (SMEs), it was overwhelmingly agreed that the RED (Confederate) left flank at the battle of Antietam exhibited the attribute of ‘anchored flank3)a flank that is attached to or protected by terrain, a body of water, or defended fortifications. and other positions, such as RED’s (Russian and Austrian) left flank at Austerlitz SMEs overwhelmingly agreed that the flanks do not exhibit the attribute of ‘anchored’ and are, therefore, unanchored. Once we have an example of an anchored flank and another example of an unanchored flank we can begin testing algorithms to detect the attribute of an anchored flank.

In my doctoral thesis (above) I demonstrated the algorithm 4)see pages 45-6 http://riverviewai.com/download/SidranThesis.pdf  for detecting the attribute of anchored and unanchored flanks. I have made a number of substantial improvements to the original algorithm since then which are now incorporated into the current MATE.

We have recently posted analyses of other battles that did not exhibit the attribute of an anchored flank (Ligny and 1st Bull Run, or Manassas). MATE correctly recognized that Ligny and Manassas do not have these attributes.

The tactical situation for Blue at Antietam is quite different than Blue’s positions at Ligny and Manassas (is it not curious how often Blue is the attacker in wargames?). The key difference, of course, is the lack of an open flank to attack. MATE will always attack an open flank if it can. Without an obvious objective, like an exposed flank, MATE will next look at opportunities to fulfill victory conditions. For Antietam, as Blue, MATE sees the situation like this:

MATE Analysis of Antietam from the Blue position. Screen shot. Click to enlarge.

Below is a list of statements, predicates and conclusions generated by MATE during the above analysis with my commentary added on the right:

MATE analysis of Antietam. Click to enlarge.

I recently added a set of algorithms that recognize the composition of battle groups and exploits any possible advantages. For example:

Screen shot showing MATE analysis of BLUE position at Ligny. NB: Battle Group #3 (Pajol’s and Exelmans’ cavalry divisions) are, “snatching the pawn,” at Balatre. Click to enlarge.

At Ligny, above, MATE has recognized that Battle Group #3 and Battle Group #4 are uniquely cavalry (and horse artillery) battle groups and are to be used differently. While Battle Group #4 is held in reserve, Battle Group #3 will snatch Balatre. Though it is valued at only 10 Victory Points, MATE realized that no enemy force could oppose it. That said, I can still hear the voice of my old chess tutor, Mr. Selz,  warning me against ‘pawn snatching’; that is grabbing a minor point that can lead to defeat because the position was not thoroughly analyzed. MATE, however, is correct in this analysis and can safely seize the objective.

While, at Antietam, Battle Group #1 (all the cavalry of the Army of the Potomac commanded by Brigadier General Alfred Pleasonton) is frozen ‘in reserve’. This is not a case where MATE can snatch a pawn. MATE looked at the situation and said, ‘nope’, there are no unattended Victory Points to snatch and there is not an open flank to exploit so, the default setting is ‘in reserve’.

This leads to the interesting conundrum: what exactly was the Union cavalry at Antietam doing? Honestly, I had never really thought of it before. Now, when I look into the question I find, Was McClellan’s Cavalry Deployment at Antietam Doctrinally Sound? This monograph argues that McClellan massing his cavalry in the center for a great coup de grâce exploitation of a breakthrough across the Middle Bridge was acceptable within the framework of Jomini’s theories as taught at West Point before the Civil War. But, then it is countered with this:

In Landscape Turned Red, Stephen Sears has this to say: Shortly before noon, McClellan had ventured to push several batteries across the Middle Bridge, supported by Pleasonton’s cavalry and a force of regulars from George Syke’s Fifth Corps. He was nervous about the move-it was taken against the advice of Porter and Sykes-and he cautioned Pleasonton not to risk the batteries unduly. As an afterthought, he asked, “Can you do any good by a cavalry charge?” Pleasonton wisely ignored the suggestion. – Sears, Stephen, Landscape Turned Red: The Battle of Antietam, New York: Ticknor and Fields, 1983. page 271. (as cited in above)

Would a great massed cavalry attack across Middle Bridge have been suicide? Or brilliant? For the first time in memory I took the 1st edition of McClellan’s Own Story off the shelf and discovered… nothing. McClellan died suddenly of heart failure just as he was writing about Antietam and his memoirs end abruptly with very little insight into his side of the story. But, using cavalry to support horse artillery – rather than the other way around – seemed a bit odd.

I do not know of any other great cavalry charge in the American Civil War than Sheridan at Five Forks (above). Is this what McClellan envisioned at Antietam? Would it have worked? Could American Civil War regiments have formed square against a massed cavalry charge?

Moving on, let’s drill down to the Course of Action (COA) for Blue Battle Group #3 (Burnside’s IX Corps) at Antietam:

MATE tactical analysis for Blue Battle Group #3 at Antietam (Burnside’s IX Corps). Screen shot. Click to enlarge.

The author walking across Burnside’s Bridge in 1966 (age 12).

The above is MATE’s output that concludes with the COA for Burnside’s IX Corps. Perhaps, the greatest mystery of the battle of Antietam is what took Burnside so long to take this bridge (now forever linked with his name)? It is true that there were numerous, futile and bloody attempts to cross it. Note that MATE, above, recognizes the bridge as a critical Choke Point. When MATE sees a Choke Point that is within the enemy’s control (see statement #8, above, “Chokepoint (bridge) is under Red’s Range of Influence ROI = 5958″ and 5,998 is very high ROI value) it brings up artillery (see statements #9, #10, #11, #12, above). All the artillery in the IX Corps is to be within 630 meters of the objective. Why 630 meters? Because at that distance it is guaranteed a 50% accuracy rate. This rate, by the way, was set in the Army Editor:

The accuracy curve for the 1st Division, IX Corps artillery as set in the Army Editor. Screen capture. Click to enlarge.

So, MATE says 5)I apologize but I find it easier to describe how the AI works using such phrases as ‘thinks’, ‘says’, and ‘decides’. It’s not worth straining over. Trust me, “My objective is a Choke Point. I’m not sending my units into a meat grinder. I’m sending artillery to a point where they are guaranteed a 50% accuracy per volley and have a clear 3D Line of Sight to the target. This is how I’m going to project as much force as I can at the objective.” War is about force projection. MATE knows this. Is this a better plan than what Burnside actually did? Yeah, it is a lot better with a far greater probability of success. I’ve stood on that plain just east of Burnside’s Bridge and thought that nine batteries of 12 lb. Napoleons aimed at the crest of that hill just beyond the bridge would provide a substantial amount of force projection and covering fire. About half an hour of force projection followed up with an infantry assault would probably take the bridge.

I once described good AI as: Don’t do anything stupid, fast. MATE is doing that. I think MATE is on the way to beat most human opponents because humans do stupid things, fast.

We’ll see. Should be an interesting journey.

References

References
1 MATE: Machine Analysis of Tactical Environments
2 see http://riverviewai.com/download/SidranThesis.pdf
3 a flank that is attached to or protected by terrain, a body of water, or defended fortifications.
4 see pages 45-6 http://riverviewai.com/download/SidranThesis.pdf
5 I apologize but I find it easier to describe how the AI works using such phrases as ‘thinks’, ‘says’, and ‘decides’. It’s not worth straining over. Trust me

A Human-Level Tactical Artificial Intelligence at Ligny

Map 159 from the superb, “West Point Atlas of the Napoleonic Wars,” (Esposito & Elting, 1999, Stackpole). Scanned from the author’s collection. Click to enlarge.

The seeds of Napoleon’s defeat at Waterloo were sown two days earlier at his victory near Ligny. Napoleon needed to surround and completely remove the Prussian army as a viable force on the battlefield. Instead, they escaped to Wavre in the north and resurfaced at the worst possible time on Napoleon’s right flank two days later at Waterloo.

MATE1)Machine Analysis of Tactical Environments 2.0 is now capable of analyzing the battle of Ligny, June 16, 1815 from both the Blue (L’Armée du Nord on the offensive) and Red (Prussian on the defensive) positions. (MATE is the AI behind General Staff: Black Powder. For more information about MATE see these links).

The Ligny map was donated by Glenn Frank Drover. Jared Blando is the artist. Ed Kuhrt did the elevation, roads and mud terrain overlays. The unit positions are from the West Point Atlas of the Napoleonic Wars (above) and from David Chandler’s Waterloo: The Hundred Days. If any one has a better source for unit positions, please contact me directly.

Screen capture of the Ligny scenario in General Staff. Elevation and slope layers enhanced.

Below is MATE’s analysis from the Blue (L’Armée du Nord) perspective. MATE correctly identifies the key positions and realities of the battlefield:

  • Red is on the defensive
  • Red has an exposed flank
  • There are two key choke points on the route to Red’s exposed flank

MATE then creates an appropriate Course of Action (COA) for Blue:

  • Battle Group #1 (The French III Corps) is assigned the flanking maneuver.
  • Battle Group #0 (The Imperial Guard) is assigned the objective of St. Amand with the support of Battle Group #4 (IV Corps cavalry and reserve artillery).
  • Battle Group #2 (IV Corps) demonstrates against Ligny.
  • Battle Group #3 (The Cavalry Reserve) seizes Balatre and a crucial bridge located there.

MATE’s analysis of Blue’s position at Ligny. Screen capture. Click to enlarge.

A log of MATE’s thought processes, with my commentary, follows:

Text output of MATE’s analysis of Blue’s position at Ligny. Click to enlarge.

MATE also analyzed Ligny from the Prussian (Red) perspective:

Screen capture of MATE’s analysis of Ligny for Red (Prussian army). MATE recognizes the two choke points on the route of the enemy’s flank attack and dispatches cavalry units to cover these critical areas. Click to enlarge.

MATE, analyzing the Prussian (Red) position correctly recognizes that it is on the defensive, it has an exposed flank, there are two crucial choke points on the route that Blue will take on its flanking maneuver and dispatches two cavalry units to cover the bridges. A log of MATE’s thought processes, with my commentary, follows:

Text output of MATE’s analysis of Red’s position at Ligny. Click to enlarge.

Critique of MATE’s analysis:

As the author of MATE any critique I have of its performance should be taken with a grain of salt (also, see this video). If I was back in academia I would put together twenty or thirty Subject Matter Experts (SMEs), set up a double blind web site, get all the SME’s solutions to the problem, and compare their solutions to MATE’s. If they match to a statistical significance it proves the ‘human-level’ part. But, I’m not in academia anymore and you’ll just have to take my word for it. That said, MATE did what I expected it to do.

It first sussed out if it was on offense or defense and what it had to do to win.

Then, as Blue, MATE discovered a back door to Red’s position and ordered a classic enveloping maneuver. MATE assigned Blue Battle Group #1 the task of implementing the flanking maneuver. Blue Battle Groups #0, #4 and #2 are the fixing force. See my paper, Implementing the Five Canonical Offensive Maneuvers in a CGF Environment (free download here) for details and algorithms.  The Blue Cavalry Reserve is given the COA to seize the town of Balatre. This, in my opinion, is a pretty good tactical plan.

When MATE finds itself on defense, as it does as Red at Ligny, one of the first things it does is ask itself, “how would I attack myself?” So, of course it finds the back door right away. Then it compiles a list of available units that are not actively engaged in holding crucial parts of a defensive line, selects the optimal (fastest) units and assigns them orders to defend the crucial choke points. This was a better plan than Field Marshal Gebhard Leberecht von Blücher had. So, again, I’m going to argue that MATE is operating at a ‘human-level’.

As always, please feel free to write me with the questions or comments. MATE is going to take a look at Antietam next.

References

References
1 Machine Analysis of Tactical Environments