Tag Archives: MATE

A Human-Level Intelligence at Quatre Bras

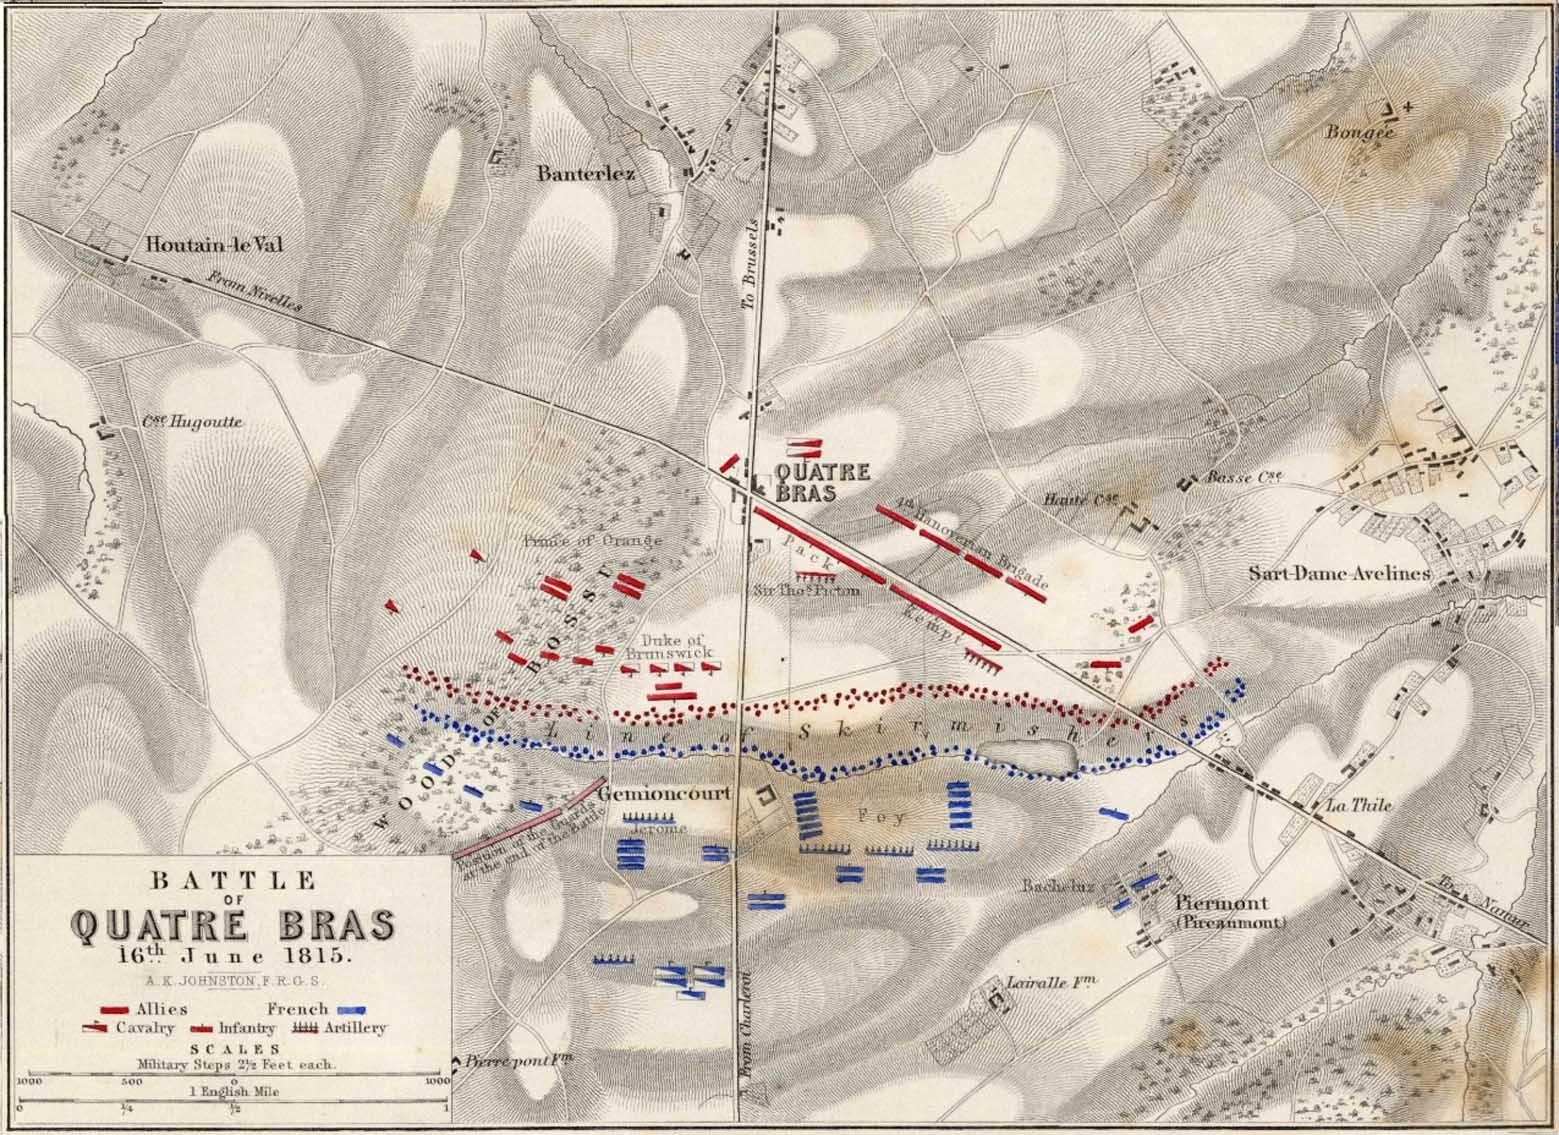
Quatre Bras, June 16, 1815. Click to enlarge

Napoleon has humbugged me, by God!” Lord Wellington swore. “He has gained twenty-four hours’ march on me!” 1)David Chandler, Waterloo: The Hundred Days, Macmillan Publishing Co., Inc. New York 1980, p. 85 And, indeed, he had.

The Armée du Nord, racing north on the roadnet from Paris to Brussels, now occupied the crucial strategic ‘central position’ between the Anglo-Allied army under Wellington assembling at Quatre Bras in the west, and the Prussian army under Blücher at Ligny in the east. Napoleon, outnumbered by the combined forces of Wellington and Blücher only had one realistic option: destroy his opponent’s armies separately before they could combine and destroy him.

Napoleon divided the Armée du Nord into two wings (the left commanded by Marshal Ney and the right by the Emperor, himself). The Imperial Guard would serve as the strategic reserve. In our previous blog, we showed the MATE (Machine Analysis of Tactical Environments) artificial intelligence analysis of the battle of Ligny.
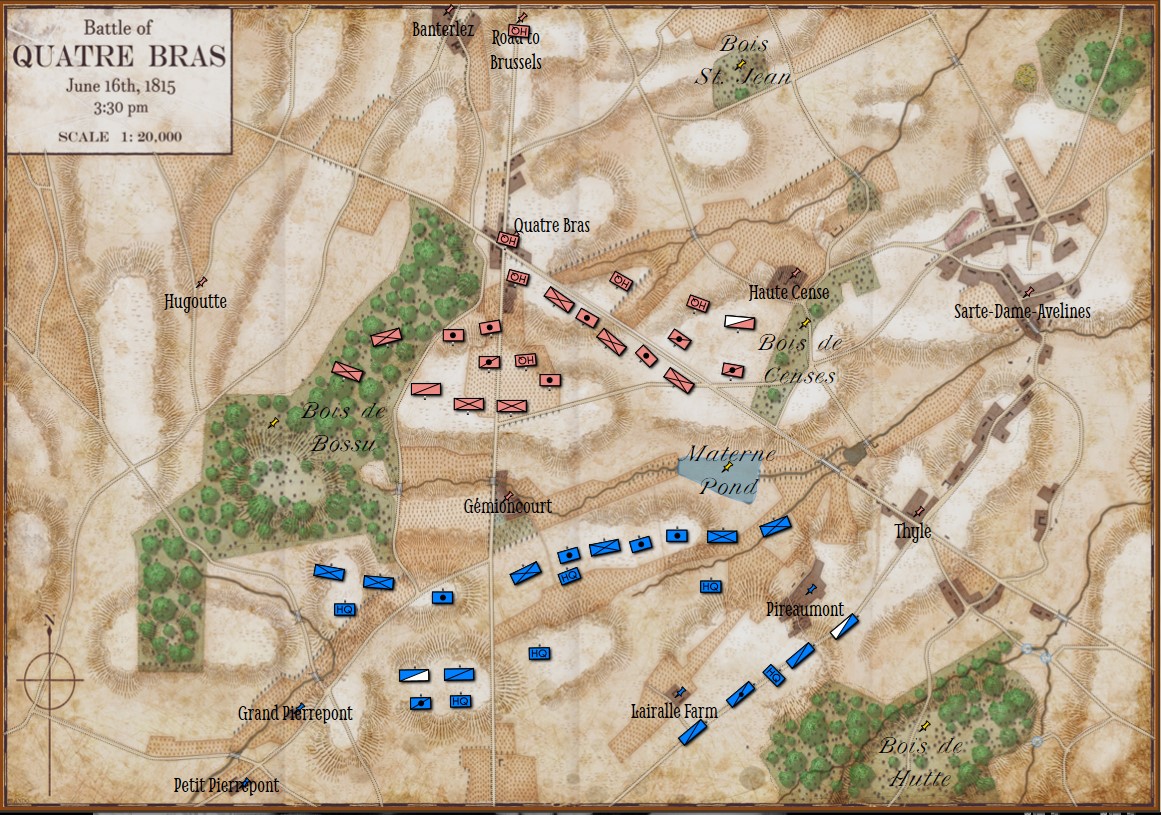
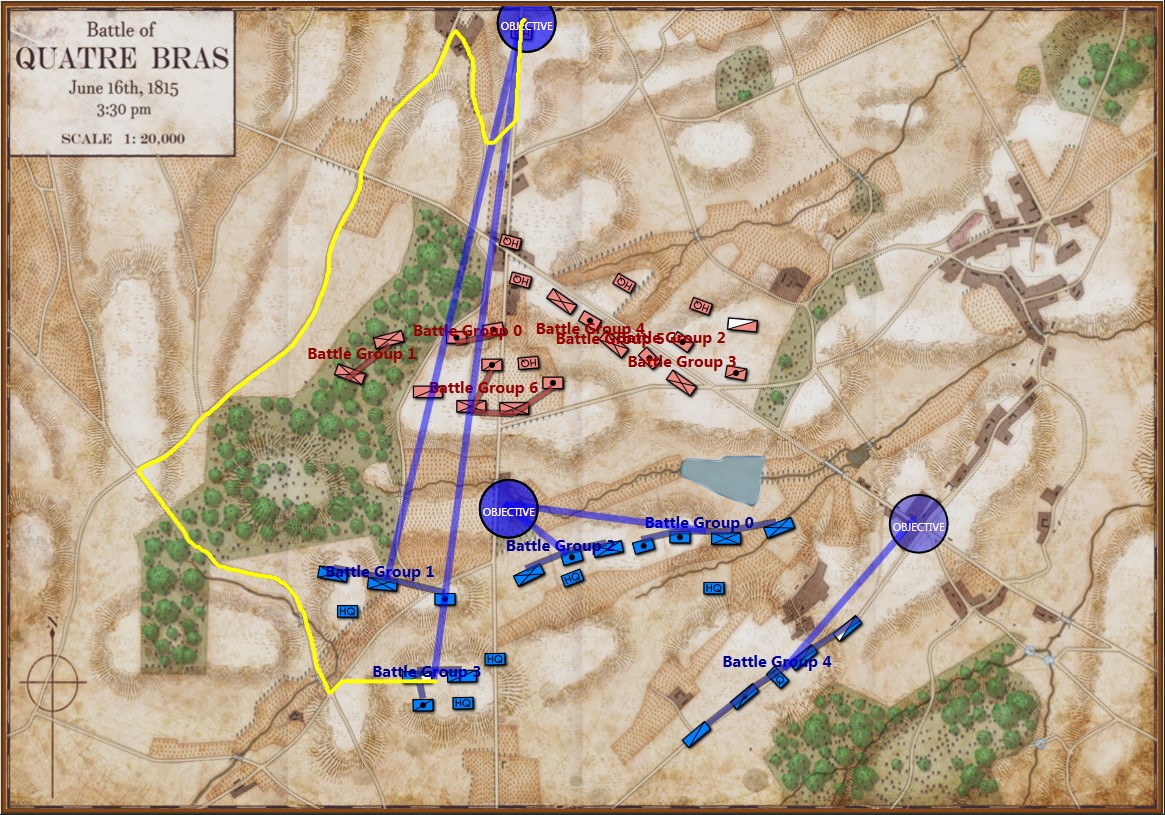
The starting positions of the Armée du Nord (Blue) and the Anglo-Allied Army (Red) at the battle of Quatre Bras. Screen shot from General Staff: Black Powder. Click to enlarge.

The positions in the above screen shot come from the West Point Atlas of the Napoleonic Wars and Chandler’s Waterloo: The Hundred Days. I’ve ordered Mike Robinson’s The Battle of Quatre Bras, 1815 (which is very highly regarded) but it’s coming from Europe and will be a while before it arrives. I’ll update the positions accordingly when it arrives.

Today MATE is going to show off a new trick that it learned.
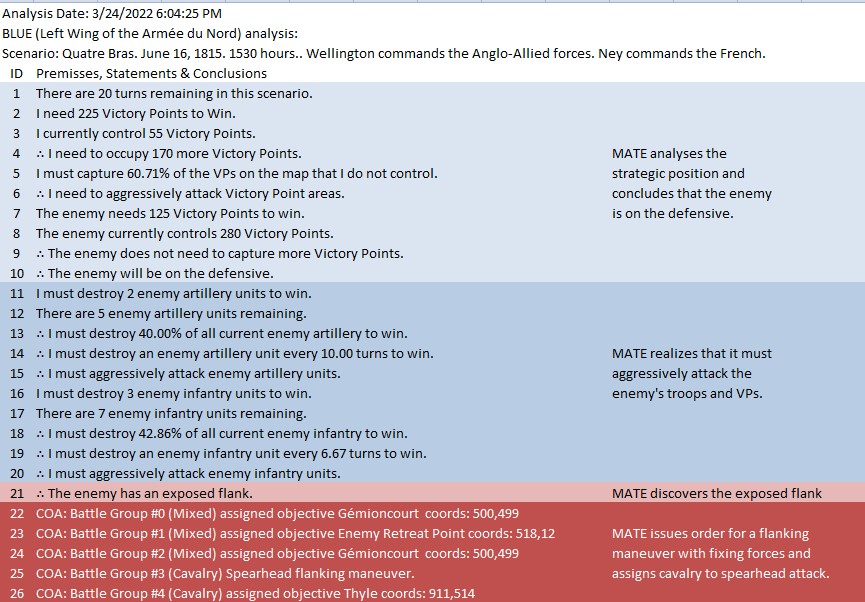
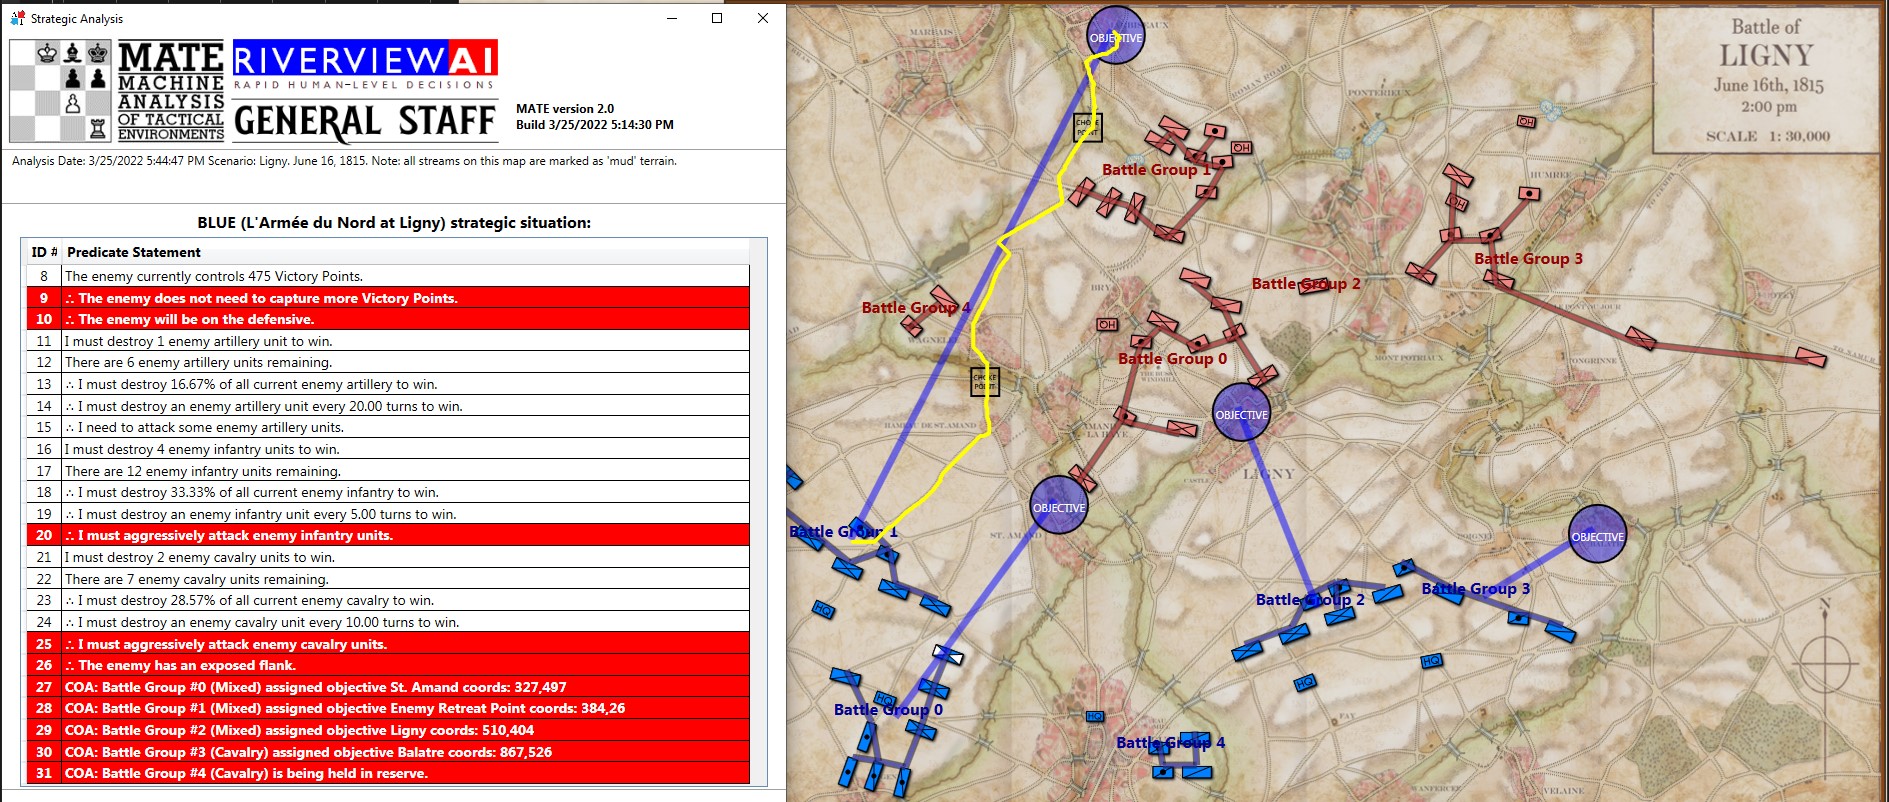
MATE AI analysis of Blue’s position. General Staff screen shot. Click to enlarge.

Text output and author’s commentary of MATE’s analysis of Blue’s position at the battle of Quatre Bras.

The salient points of MATE’s analysis of Blue (Ney’s) position at the battle of Quatre Bras are:

  • Red (Wellington) has an open flank (in fact, both of Red’s flanks are exposed but MATE has calculated a left flanking maneuver is shorter than a right flanking maneuver)
  • Blue has a reserve cavalry division (Line #25 in the text output above, Battle Group #3, Pire’s 2nd Cavalry Division) that is in position to spearhead the left flanking maneuver ahead of
  • Battle Group #1 (the 6th Division commanded by Prince Jerome) which will follow as the main strike force of the left flanking maneuver (Line #23)
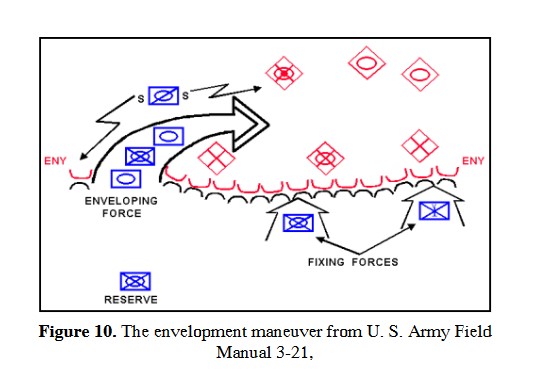
  • Battle Groups #0 and #2 (Reilles and Foy’s divisions) will be the fixing force attacking Gémioncourt in the classic envelopment maneuver (see below):
  • Battle Group #4 (Kellerman’s reserve cavalry division) will snatch the important crossroads at Thyle.

In other words, Battle Groups #3 and #1 will be the Enveloping Force and Battle Groups #0 and #2 will be the Fixing Force as illustrated in the above graphic from the U. S. Army Field Manual 3-21. Algorithms for implementing this maneuver (an early version of MATE) first appear in my paper, Implementing the Five Canonical Offensive Maneuvers in a CGF Environment.

And MATE’s new trick? It’s in line #25, above. If there is a Battle Group that is composed entirely of  cavalry and horse artillery, and it is close enough, it will be used as the spearhead for the flanking maneuver.

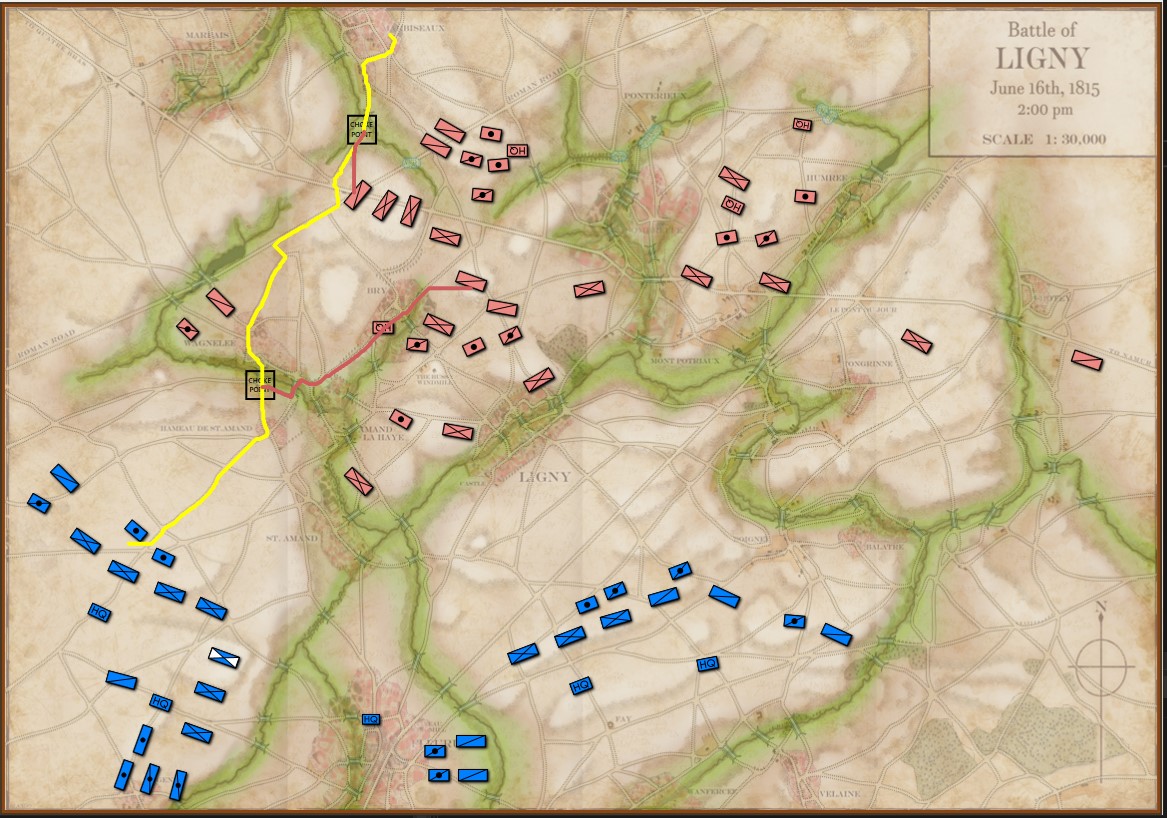
MATE’s analysis of Ligny. Screen shot from General Staff AI Editor. Click to enlarge.

But, in this situation (Ligny, above) MATE has calculated that Battle Group #1 will get to the crucial Choke Point (labeled in black, above) before the reserve cavalry Battle Group #4 will arrive and would create a tremendous bottleneck at the very choke point that MATE wants to quickly capture. Consequently, the cavalry has been left in reserve.

Mini MATE FAQ

Can MATE read and analyze any battle map from history?

No. MATE is integrated into the General Staff Wargaming System. MATE can only ‘understand’ Order of Battle (OOB) tables created in the General Staff Army Editor, maps created in the General Staff Map Editor and scenarios created in the General Staff Scenario Editor.

What is meant by a ‘human-level’ artificial intelligence?

Perhaps you have heard of the famous Turing Test (from Alan Turing’s Computing Machinery and Intelligence). In it he describes, “The Imitation Game,” where a computer is in one room behind a closed door, and a human is another room behind a closed door. A third person, the ‘interrogator’, can only ask questions via a teletype (an ancient I/O device consisting of a keyboard and a printer) and must determine in which room the computer is and in which room is the human. In Turing’s original paper the interrogator would ask questions of the two subjects such as, “Please write me a sonnet on the subject of the Forth Bridge,” and, “Add 34957 to 70764.” Currently, no Artificial Intelligence (AI) could pass such a test; the subject area is far too broad. However, it has been my thesis, that an AI could pass such a test if the subject area is restricted to a narrow field of human endeavor, such as commanding units on a battlefield. If, in the above Turing test, the computer in one room was replaced with MATE, the human in the other room was replaced by Napoleon, and the teletype was replaced by the General Staff Wargaming System, I argue that MATE could (or soon will be able to) pass such a test (subject matter experts would not be able to discern if it was MATE or Napoleon giving orders).

Can MATE analyze current military situations?

Though MATE came out of the TIGER (Tactical Inference GenERator) project funded by DARPA, it is currently set up specifically for the General Staff: Black Powder project which limits analysis to scenarios in the 18th and 19th centuries. It is intended that this project will be followed up with General Staff: Modern Warfare to specifically work with 20th and 21st century combat.

References

References
1 David Chandler, Waterloo: The Hundred Days, Macmillan Publishing Co., Inc. New York 1980, p. 85

A Human-Level Tactical Artificial Intelligence at Ligny

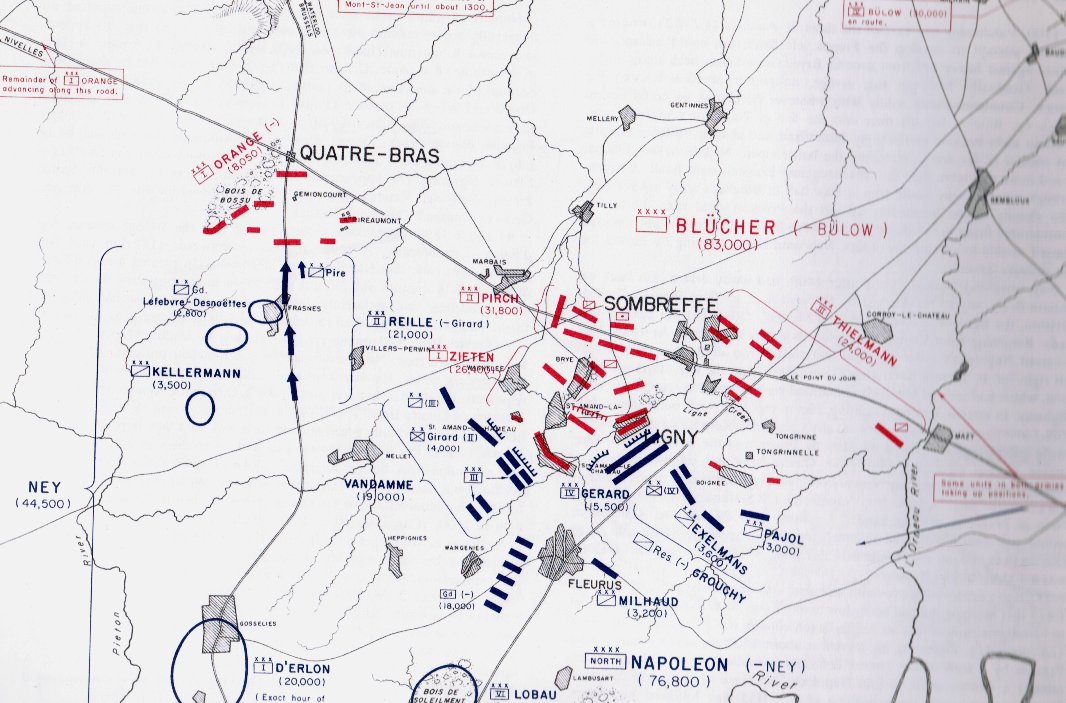
Map 159 from the superb, “West Point Atlas of the Napoleonic Wars,” (Esposito & Elting, 1999, Stackpole). Scanned from the author’s collection. Click to enlarge.

The seeds of Napoleon’s defeat at Waterloo were sown two days earlier at his victory near Ligny. Napoleon needed to surround and completely remove the Prussian army as a viable force on the battlefield. Instead, they escaped to Wavre in the north and resurfaced at the worst possible time on Napoleon’s right flank two days later at Waterloo.

MATE1)Machine Analysis of Tactical Environments 2.0 is now capable of analyzing the battle of Ligny, June 16, 1815 from both the Blue (L’Armée du Nord on the offensive) and Red (Prussian on the defensive) positions. (MATE is the AI behind General Staff: Black Powder. For more information about MATE see these links).

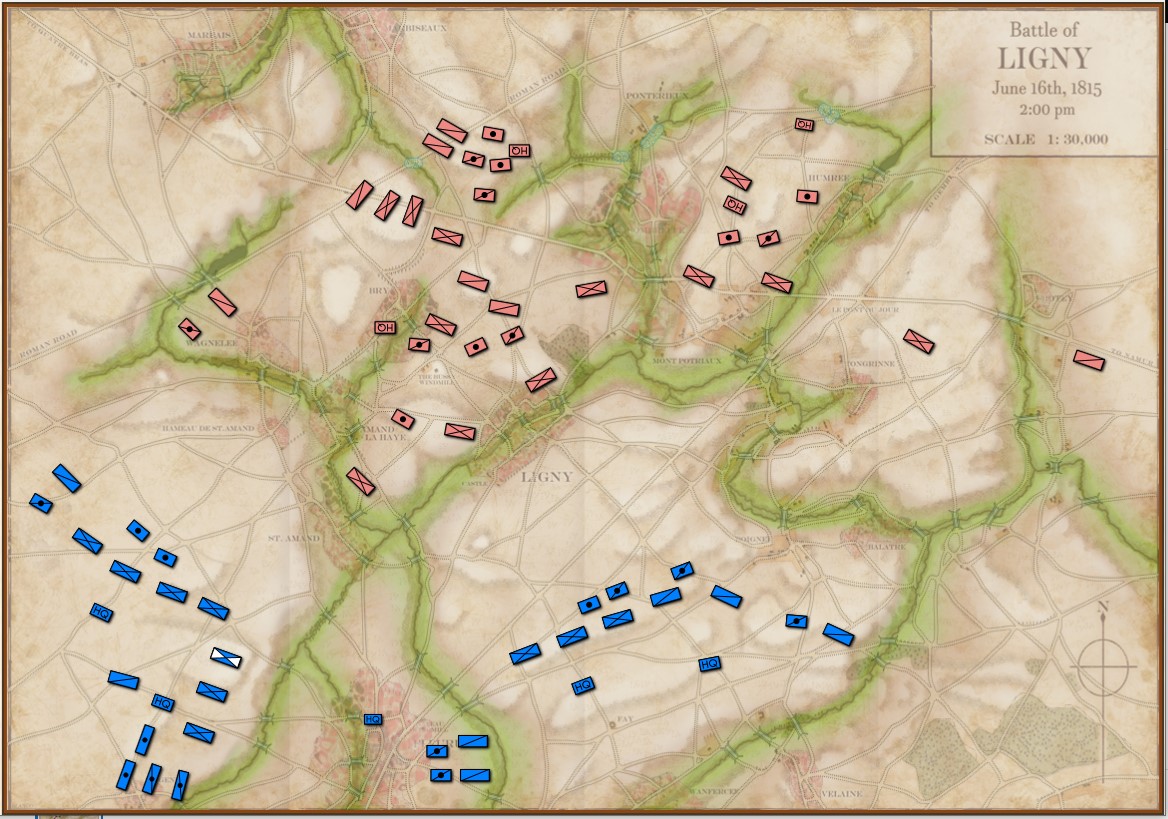
The Ligny map was donated by Glenn Frank Drover. Jared Blando is the artist. Ed Kuhrt did the elevation, roads and mud terrain overlays. The unit positions are from the West Point Atlas of the Napoleonic Wars (above) and from David Chandler’s Waterloo: The Hundred Days. If any one has a better source for unit positions, please contact me directly.

Screen capture of the Ligny scenario in General Staff. Elevation and slope layers enhanced.

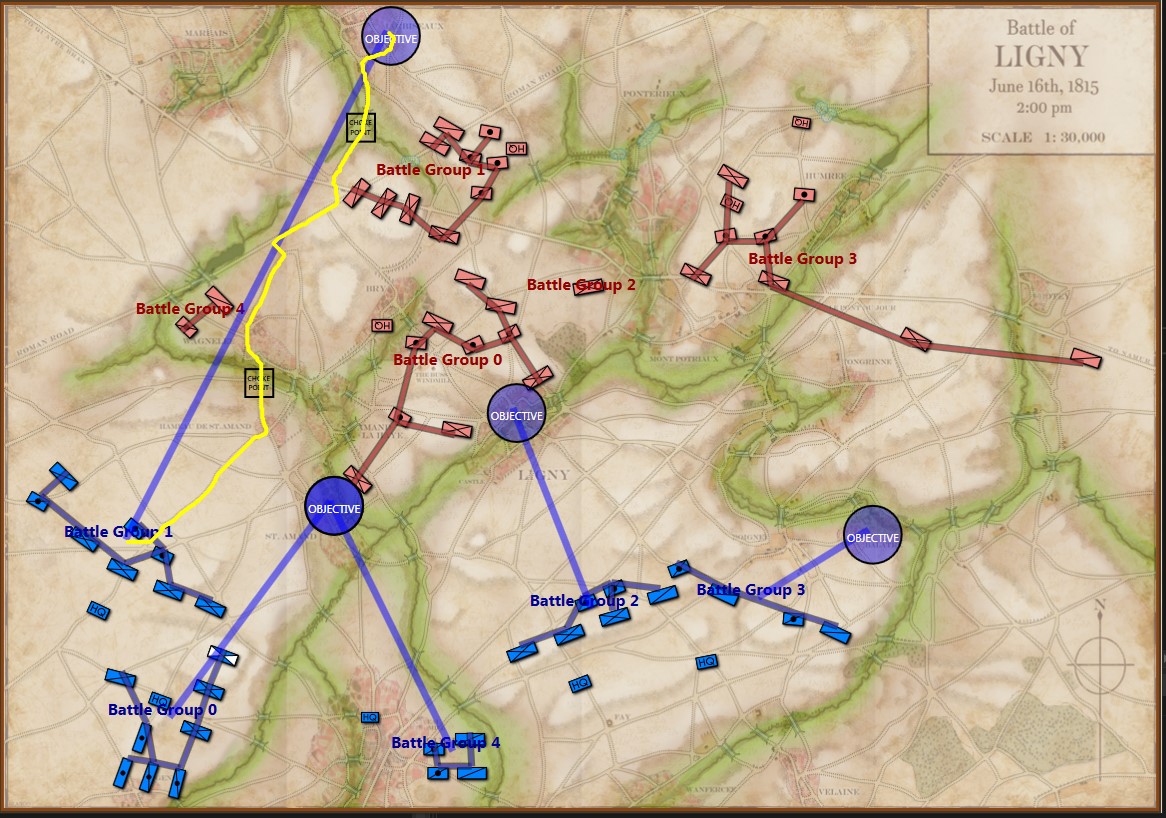
Below is MATE’s analysis from the Blue (L’Armée du Nord) perspective. MATE correctly identifies the key positions and realities of the battlefield:

  • Red is on the defensive
  • Red has an exposed flank
  • There are two key choke points on the route to Red’s exposed flank

MATE then creates an appropriate Course of Action (COA) for Blue:

  • Battle Group #1 (The French III Corps) is assigned the flanking maneuver.
  • Battle Group #0 (The Imperial Guard) is assigned the objective of St. Amand with the support of Battle Group #4 (IV Corps cavalry and reserve artillery).
  • Battle Group #2 (IV Corps) demonstrates against Ligny.
  • Battle Group #3 (The Cavalry Reserve) seizes Balatre and a crucial bridge located there.

MATE’s analysis of Blue’s position at Ligny. Screen capture. Click to enlarge.

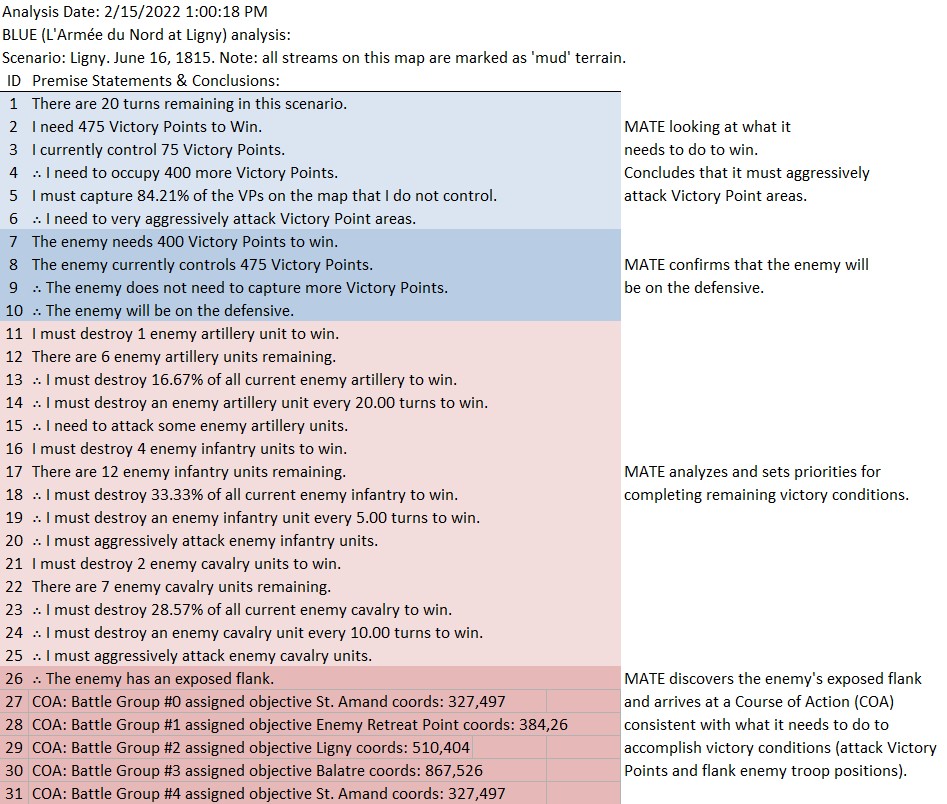
A log of MATE’s thought processes, with my commentary, follows:

Text output of MATE’s analysis of Blue’s position at Ligny. Click to enlarge.

MATE also analyzed Ligny from the Prussian (Red) perspective:

Screen capture of MATE’s analysis of Ligny for Red (Prussian army). MATE recognizes the two choke points on the route of the enemy’s flank attack and dispatches cavalry units to cover these critical areas. Click to enlarge.

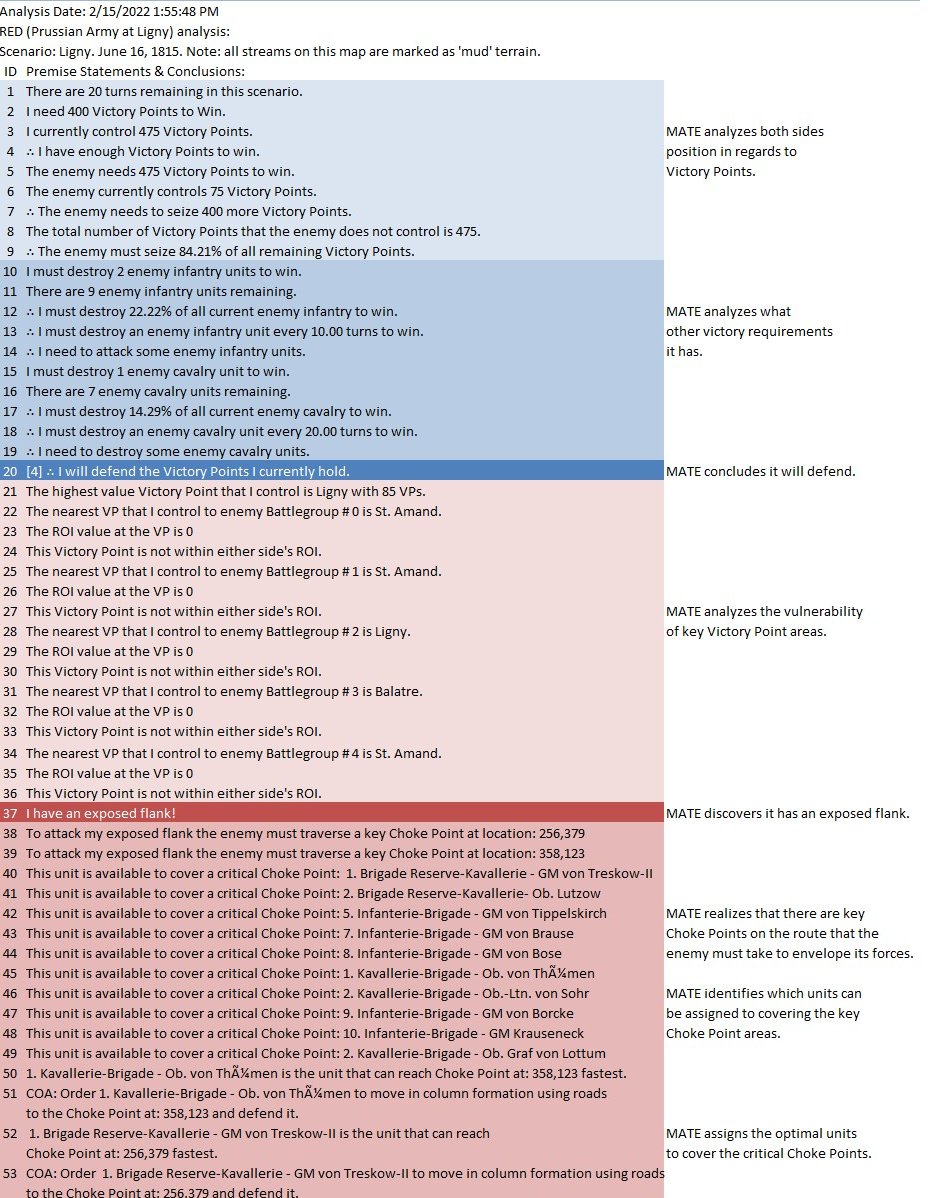
MATE, analyzing the Prussian (Red) position correctly recognizes that it is on the defensive, it has an exposed flank, there are two crucial choke points on the route that Blue will take on its flanking maneuver and dispatches two cavalry units to cover the bridges. A log of MATE’s thought processes, with my commentary, follows:

Text output of MATE’s analysis of Red’s position at Ligny. Click to enlarge.

Critique of MATE’s analysis:

As the author of MATE any critique I have of its performance should be taken with a grain of salt (also, see this video). If I was back in academia I would put together twenty or thirty Subject Matter Experts (SMEs), set up a double blind web site, get all the SME’s solutions to the problem, and compare their solutions to MATE’s. If they match to a statistical significance it proves the ‘human-level’ part. But, I’m not in academia anymore and you’ll just have to take my word for it. That said, MATE did what I expected it to do.

It first sussed out if it was on offense or defense and what it had to do to win.

Then, as Blue, MATE discovered a back door to Red’s position and ordered a classic enveloping maneuver. MATE assigned Blue Battle Group #1 the task of implementing the flanking maneuver. Blue Battle Groups #0, #4 and #2 are the fixing force. See my paper, Implementing the Five Canonical Offensive Maneuvers in a CGF Environment (free download here) for details and algorithms.  The Blue Cavalry Reserve is given the COA to seize the town of Balatre. This, in my opinion, is a pretty good tactical plan.

When MATE finds itself on defense, as it does as Red at Ligny, one of the first things it does is ask itself, “how would I attack myself?” So, of course it finds the back door right away. Then it compiles a list of available units that are not actively engaged in holding crucial parts of a defensive line, selects the optimal (fastest) units and assigns them orders to defend the crucial choke points. This was a better plan than Field Marshal Gebhard Leberecht von Blücher had. So, again, I’m going to argue that MATE is operating at a ‘human-level’.

As always, please feel free to write me with the questions or comments. MATE is going to take a look at Antietam next.

References

References
1 Machine Analysis of Tactical Environments

A Human-Level Tactical Artificial Intelligence at Bull Run

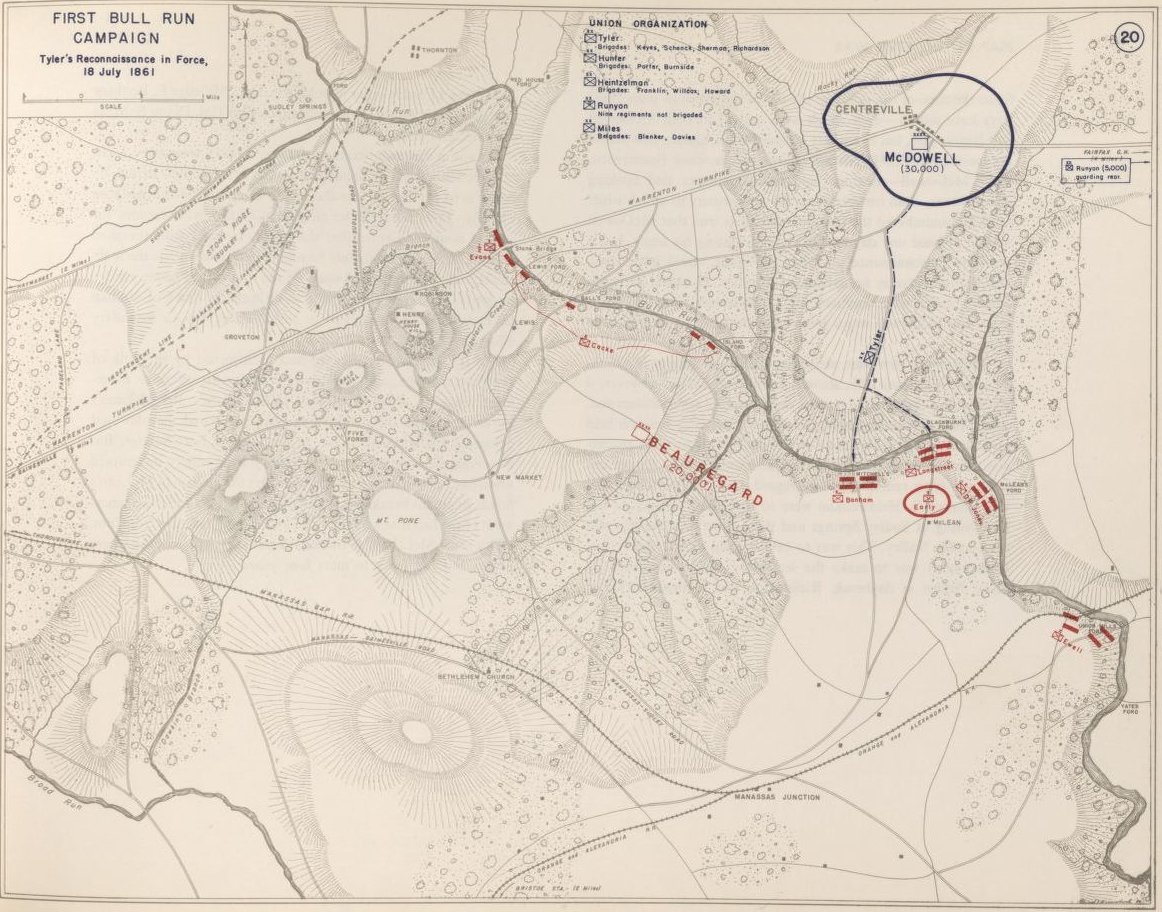
West Point Atlas Map 20; the situation near Manassas & Centreville, July 20, 1861. Click to enlarge. From the Library of Congress; original source.

I‘ve been looking for interesting tactical problems for MATE1)Machine Analysis of Tactical Environments 2.0 to solve and I found a good one after reading William C. Davis’s Battle at Bull Run.2)1995, Stackpole Books,  Mechanicsburg, PA The actual battle (called 1st Bull Run by the Union who named battles after nearby waterways and 1st Manassas by the Confederates who labeled battles from nearby geographic features and cities) was a tragicomedy fought on July 21, 1861 in which both commanders (Irvin McDowell for the Union and P. G. T. Beauregard for the Confederates) had little control of their own forces after their initial battle orders were given. Indeed, the battle came down to a series of charges up and down Henry Hill with units committed piecemeal as they arrived on the field. Large elements of both armies were never committed. All in all, not a particularly interesting tactical situation for MATE to analyze.

However, the tactical position the day before (see West Point Atlas map #20, above) is quite a different situation. The Union army is massed at Centreville (Washington, D. C. is off the map, about 30 miles to the east). The two armies are separated by Bull Run which can only be crossed at eleven fords and bridges. Confederate general Beauregard is certain that McDowell’s attack will be almost due south from Centreville and will cross Bull Run at Mitchell’s and Blackburn’s fords. He has assembled almost all of his forces there. This is a tactical situation of which avenues of attack are open and which are closed.

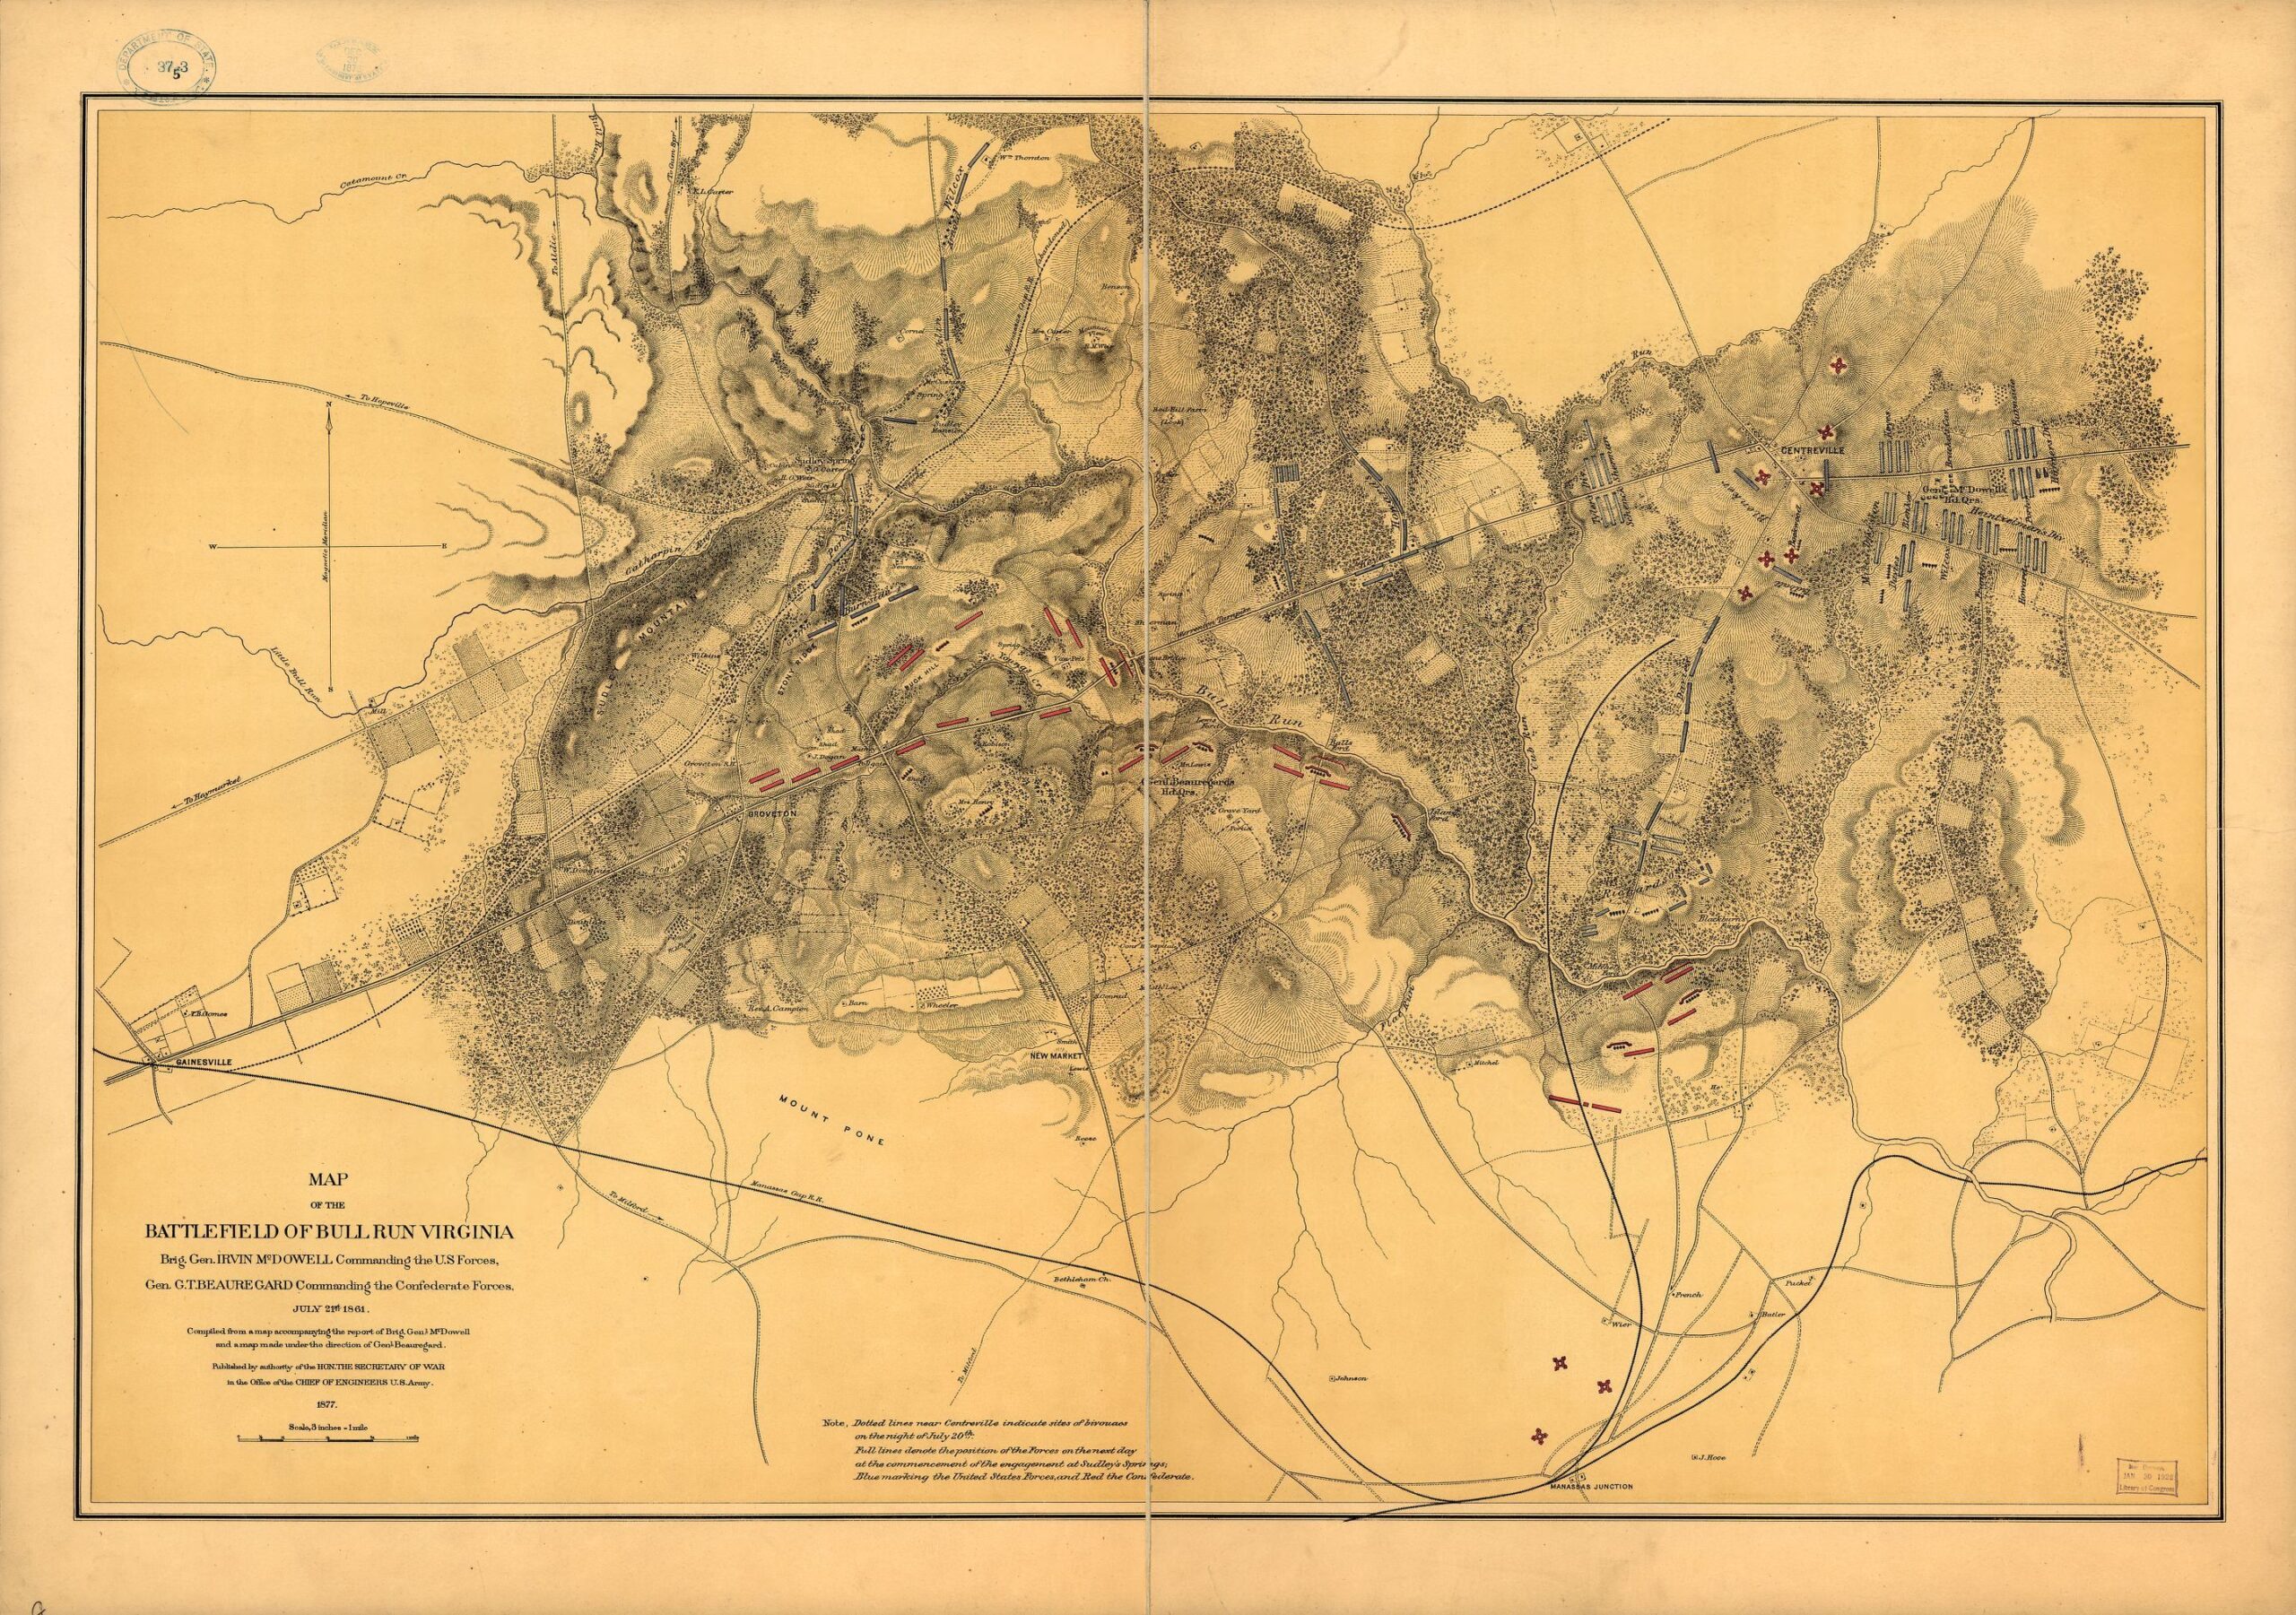
Troop positions and topographical data fed to MATE for this analysis come from the McDowell Map, below:

Map of the battlefield of Bull Run, Virginia. Brig. Gen. Irvin McDowell commanding the U.S. forces, Gen. [P.] G. T. Beauregard commanding the Confederate forces, July 21st 1861 from the Library of Congress. Click to enlarge.

MATE’s assessment of this situation from the Confederate (RED) perspective is below. I use a program called the AI Editor (which, ironically, doesn’t actually edit AI) to observe what MATE is thinking and seeing.

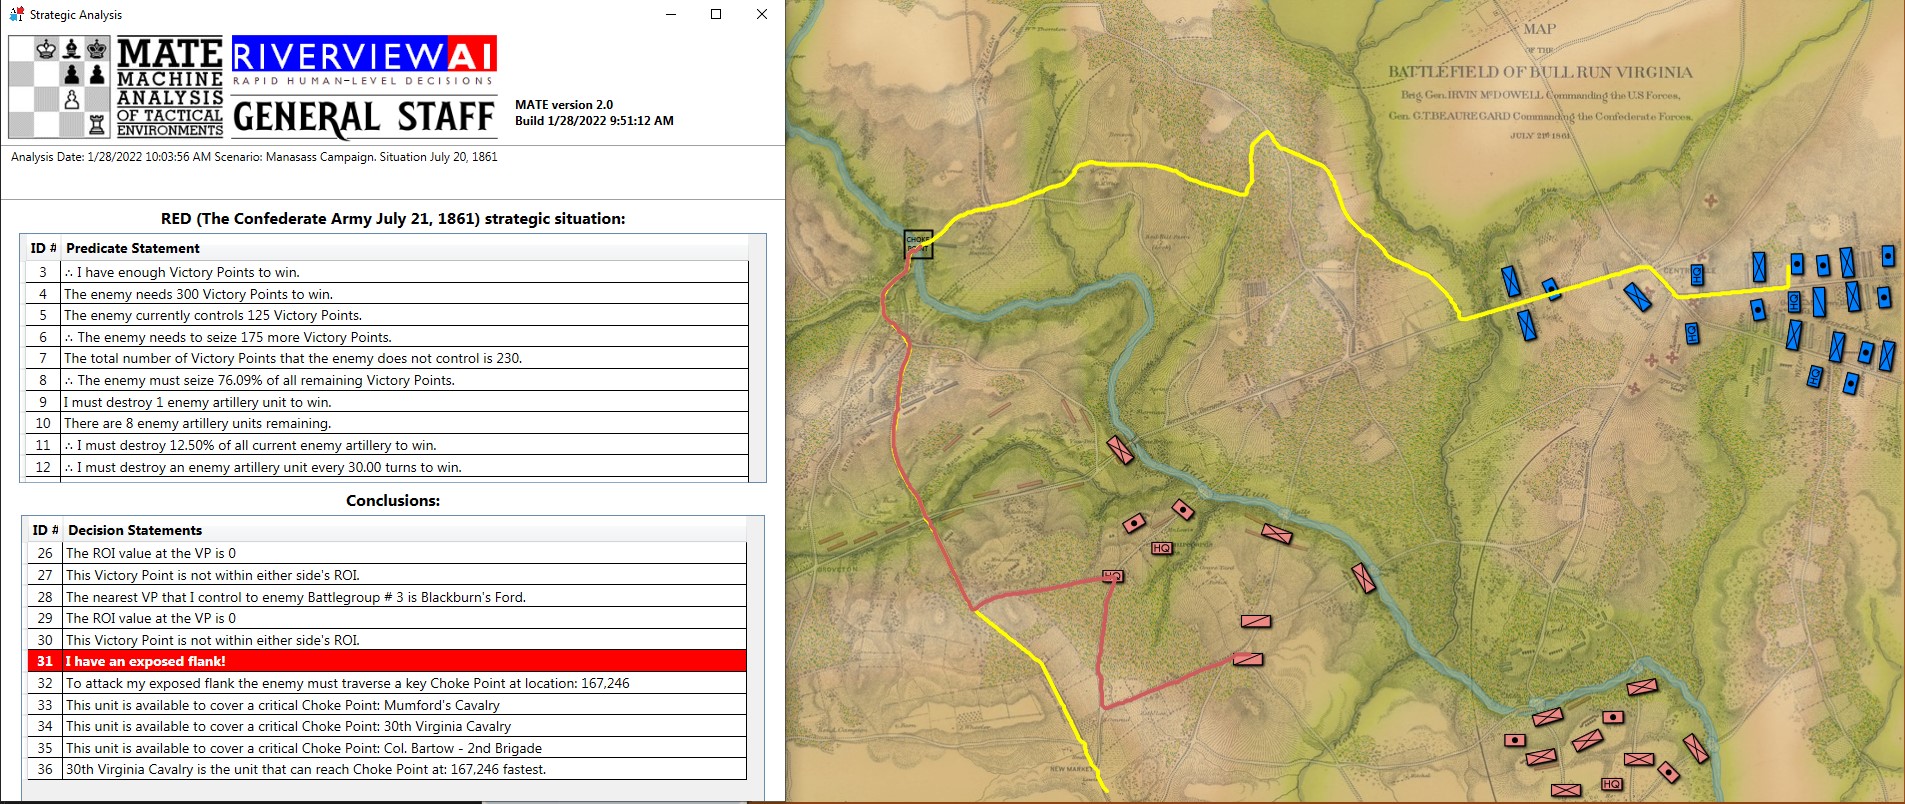
Screen shot of the AI Editor. Click to enlarge.

The left window contains a series of predicate statements, conclusions and inferences. Predicate statements to MATE are simple factual statements that MATE knows to be true; e. g. statement #4: The enemy needs 300 Victory Points to win is a basic factual statement. MATE can combine statements (such as #4 and #5: The enemy currently controls 125 Victory Points) to come to a logical conclusion (indicated by beginning the new statement with logical symbol ”∴” or therefore): #6∴ The enemy needs to seize 175 more Victory Points.

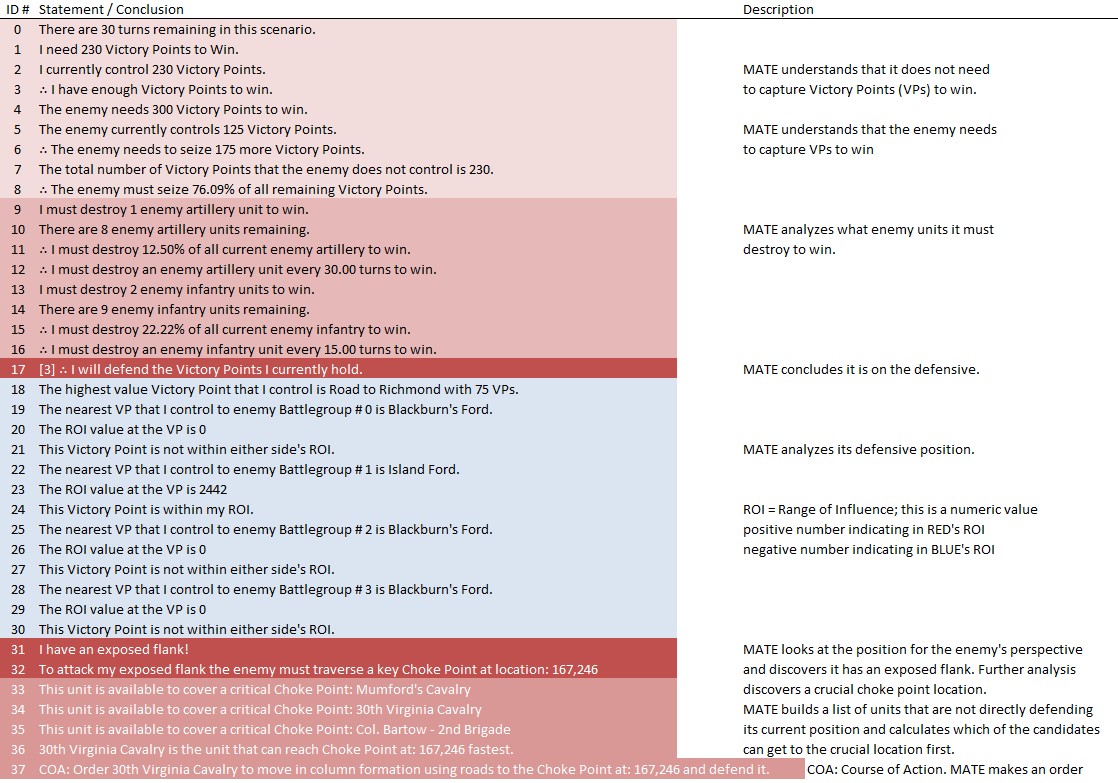
The left window is divided into two windows of scrolling text. I printed out the complete list of all statements and conclusions and added commentary (below) so you can follow the thread of MATE’s thought processes:

List of premises and conclusions with commentary from MATE’s analysis of Manassas. Click to enlarge.

The right window shows the graphic output of some of MATE’s views of the battlefield (see Layers: Why a Military Simulation Is Like a Parfait). In the above screen shot it is displaying the terrain and elevation layers of the map plus all RED and BLUE forces. The yellow line is how MATE would attack if it were BLUE. Yes, that is correct. MATE analyzes its own defensive position by planning to attack it from the enemy’s perspective. The yellow line (the path using the road net) is how it would turn its own flank. It was this analysis that triggered the creation of statement #31: I have an exposed flank! To see the complete algorithm click here (PDF). The Red line is the optimal route of the 30th Virginia Cavalry to Sudley Ford indicated on the screen by the black box labeled CHOKE POINT.

MATE’s analysis of Manassas certainly appears to be a reasonable analysis and solution to this tactical problem.  It also generated a COA (Course of Action) ordering a regiment of cavalry to secure a critical choke point. This, in fact, was better than Confederate General Beauregard’s actual performance.

Is there more work to do? Certainly. MATE uses heuristics. Here is the classic definition of heuristics: “A heuristic function, also simply called a heuristic, is a function that ranks alternatives in search algorithms at each branching step based on available information to decide which branch to follow.”

Here is my definition of a heuristic: a function that groks3)to understand profoundly and intuitively from Heinlein’s Stranger in a Strange Land the problem. MATE uses dozens of heuristic algorithms. MATE is pretty good at discovering – and pouncing – on an exposed flank. MATE groks exposed flanks. MATE also groks interior lines, the high ground, the road net, and constricted avenues of attack and retreat. That may not be a long list but it ticks more boxes than most 19th century generals.

References

References
1 Machine Analysis of Tactical Environments 2.0
2 1995, Stackpole Books,  Mechanicsburg, PA
3 to understand profoundly and intuitively from Heinlein’s Stranger in a Strange Land